This month I hosted the Daring Kitchen challenge and invited the group to make decorated Swiss rolls, aka “deco rolls”, in the style of Japanese food blogger and cookbook author Junko, who has taken the internet by storm with her adorable “kawaii” versions. This concept is a standard French pastry technique with the use of décor paste to create a pattern on a joconde sponge (which was tackled by the Daring Bakers back in 2011), and making it into a Swiss roll is an obvious next step, so when I was preparing this challenge, I decided to try it the French way. Unfortunately the results were not stellar – the décor paste cracked and the filling escaped when I rolled the cake up, because the décor paste was harder and less flexible than the surrounding sponge cake.
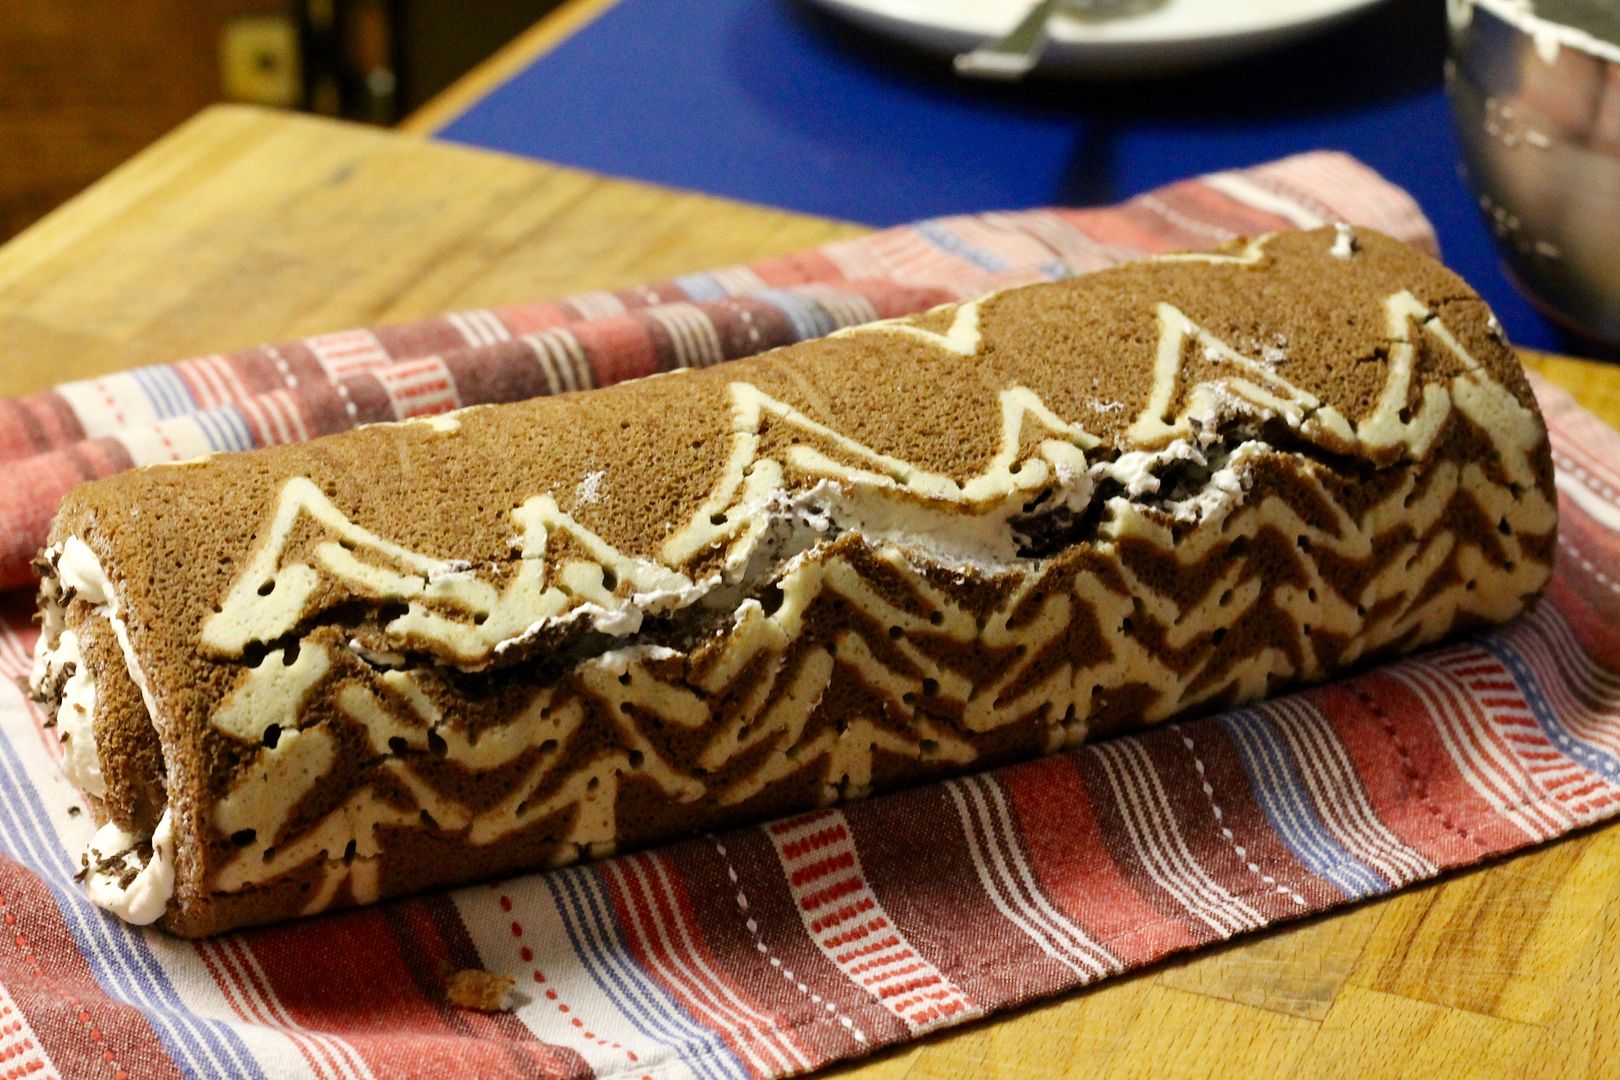
So for my next try, I turned to Junko’s deco roll method, because she obviously has it figured out. Instead of décor paste, you use a small amount of sponge cake batter to pipe the decorative pattern, which ensures that the pattern and the cake are the same texture so that the cake rolls up with no problem. The sponge cake itself is very elastic thanks to all the whipped egg whites, and her method includes a simple syrup to brush on the cake to keep it moist and pliable. And it works like a charm! The chocolate version that I made did still crack a little bit (not enough for the filling to escape though), but that’s because I over-baked it slightly and then over-filled it. So don’t be greedy like me and you’ll be just fine!
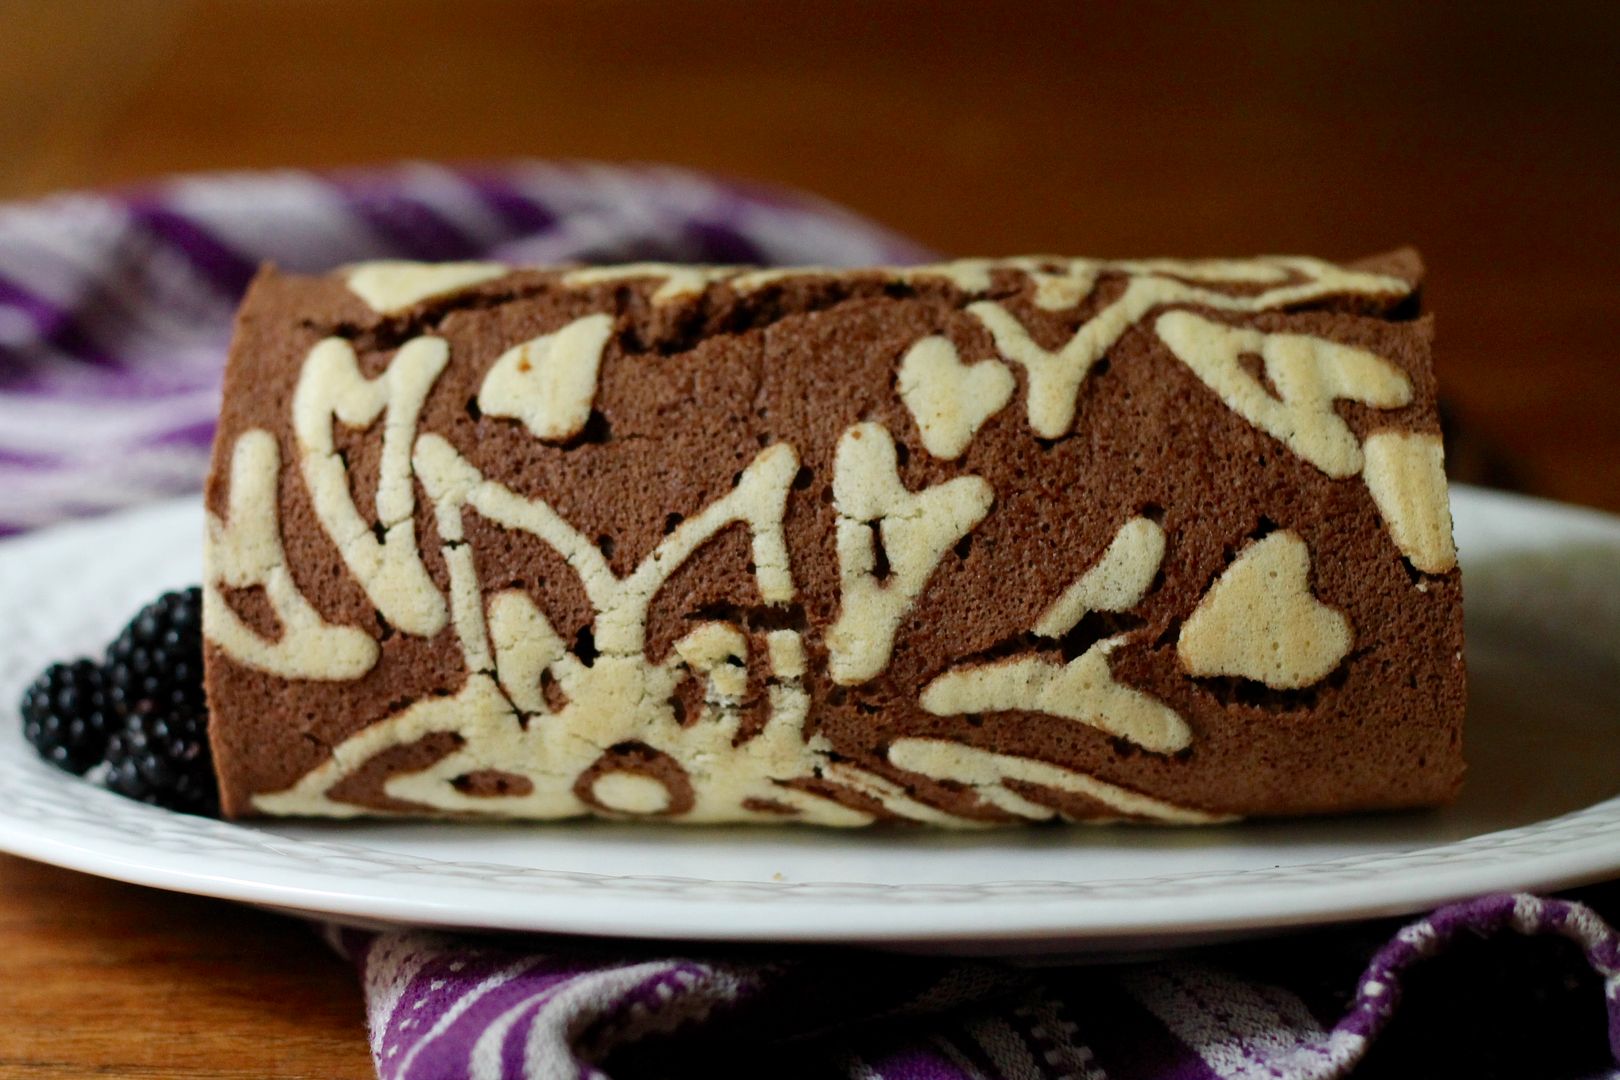

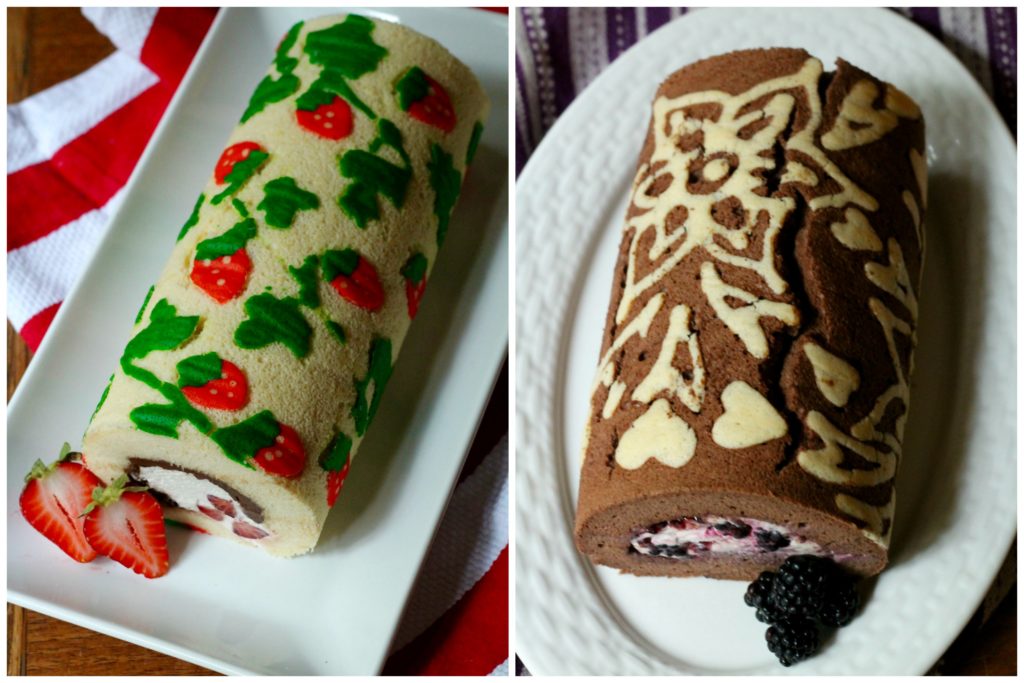
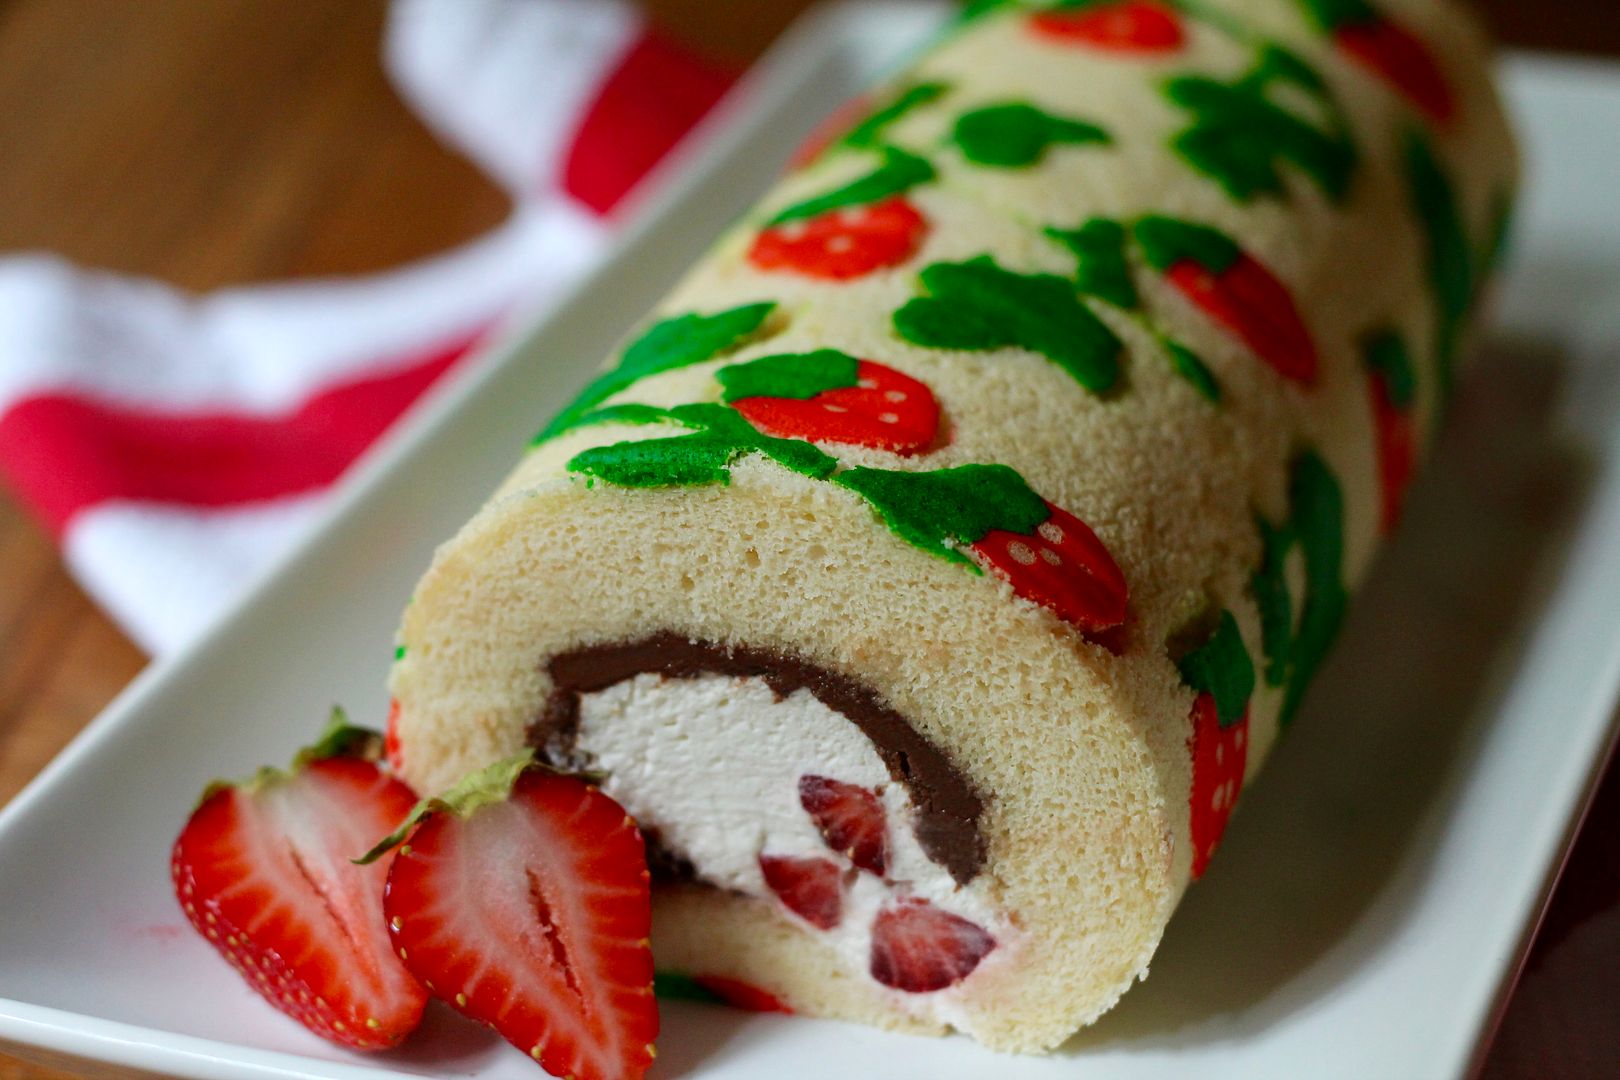
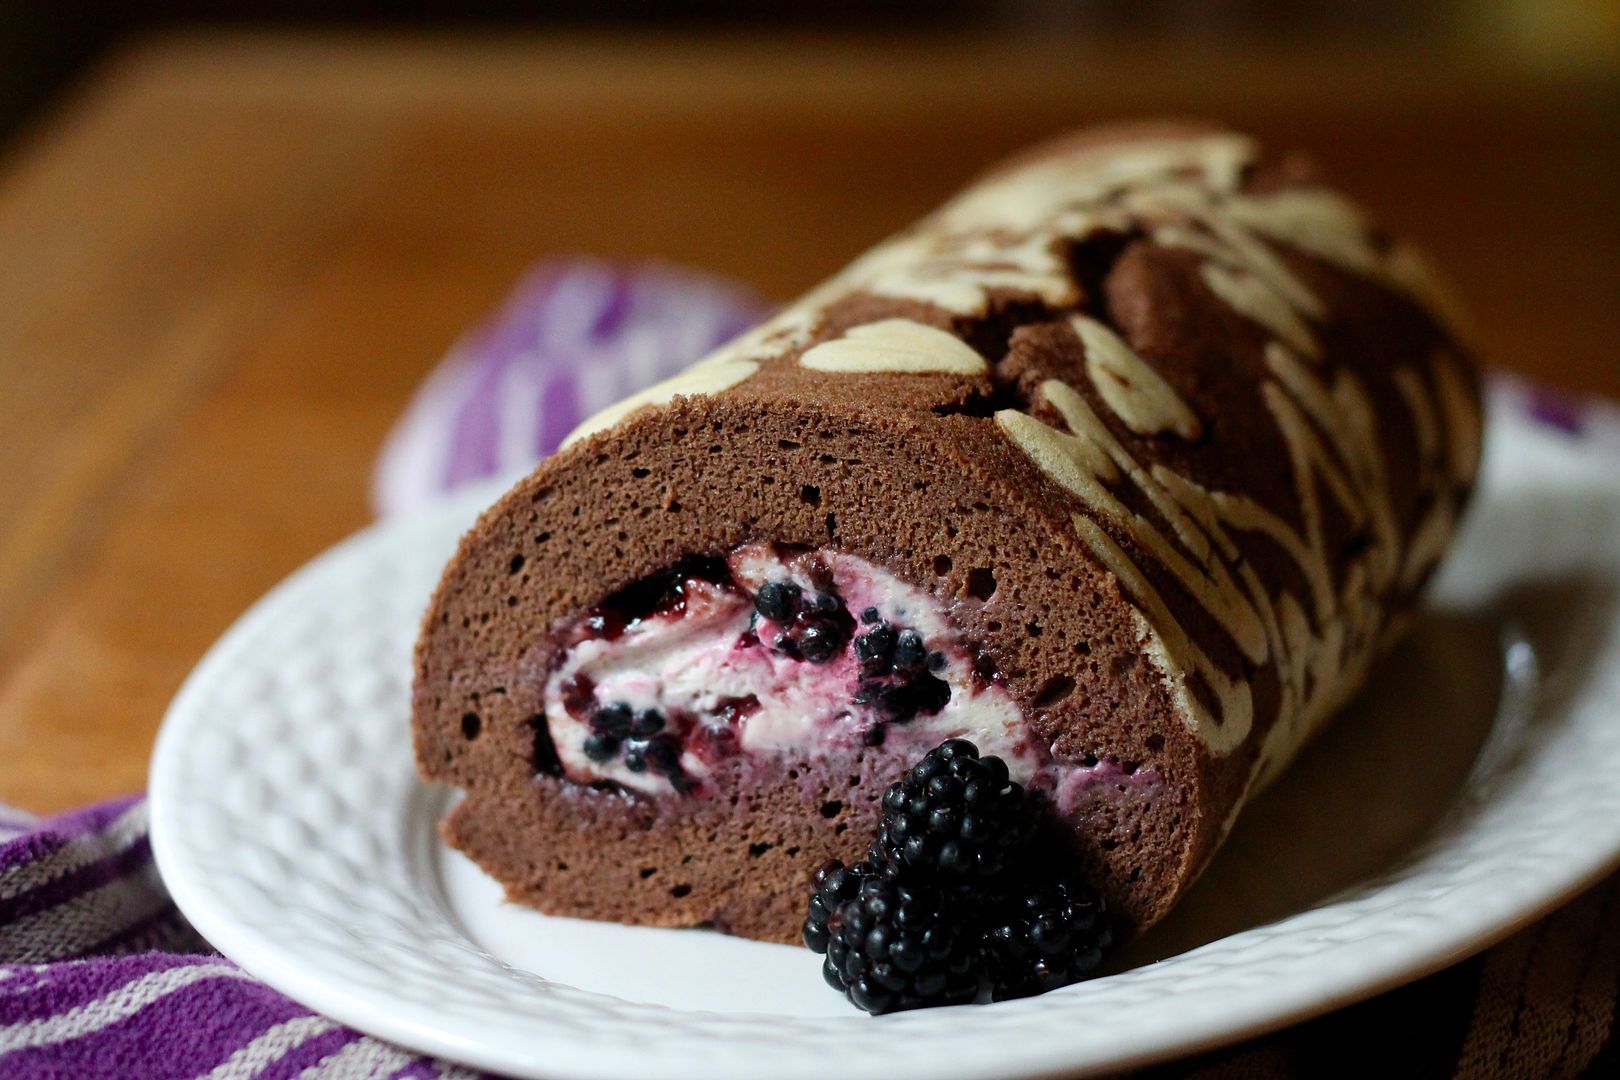
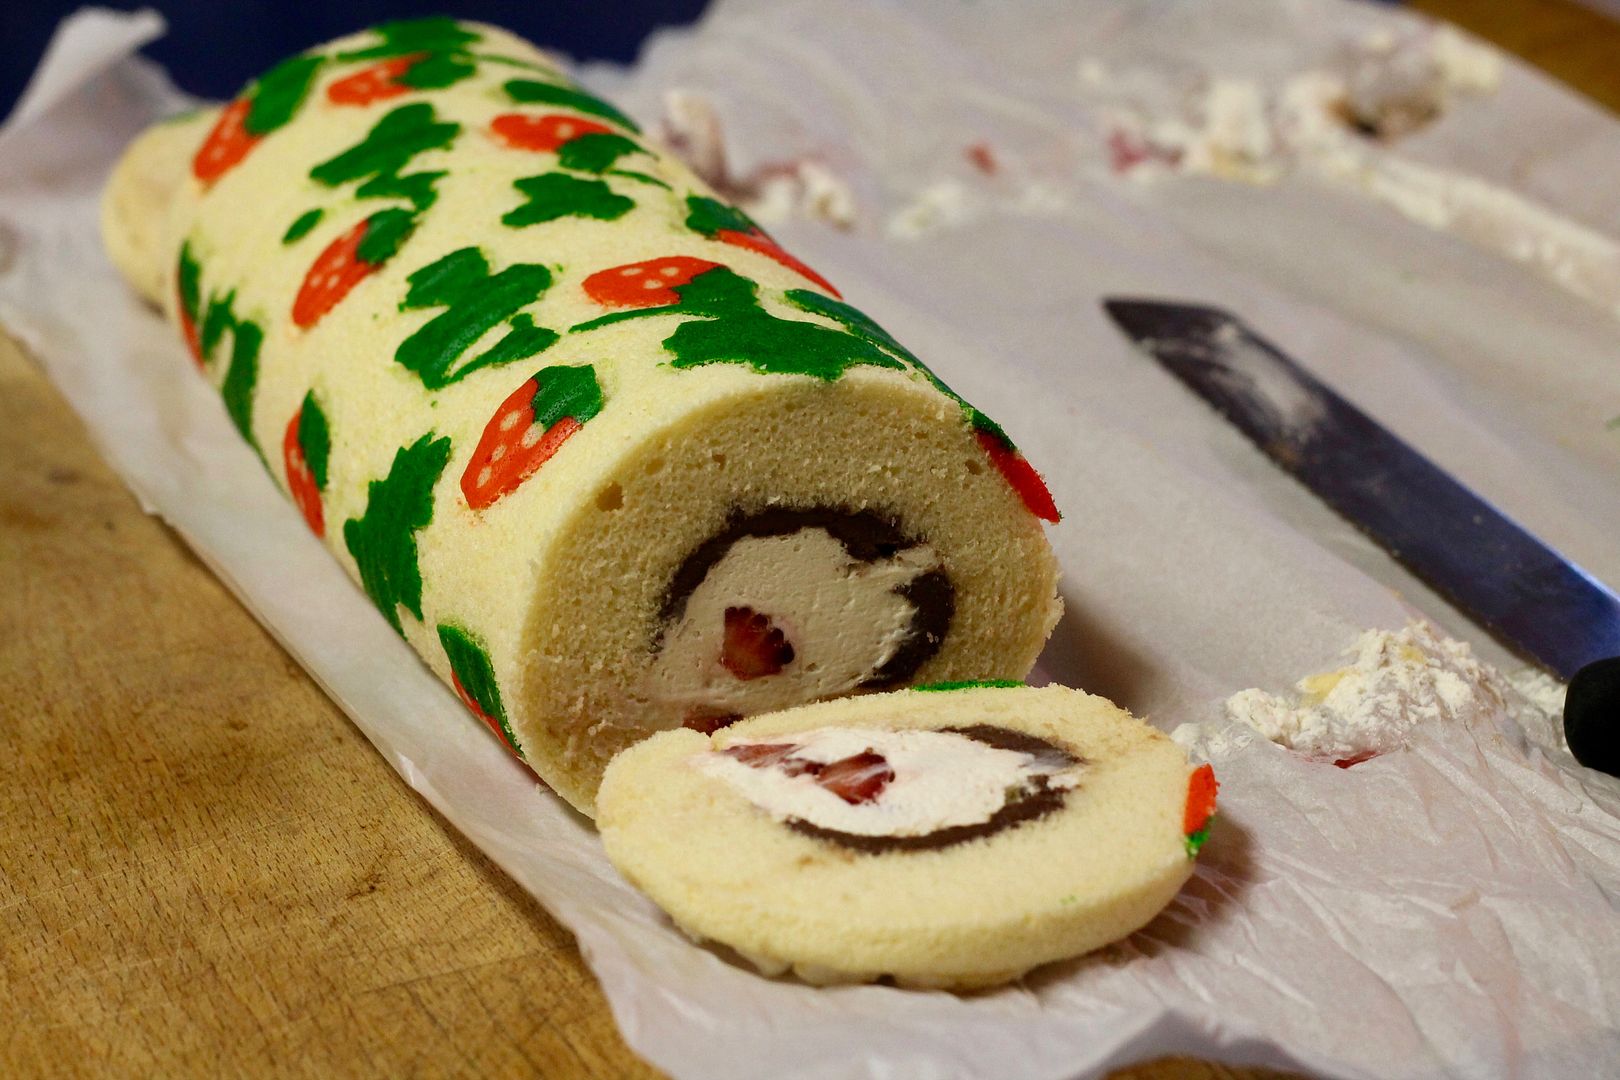
I made two versions of this cake – a vanilla one filled with Nutella, strawberries, and whipped cream, and a chocolate version with a blackberry cream cheese filling. Both were super yummy, and this recipe is versatile enough to use whatever fillings and flavours you want – not to mention whatever decorative pattern you can think of! Check out the Daring Kitchen to see to see all the creativity that the group came up with this month, and see the challenge as I presented it for even more details than what I give below 🙂
Decorated Vanilla-Strawberry-Nutella Swiss Roll
Makes one roll, 6-8 servings. Recipe adapted from Deco Cakes! by Junko, via Cake Geek, The Bakeanista, and Haikugirl’s Japan.
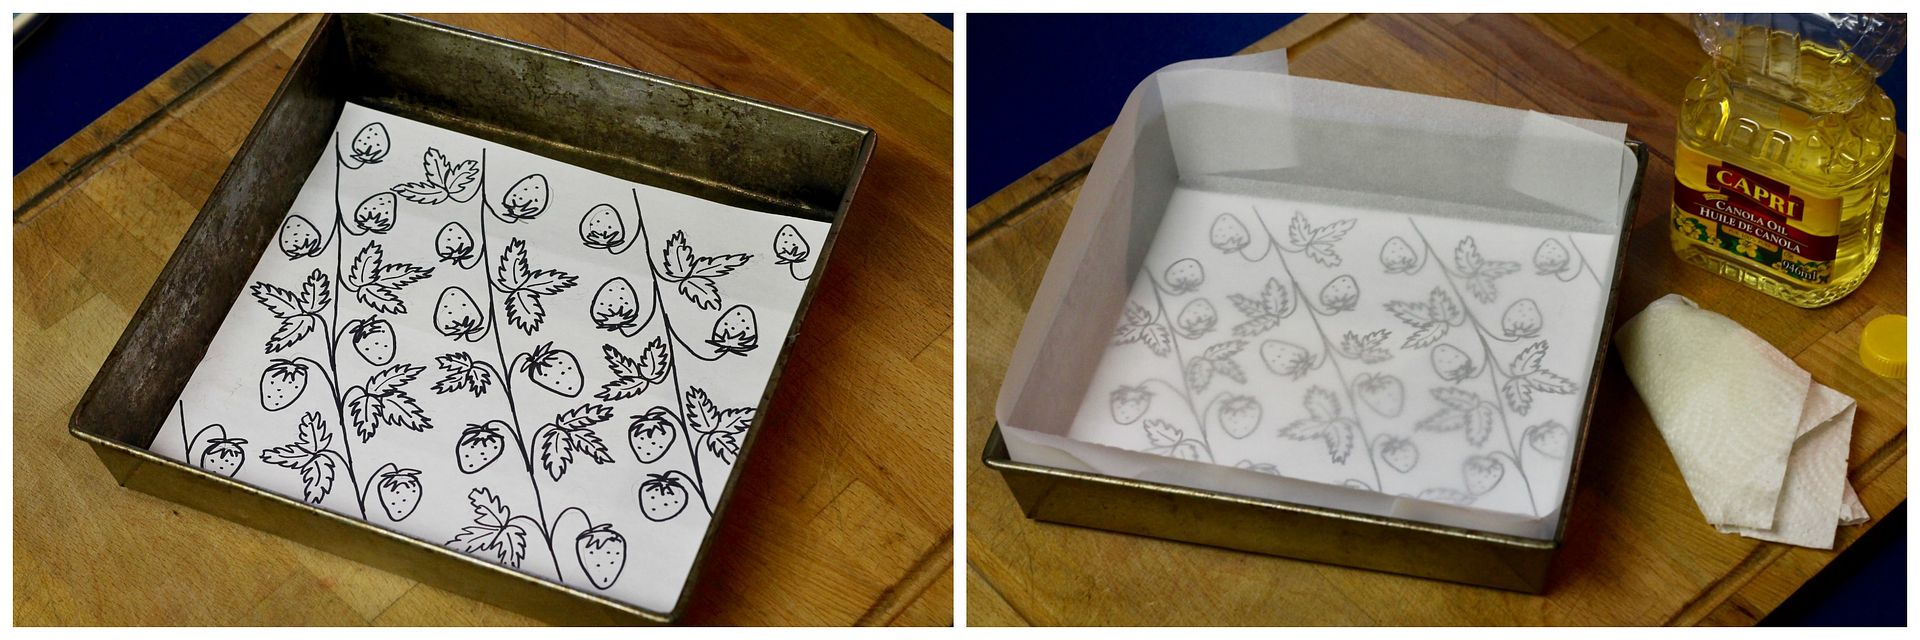
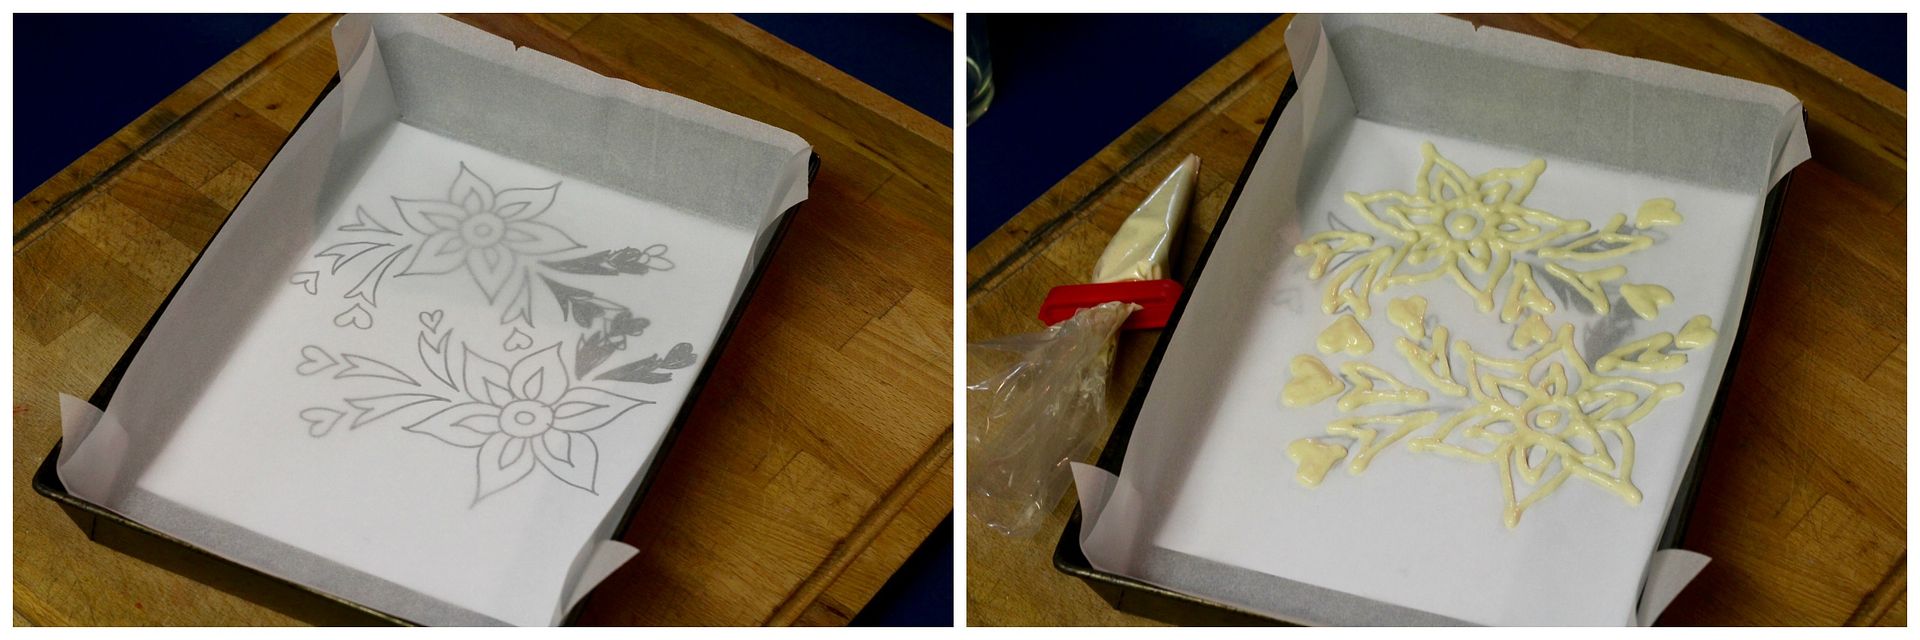
Preheat the oven to 340˚F . Line 10”x10” square baking pan, or 9”x13” rectangle baking pan with parchment paper, and use a paper towel to lightly but thoroughly grease the parchment paper with vegetable oil. Trace a pattern of strawberries, leaves, and vines on a piece of paper that will fit in the bottom of the pan. Place your stencil underneath the parchment paper. For a 10”x10” square pan, make sure the pattern is in the middle of the pan. For a 9”x13” rectangular pan, make sure the pattern is in the upper third of the rectangle.
Part A: Egg Yolk Mixture
On a large bowl with an electric mixer and whisk attachment, beat together:
3 large egg yolks (save the whites for Part C)
35 g / 2 Tbsp + 1 tsp caster sugar
Beat on medium-high speed until very pale and thick. Add:
60 ml / 1/4 cup water
40 ml / 2 Tbsp + 2 tsp vegetable oil
5 ml / 1 tsp vanilla extract
Mix to combine. Sift over:
80 g / 4/5 cup cake flour (or 65 g / 1/2 cup all purpose flour + 15 g / 5 1/2 tsp cornstarch)
pinch salt
Mix to make a smooth batter. Set aside.

Part B: Pattern Mixture
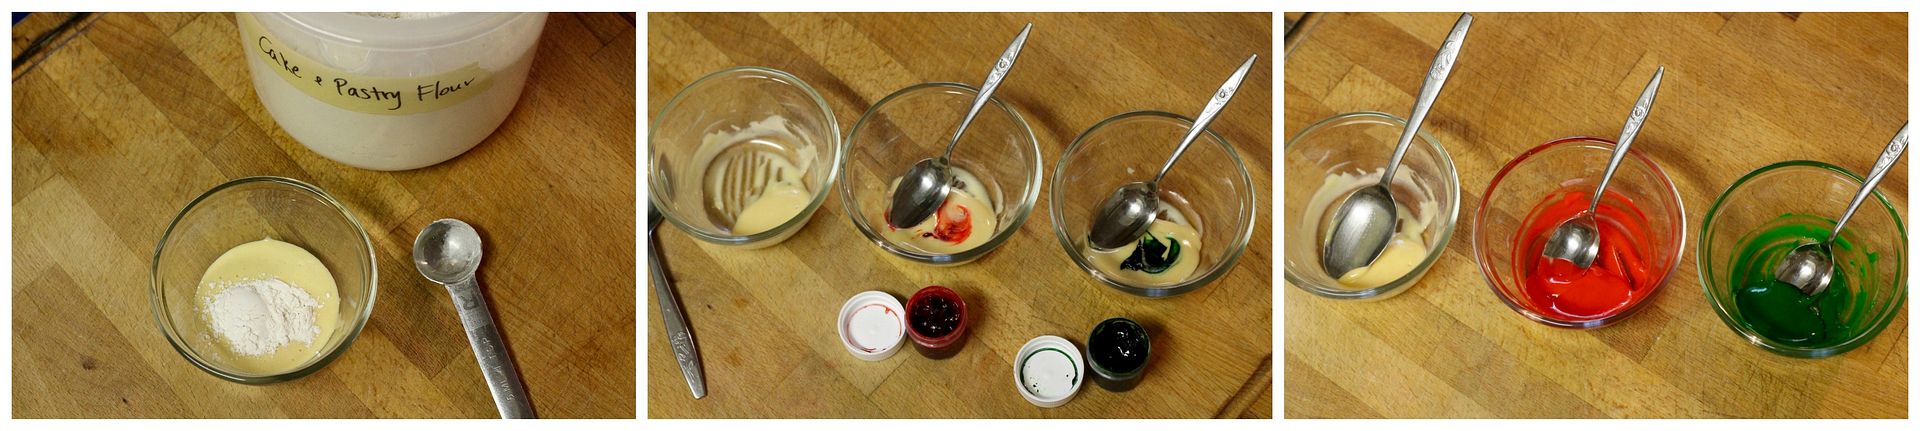
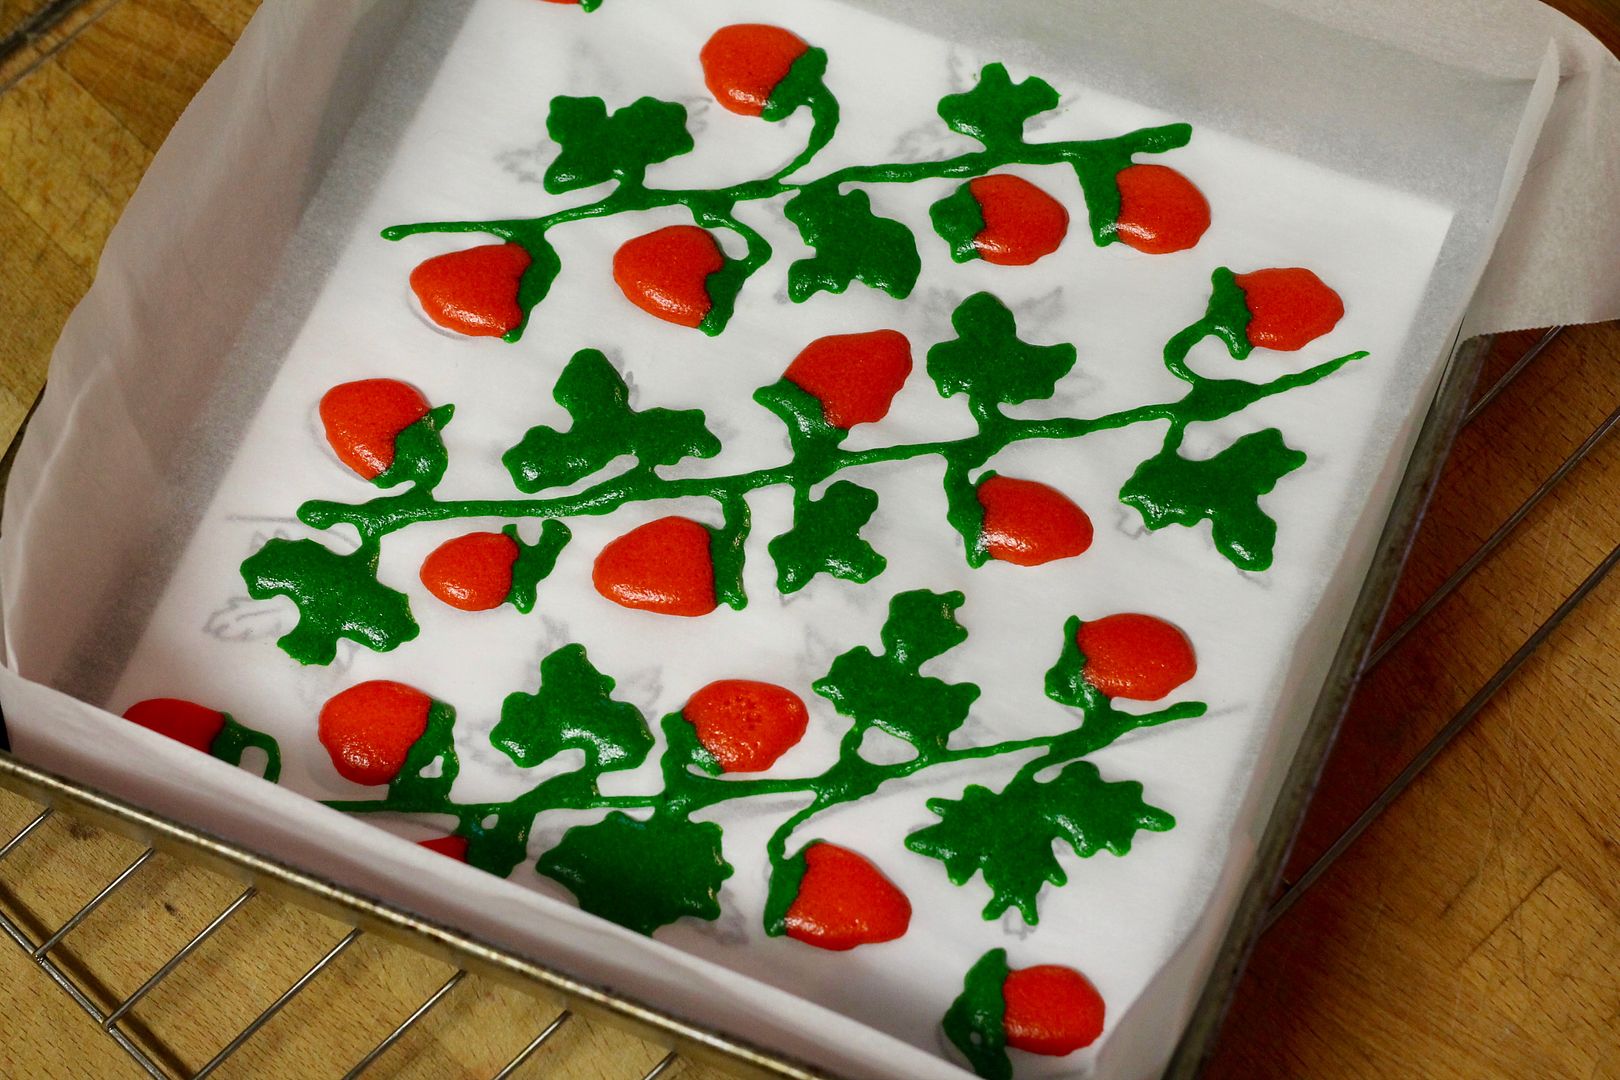
Place 15 ml / 1 Tbsp of the prepared egg yolk mixture from Part A in a small bowl and mix in 1 tsp / approx. 3 g cake flour. Divide this mixture into 3 small bowls. Tint one bowl red and one green with food colouring (paste is best) and leave one bowl white/plain.
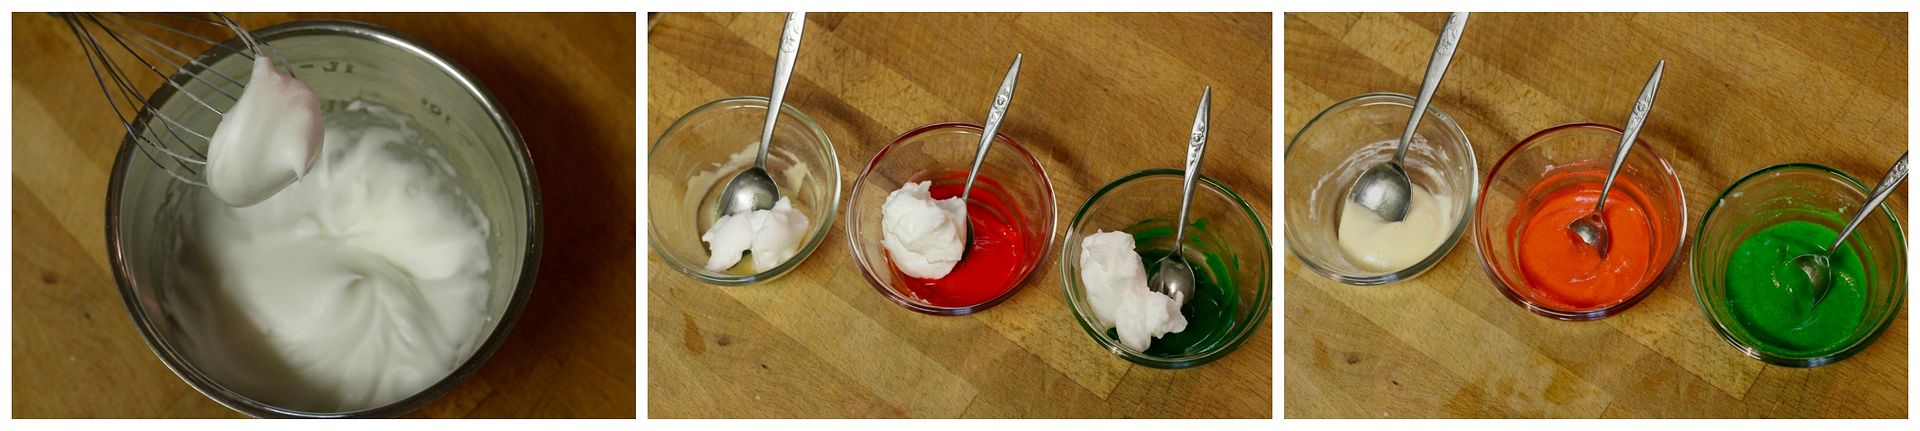
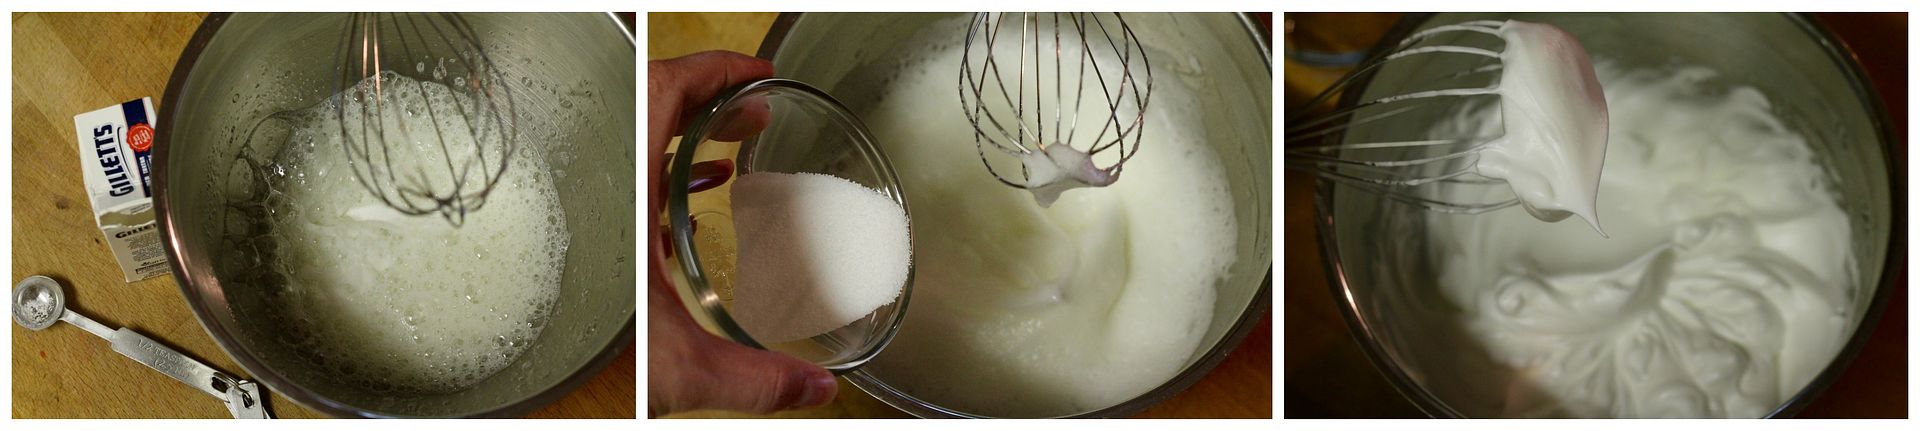
In a clean medium bowl, beat 1 large egg white with an electric mixer and whisk attachment until foamy, then add a pinch of cream of tartar and beat until stiff peaks form. Measure out 45 ml / 3 tbsp of the egg white meringue (keep the rest for Part C) and divide it evenly between the red, green, and white bowls of batter. Mix to combine.
Scrape each coloured mixture into a piping bag (or parchment paper piping cone, or small zipper-lock bag with the corner snipped off) and pipe your pattern of strawberries, vines, and leaves on to the parchment paper in your prepared baking pan. Remember to pipe the pattern in layers with the details in the foreground first. To avoid smudging the pattern, freeze each layer of the pattern until firm before adding the next layer: pipe the seeds and crown of leaves for each strawberry first, freeze until firm, then pipe the red strawberries, freeze again, and finish with the green vines and leaves.

Bake the pattern in the preheated 340˚F oven for 60-90 seconds, just until set (you don’t want it to colour/brown at all). Set aside on a cooling rack while you finish making the cake batter.
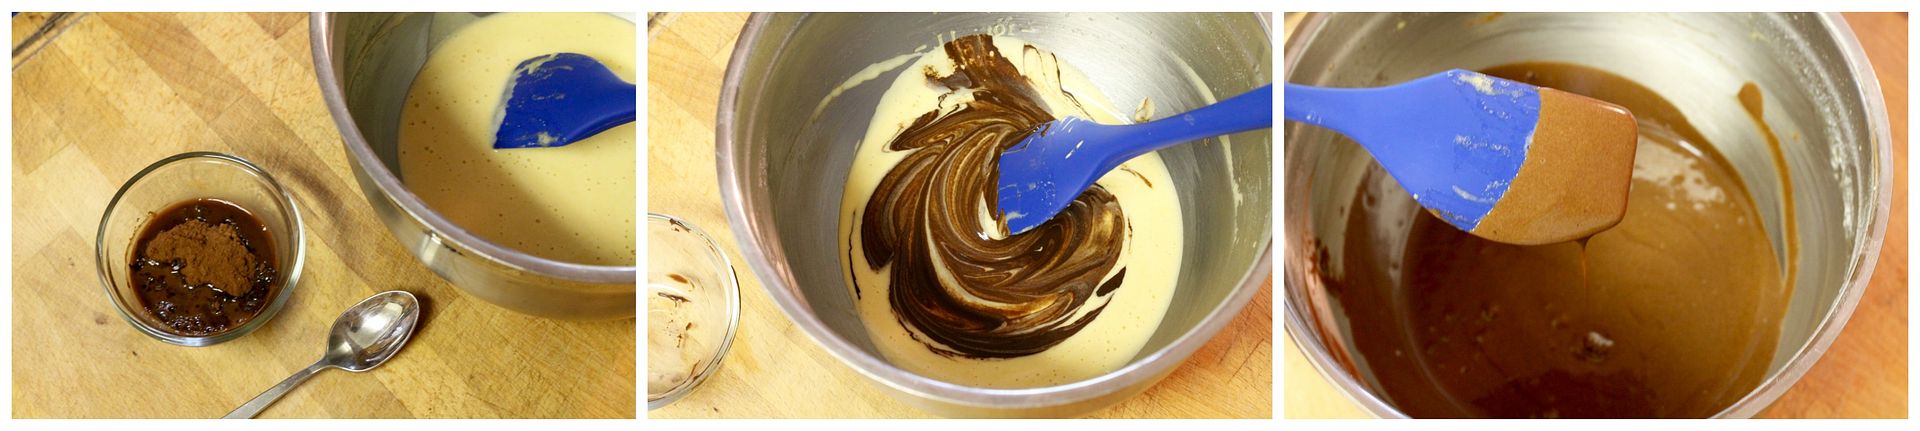
Part C: Meringue
In a clean large bowl, beat 3 large egg whites (leftover from egg yolks in Part A) with an electric mixer and whisk attachment on medium-high speed until foamy. Add 1/2 tsp cream of tartar and beat until soft peaks form. Gradually add in 30 g / 2 tbsp caster sugar, a spoonful at a time, until stiff and glossy peaks form. Mix in any remaining egg white from Part B.
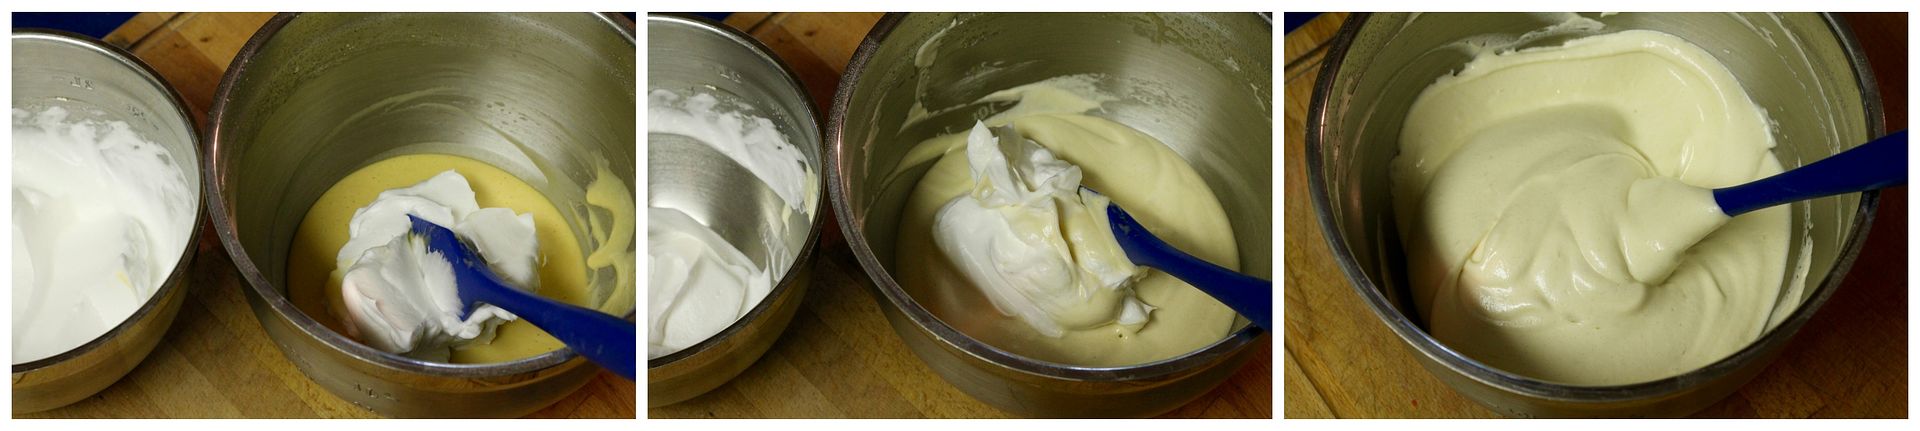
One third at a time, mix the meringue into the egg yolk mixture from Part A, folding gently with a spatula so as not to deflate the meringue, until the batter is smooth and no streaks of meringue remain.
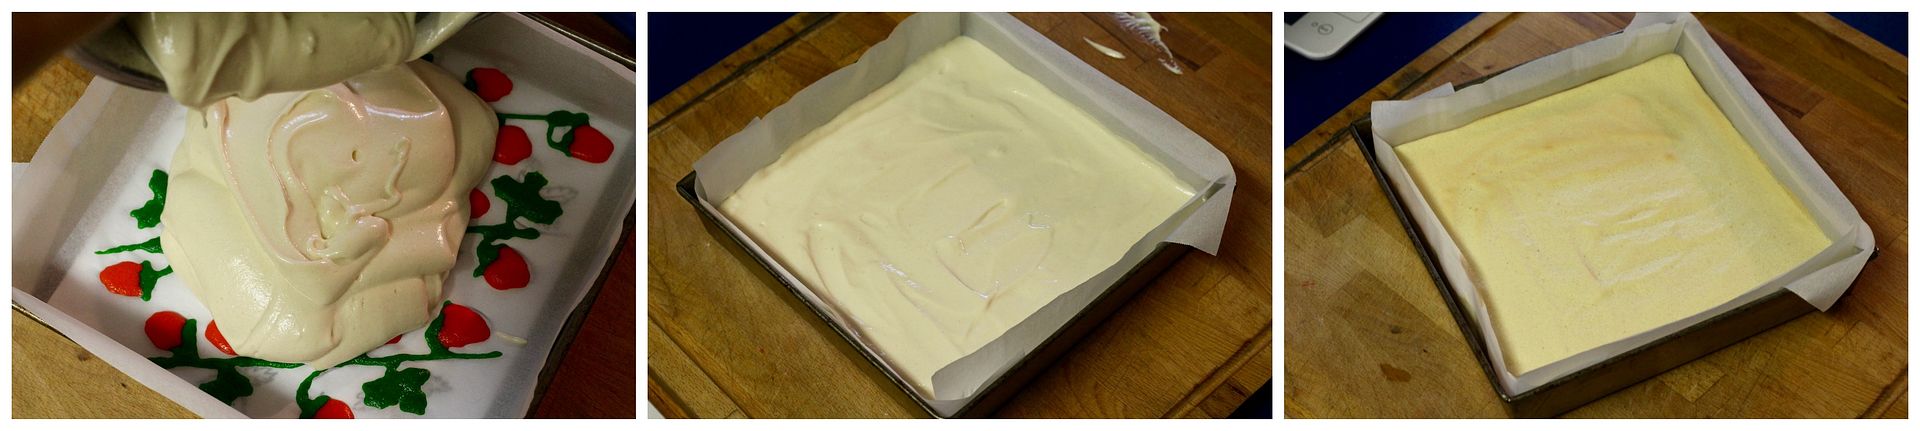
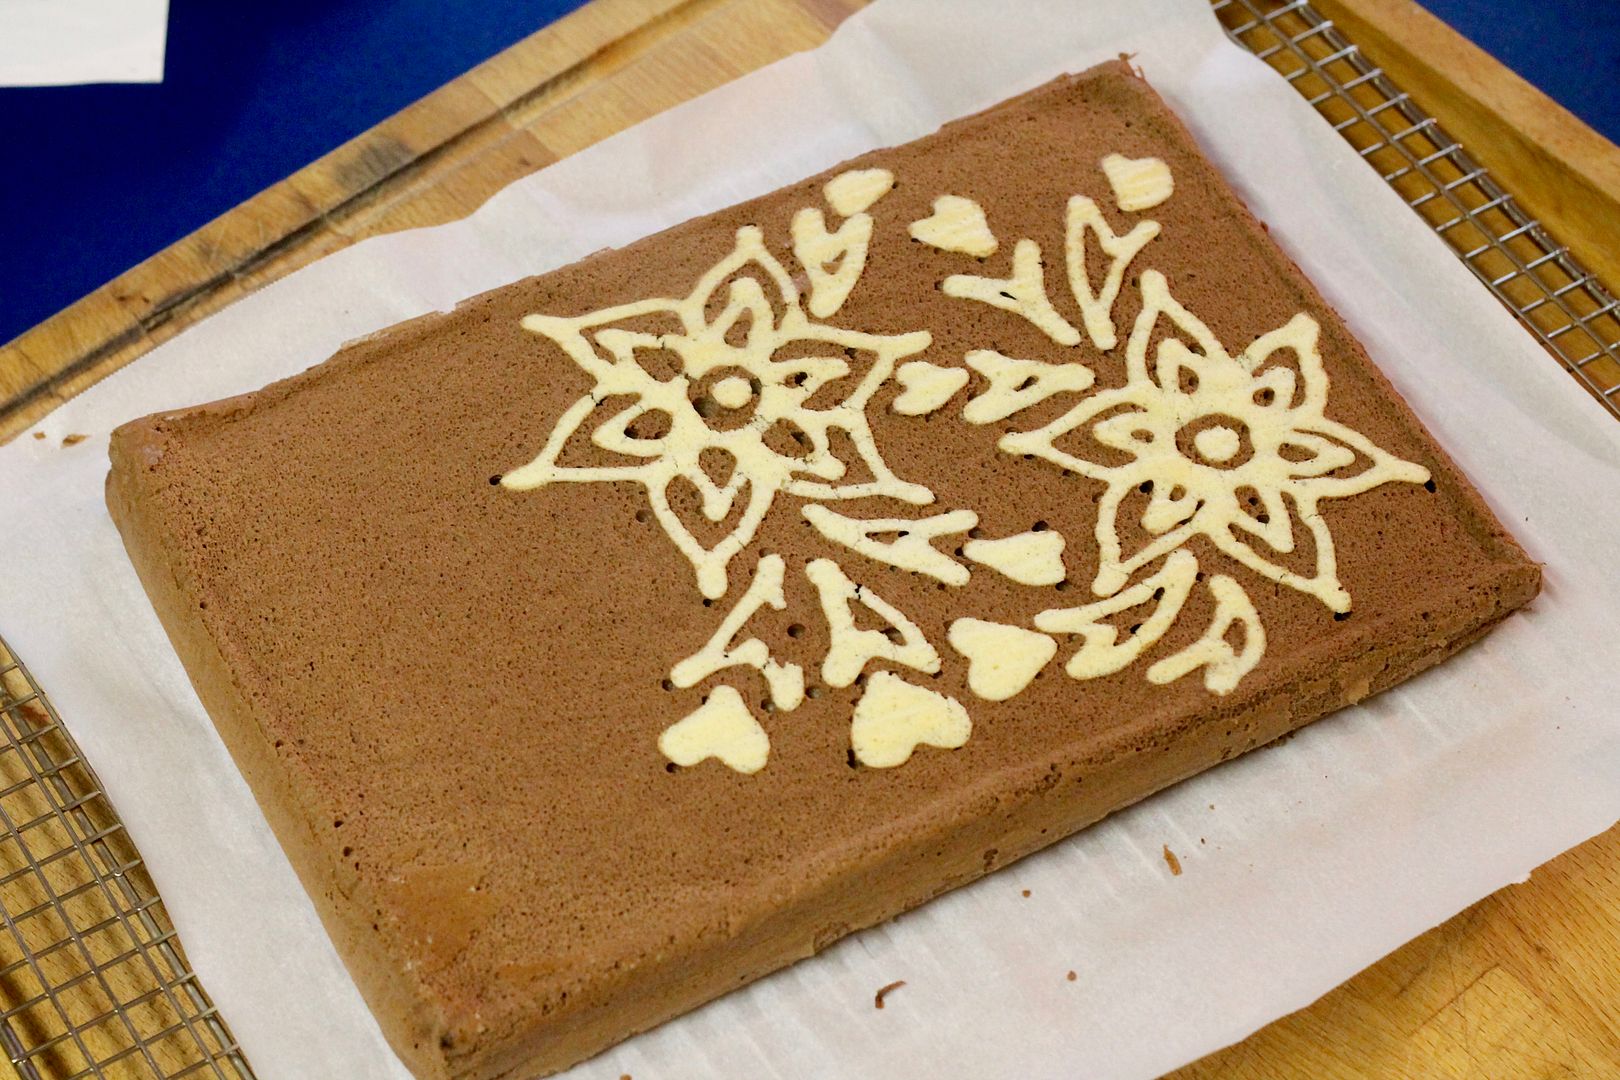
Pour the batter over the baked pattern in the prepared cake pan and spread evenly. Lift up the baking pan a few inches and drop it onto the counter 2-3 times to dislodge any large air bubbles. Bake in the preheated 340˚F oven for 12-14 minutes, depending on the size of your cake pan, until just set and slightly springy. Try not to let the cake colour/brown much, if at all.
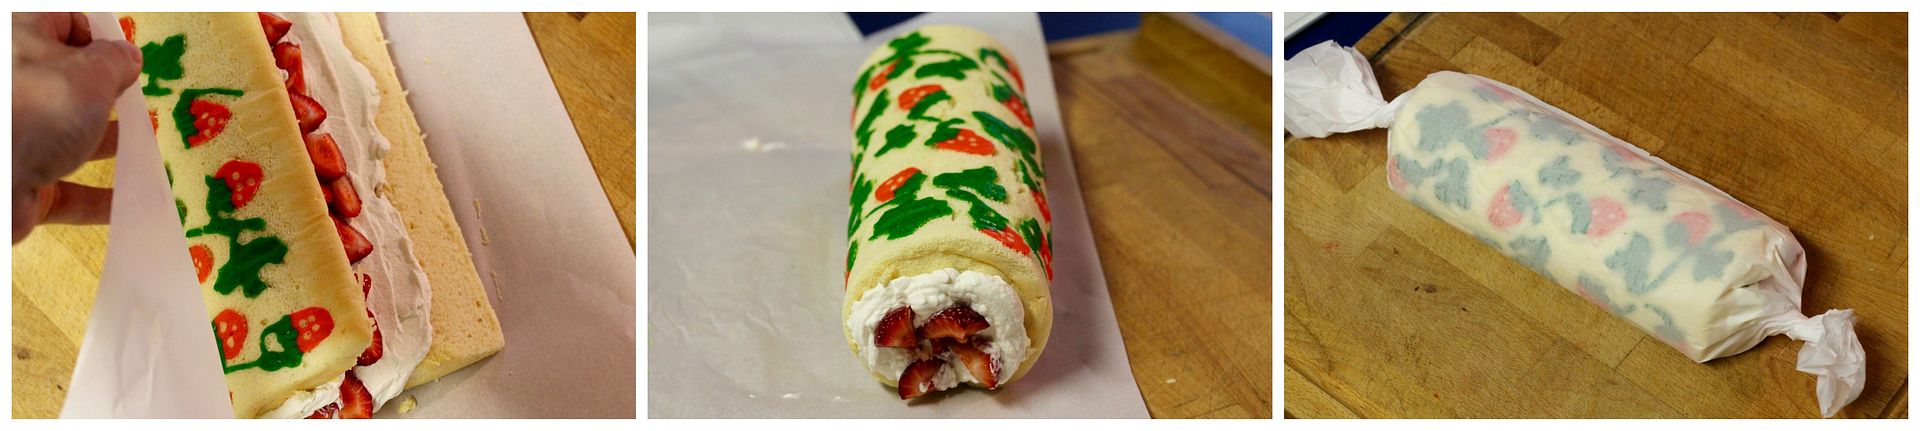
Place a fresh piece of parchment paper on top of the cake and invert it onto a cooling rack. Lift off the pan and stencil and gently peel back the parchment to reveal the baked-in decoration. Place the parchment back on top and allow the cake to cool between the pieces of parchment paper. Make sure the cake is completely cool before filling.

Part D: Simple Syrup
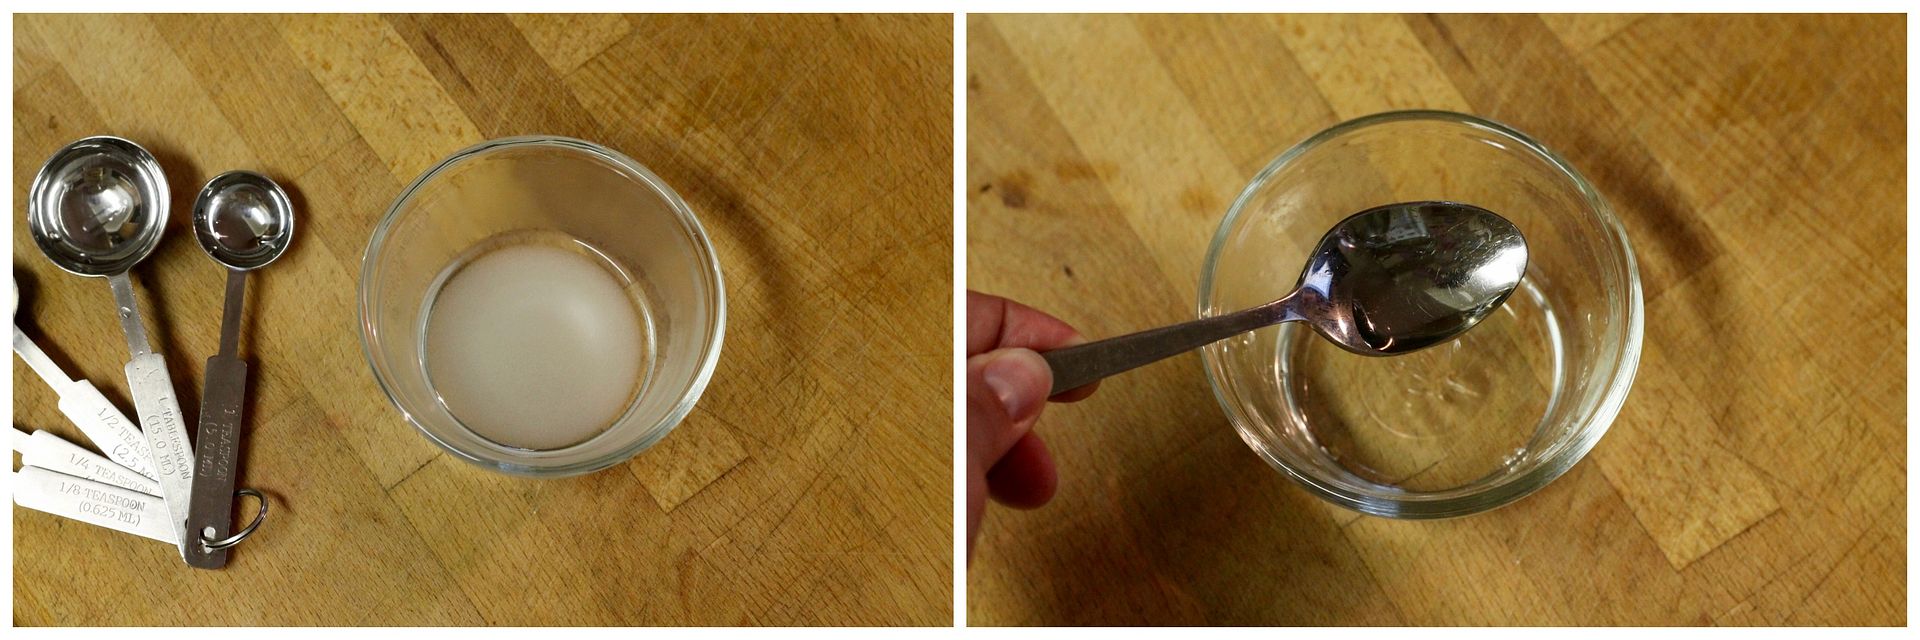
In a small bowl, combine 10 g / 2 tsp caster sugar and 20 ml / 4 tsp boiling water and mix until the sugar is dissolved. Stir in 1 1/2 tsp liqueur of your choice, if desired.
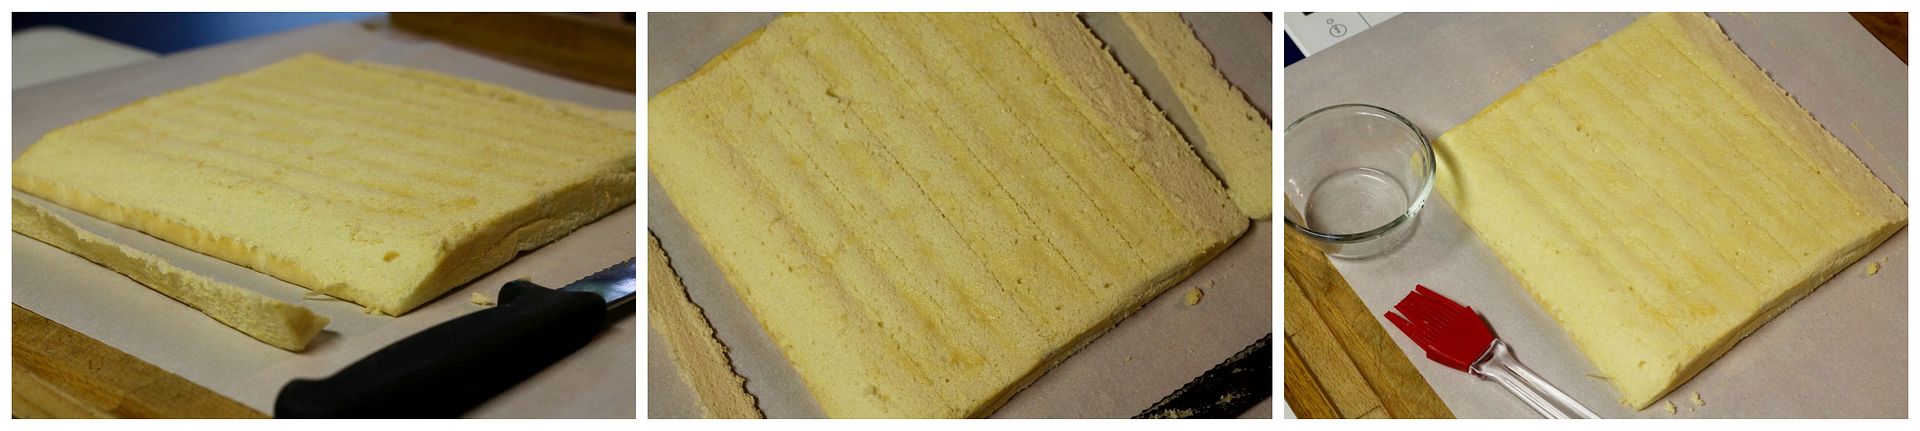
When the cake is completely cool, peel off the parchment paper and turn it over so that the pattern is facing down and horizontal (for a 9”x13” cake, make sure the short edges are at the top and bottom and the pattern is at the top). With a serrated knife, trim the top and bottom edges at an angle and make some very shallow cuts horizontally across the cake, about 1” / 2.5cm apart. This will help with rolling.
With a pastry brush, brush the simple syrup over the cake and let it soak in while you prepare the filling.
Part E: Filling
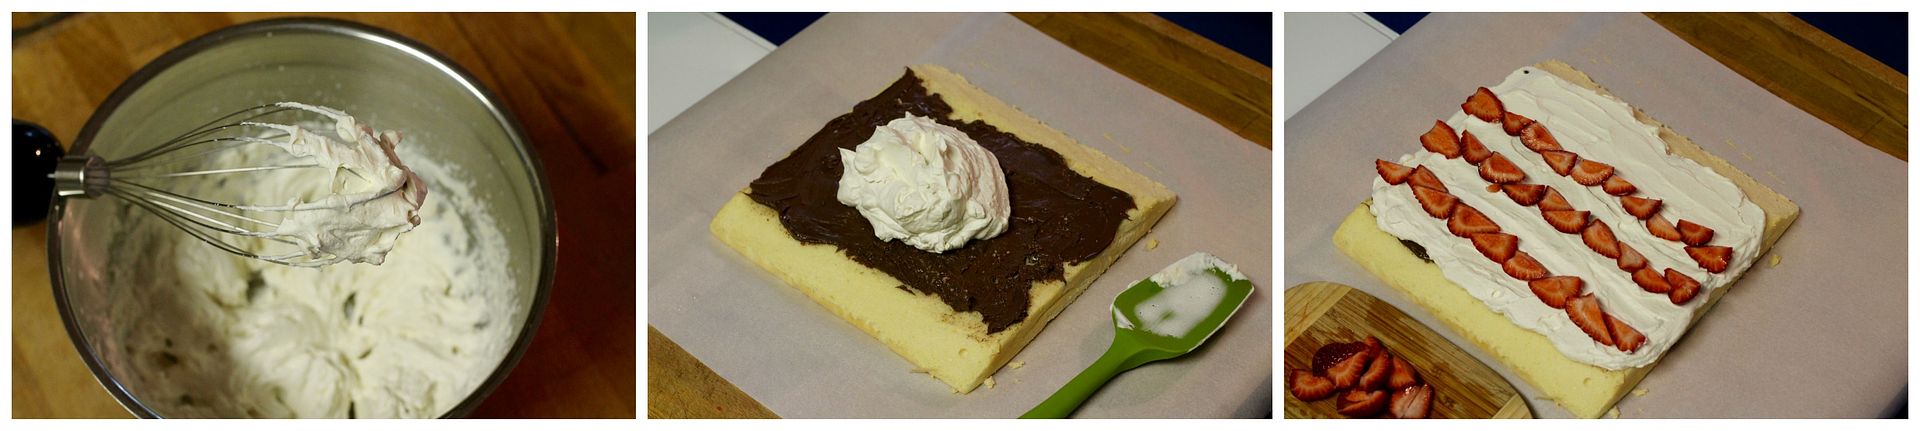
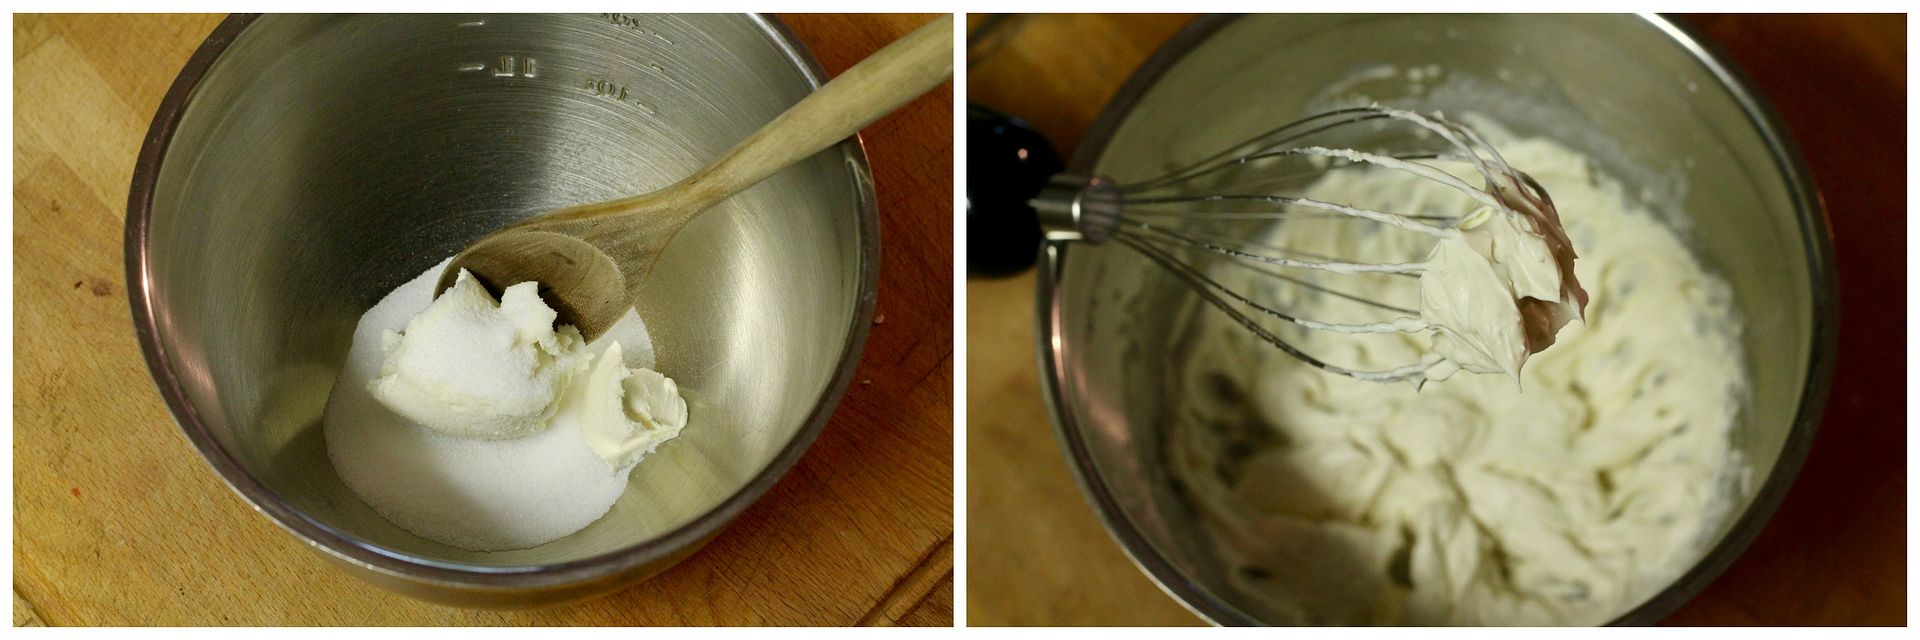
In a bowl, whip 150ml / 2/3 cup heavy cream until soft peaks form, then add:
15g / 1 Tbsp caster sugar
½ tsp vanilla extract
Continue beating until firm peaks form.
Spread a few tablespoons of Nutella evenly over the surface of the cake, leaving the angled parts that you trimmed on the top and bottom edges bare. Spread the whipped cream evenly on top, again leaving the angled parts bare. For a 10”x10” cake, arrange 1/2 cup sliced strawberries in lines in the middle of the cake. For a 9”x13” cake, go easy on the filling and arrange the strawberries in lines over the bottom half.
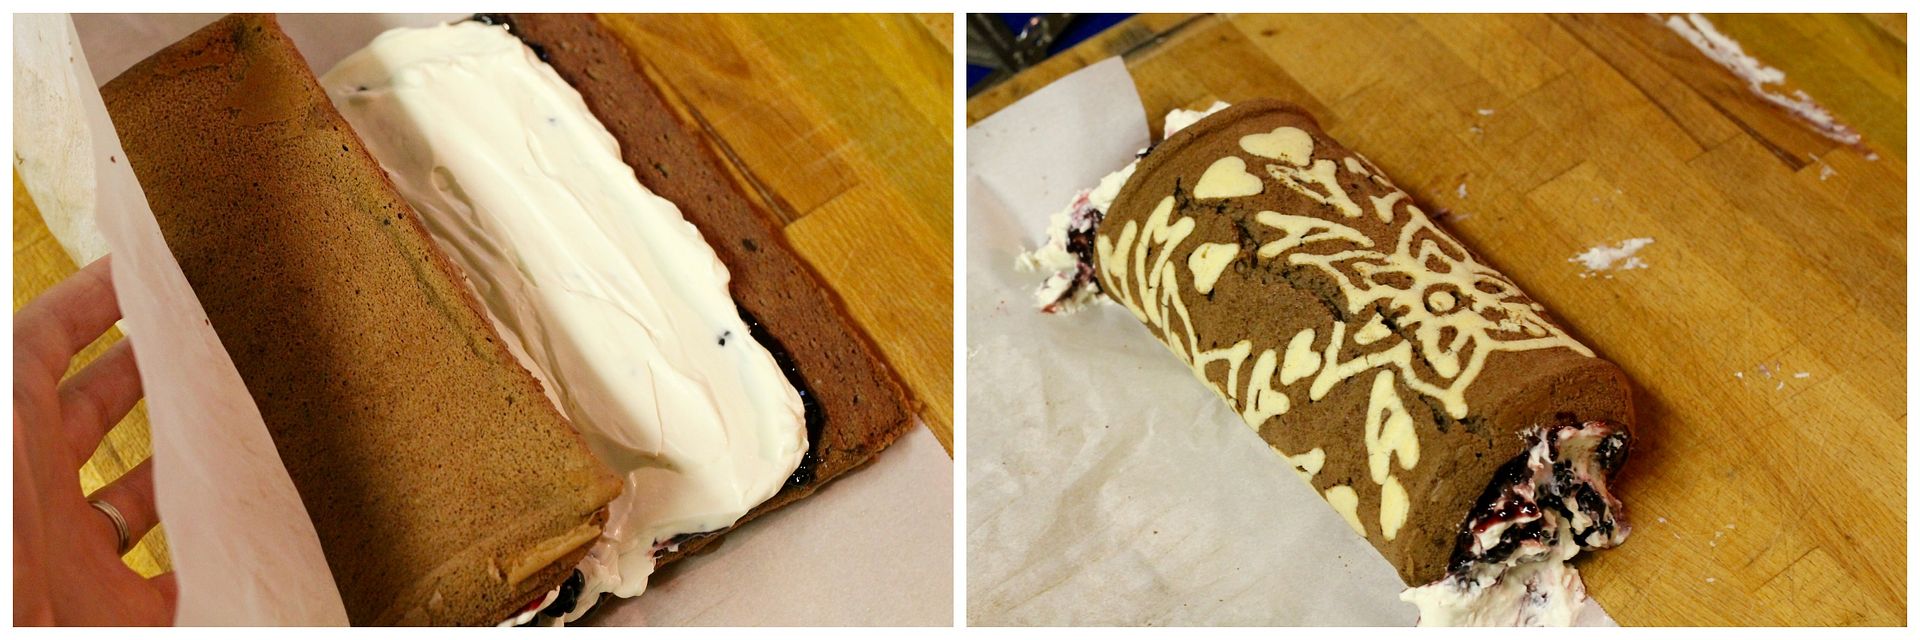
Tightly roll up the cake from the bottom edge, using the parchment paper to help. The 10”x10” square cake will form a complete cylinder around the filling, with the top and bottom edges meeting. For the 9”x13” cake, lift the bottom edge and tuck it over the filling, then continue to roll – there will be a bit of an overlap between top and bottom edges. Once rolled, twist the parchment paper ends like a candy wrapper to secure the cake in a log. Refrigerate for at least 1 hour until the filling is firm.
To serve, unwrap the parchment paper and trim the ends of the cake with a serrated knife. Roll it up in parchment again and re-shape if necessary, then transfer to a plate. Cut slices with a serrated knife, wiping it clean between each cut.
Decorated Chocolate-Blackberry-Cream Cheese Swiss Roll
Follow the recipe above with the following changes:
Part B: Pattern Mixture
Do not divide the mixture – just keep the egg yolk mixture in one bowl, and mix in 3 tbsp meringue. Keep the piping mixture plain/white, ie: do not colour it with food colouring. scrape into a piping bag (or parchment paper piping cone, or small zipper-lock bag with the corner snipped off) and pipe out a floral pattern.
Part C: Meringue
Before you add the meringue into the egg yolk mixture, mix together:
20 g / 3 1/2 tbsp cocoa powder
30 ml / 2 tbsp boiling water
Mix it into the egg yolk mixture, then continue with the recipe as above.
Reduce the baking time by 1-2 minutes for chocolate sponge – it will be slightly drier than the plain sponge and you do not want to over-bake it, or it will crack when rolled.
Part E: Filling
In a bowl, whip together:
75 g / 1/3 cup cream cheese
30 g / ~ 2 tbsp granulated sugar
1/2 tsp vanilla
Once mixed, add 100 ml / ~ 7 tbsp whipped cream and whip until stiff peaks form.
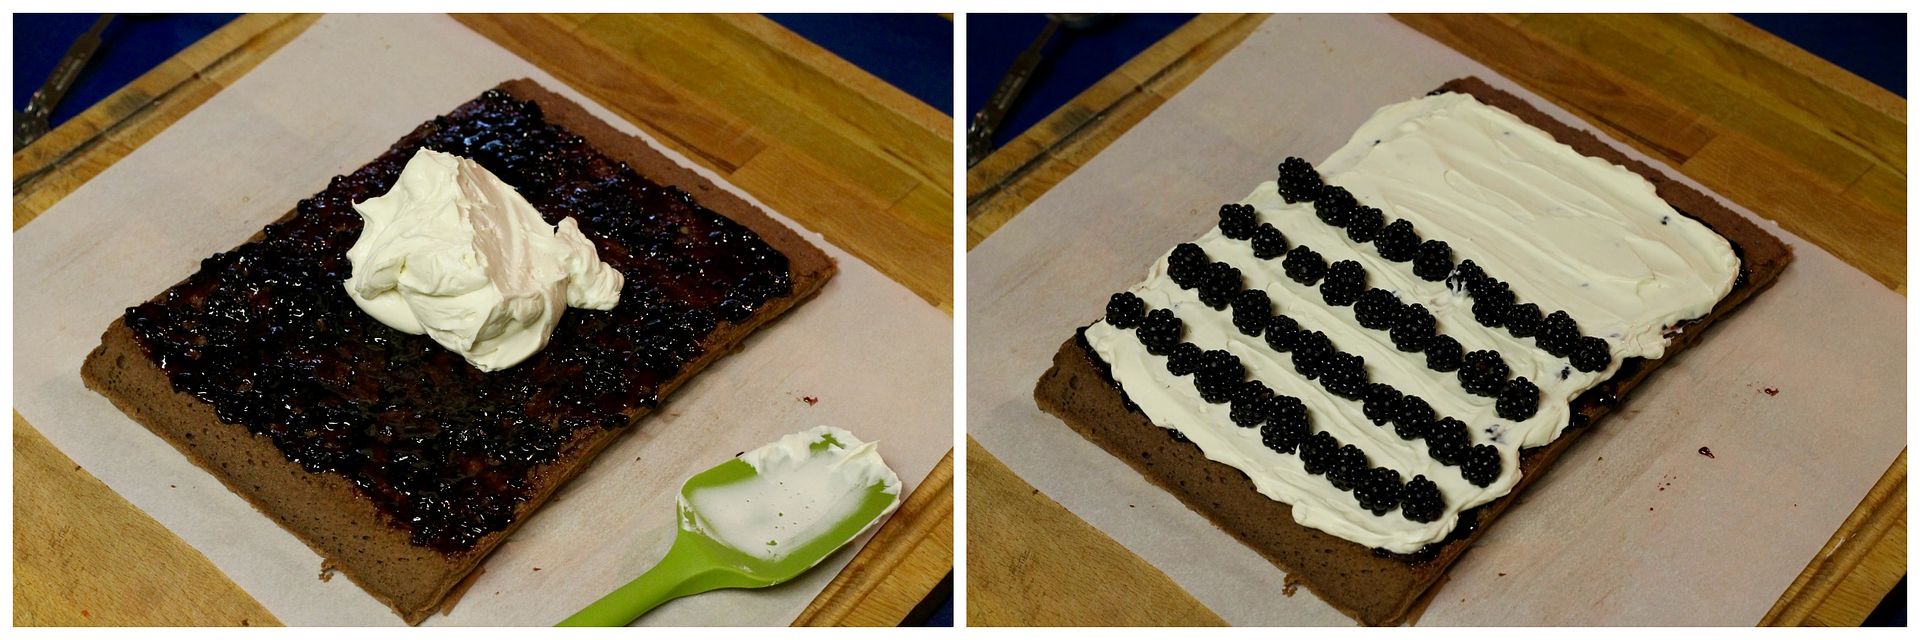
Spread the cake with a few tablespoons of blackberry jam, top with the cream cheese filling, then arrange with 1/2 cup blackberries on top of the cream.
Roll up and chill as above.
Cracks or no cracks, I still think both of these cakes look delicious. Swiss Roll cakes are on my baking bucket list, I’m just scared of cracking myself lol 😉
Wonderful challenge! Yours look great and I especially like the strawberry pattern. One day I’ll make one as pretty! 🙂
Thank you Korena for a délicious challenge!
Thank you Korena for the awesome challenge, I did not know if I would try this again after past fails but it was a success with all your great tips. I think yours all turned out gorgeous!
You just got me SO SO SO SO SO excited for XMAS!!
Oooooooh you could make the cutest Christmas roll cake!!
Many thanks for sharing this beautiful recipe with all Daring Bakers and congrats for all the hard work that goes in hosting these daring challenges!
Hi,
I followed here through your Battenberg series!! You are fab!!
Can I substitute the 10X10 inch pan with 8X8?
warmly,
San
Hi San, thanks for the lovely compliment! This cake wouldn’t work well in an 8X8 inch pan – it would end up too thick to roll. You could try it in a jelly roll pan instead if you don’t have a 9×13 inch pan (which is the suggested substitute for a 10×10 inch pan) – the jelly roll version would be thinner (so shorter baking time) and you’d get more of a coiled cross section.