 Our October 2012 Daring Bakers’ challenge was hosted by Suz of Serenely Full. Suz challenged us to not only tackle buttery and flaky puff pastry, but then take it step further and create a sinfully delicious Mille Feuille dessert with it!
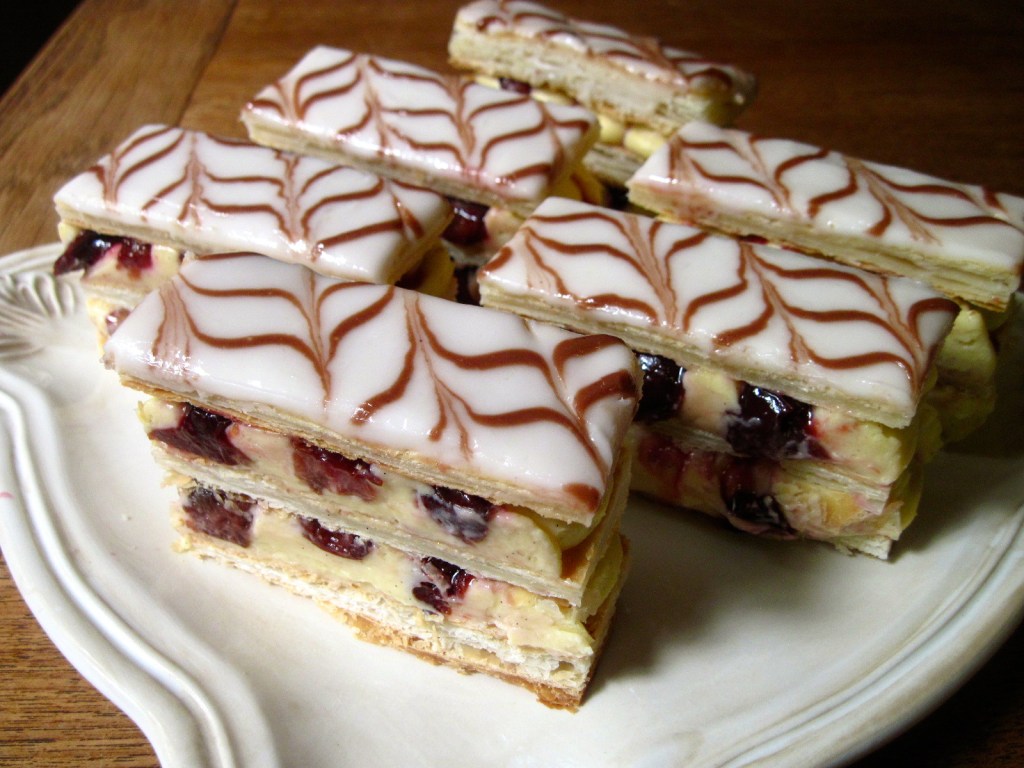
Mille feuille (aka napoleon) means “a thousand layers” in French, and is so-called because it contains three layers of puff pastry (pâté feuilleté), each containing many flaky layers, plus two layers of pastry cream (crème pâtissière). I’ve been wanting to make puff pastry since making croissants and danishes – the laminating process (aka rolling and folding and rolling and folding) is exactly the same, the only difference is that croissants and danishes are yeasted and puff pasty is not.

Aside from the opportunity to make puff pastry, I was stoked to see this challenge because about a week before it was announced, this happened:

It was supposed to be a galette filled with vanilla pastry cream and plums. I was excited about it because I think those flavours go really well together, and I was pretty sure it would be a hit. I put it in the oven and then had to leave to pick up a friend from the ferry, so I asked Nate to take the galette out when the timer went off – which it never did! Well, it eventually did – about an hour after it was supposed to. I managed to salvage a few edible slices, and I was right – the flavour was great, but obviously not an optimal execution. So when I saw that Suz’s challenge included both pastry and pastry cream, I knew right away that I would be adding plums in the mix – a redemption mille feuille!

Nate and I both really really liked this dessert – it’s rich, but not overly sweet, and the contrast between the silky vanilla pastry cream, the crunchy puff pastry, and the sweet-tart plums is a winner. My puff pastry was a bit on the under-done side (silly oven was burning the edges) and I over-cooked the pastry cream just slightly so it was a sturdier than it needed to be, but all in all, I think a good success. Oh! And I made poured fondant for the icing on top – a rather pastry cheffy thing to do, but actually not very hard.

Please check out the Daring Kitchen for all the other spectacular mille feuilles that were made and devoured this month. Thanks for being such a great host, Suz! 🙂
Roasted Plum Mille Feuille
Makes one mille feuille, about 6 – 10 slices, depending on how conservatively you trim the puff pastry. This recipe has a lot of components and should be spread out over at least a few days. I made the puff pastry and fondant about a week in advance and froze them, and made the pastry cream the day before. On assembly day, I baked the pastry, roasted the plums, and then put it all together. See Suz’s challenge recipe here (including a simpler alternative to fondant).
Jean Millet’s Puff Pastry
Adapted from Desserts: A Lifelong Passion by Michel Roux. I bought this book in Paris 10 years ago and have had this recipe bookmarked ever since. Feel free to double this recipe and keep the extra batch of puff pastry in the freezer for another project.
Sift into a medium bowl:
250 g all purpose flour
3/4 tsp salt
Make a well in the middle and add:
100 ml water
2 1/2 tsp white wine vinegar
25 g melted unsalted butter
Stir briskly with a fork to combine into a shaggy dough, then turn out onto a lightly floured surface and knead until it is completely combined but not too firm. Shape the dough into a ball and cut a cross in the top. Wrap in plastic and chill for 2 – 3 hours.

Prepare your butter square by wrapping 200 g will-chilled unsalted butter in parchment paper to form a loose square package. Beat the butter with a rolling pin to soften it and form it into a 4-inch square – the parchment paper package should help confine it to a square shape. Place it in the fridge while you roll out the pastry.
Place the chilled pastry on a floured surface. Spread out the four points of the pastry and roll them out to make four “ears” around a “head” in the middle. The “head” should be about 4-inches square – the same size as your butter square (or slightly larger).

Place the butter in the middle of the pastry and fold the ears in to cover it completely. Seal the edges, making sure that the butter is fully enclosed. Wrap in plastic and chill for at least 30 minutes to make sure the butter and dough are the same consistency.

Roll the chilled dough-butter square out on a lightly floured surface into an 8″ x 12″ -ish rectangle. Be careful to roll gently, evenly, and gradually – you want the butter within the dough to be in one even layer. Trim off the bottom short edge of dough to expose the butter, then fold the dough into thirds like a letter – bottom up and top down. This is Turn 1. Rotate the dough so that the closed long edge is to your right, then roll out and repeat the trimming and folding. This is Turn 2. Wrap the dough in plastic and chill for at least 30 minutes, then repeat whole the process (including chilling after each two turns) two more times for a total of six turns. If your pastry starts to get too soft or the butter starts to break through the dough, chill it before continuing – this will save you a lot of mess and will preserve those flaky layers you’re working so hard to produce.

After the sixth turn, the pastry is ready. Chill for at least 30 minutes before baking, or freeze for several weeks, tightly wrapped.
When you are ready to bake, preheat the oven to 400˚F. Poll the pastry out to fit the dimensions of your cookie sheet – mine was about 12″ by 18″. The pastry should be the thickness of corrugated cardboard. Trim the edges of the pastry to expose the layers, then place it on a piece of parchment paper on the cookie sheet. Prick the pastry all over with a fork, then top it with a second piece of parchment paper, and another cookie sheet. Weight it down on top with a heavy glass or ceramic baking dish. The pastry will still puff up, but this is supposed to keep it thinner and more evenly puffed. Bake in the preheated 400˚F oven for about 25 minutes, removing the top cookie sheet and parchment paper for the last 10 minutes.

The pastry should be deeply browned – you may need to lower the temperature in the last few minutes to keep the edges from burning. If, on removal from the oven, it has puffed-up unevenly, replace the top cookie sheet and press down lightly to even it out. Do this while the pastry is still warm, before it gets brittle. Allow to cool completely on a rack before continuing.

Poured Fondant
Adapted from Joe Pastry. This recipe requires a candy thermometer and a food processor. I used the whole batch to cover my mile feuille, but there there was a lot of excess fondant that ended up going to waste. I would suggest making the full batch and only using using half for the mille feuille (including half the chocolate fondant recipe) and saving the rest for another project.
In a small, heavy bottomed saucepan, combine:
17.5 oz (2 1/2 cups) granulated white sugar
4 oz (1/2 cup) water
3 oz (1/4 cup) corn syrup
Bring to a rapid boil over medium-high heat and cook until it reaches 238˚F on a candy thermometer. Immediately remove from the heat and pour the hot sugar syrup into the bowl of a food processor. Stick the thermometer in the syrup and wait for 30 – 45 minutes for the temperature to drop down to 140˚F.

When it does, put the lid on the food processor and blend on high for a few minutes. The mixture will start to turn a slightly translucent yellow before becoming white and opaque. You can use the fondant immediately, or pour it into a Ziplock bag, leave it open to cool, then squeeze out the air and store it in the fridge or freezer for up to a year.

To use the fondant, place it in a microwave-safe bowl and microwave in 20 – 30 second intervals, stirring after each, until smooth. If it seems too thick to pour easily, stir in a few drops of hot water. The fondant will thicken as it cools, so warm it in the microwave just before you are ready to use it.

For Chocolate Fondant, place about 3 oz of the fondant (a scant 1/2 cup) in a microwave-safe bowl and add 1 heaping tsp cocoa powder. Stir until smooth, adding a few drops of hot water to thin it out to the original consistency. Warm before using, as above.

Pastry Cream
Adapted from Ratio by Michael Ruhlman. Makes about 2 1/2 cups.
In a medium saucepan, combine:
8 oz (1 cup) milk
8 oz (1 cup) heavy cream
1 vanilla bean, split and scraped
Bring to a simmer over medium heat, then remove from the heat and allow to steep for 10 to 15 minutes. Remove the vanilla bean pod and discard.

In a large bowl, whisk together:
4 oz egg yolks (about 8 yolks)
4 oz (1/2 cup) granulated white sugar
Bring the milk mixture to a simmer again, then pour it into the egg yolks, whisking constantly. Pour the mixture back into the pan (off the heat).

In a small bowl, whisk together a slurry of:
6 tbsp cornstarch
3 oz (~1/3 cup) milk
Whisk the slurry into the egg-milk mixture.

Return the pan to medium heat and cook, whisking constantly, until the mixture thickens to the consistency of pudding. It will look curdled as it starts to thicken, but keep whisking and it will smooth out. Immediately plunge the bottom of the pan into a bowl of ice water to stop the cooking, and whisk until it has cooled slightly but is still warm enough to melt butter. Add:
2 oz (4 tbsp) unsalted butter, cut in tiny pieces
Whisk until totally combined and the pastry cream is smooth and silky.

Pour into a bowl and press plastic wrap directly onto the surface to prevent a skin from forming. Chill until completely cool (overnight is good).
Roasted Plums
Preheat the oven to 425˚F. Pit and cut into quarters:
10 oz Italian prune plums (or any other variety, cut into small slices)
Place them in a close-fitting baking dish (I would recommend glass or ceramic rather than metal) and drizzle with a little honey. Toss to coat, then roast for 20 – 25 minutes, until the plums are tender and the juice is bubbling. Remove to a bowl and chill to cool completely.

Mille Feuille Assembly
For assembly tips, check out Joe Pastry’s mille feuille tutorial – I found it really helpful.
Take the pastry cream out of the fridge to warm up a little. Once it has, beat it with a spoon until it is smooth, then place it in a piping bag with a large round tip (I just used the coupler). Set aside.
Trim the cooled puff pastry with a serrated knife so that it is a rectangle with perfectly squared edges. Mine ended up being about 8″ x 12″ because I had to cut off some rather burned corners. Cut the rectangle into three equal pieces along its length (mine were about 3″ wide). Place one piece to the side (this will be the top).

Place one piece of pastry on a serving dish. Pipe on the pastry cream in dollops. If the pastry is not evenly thick, pipe little extra cream to fill in the dips. Arrange the roasted plums evenly over the cream, in between the dollops. Top with the second pastry piece and repeat. Place in the fridge to set while you prepare the fondant-ed top.

Put the “top” pastry piece on a rack over a plate or cookies sheet. Warm up the plain fondant so that it is pourable, then pour it over the pastry. Smooth it out with an offset spatula, pushing the excess over the edges. Working quickly before the fondant sets, place the warm chocolate fondant in a piping bag fitted with a small round tip. Pipe the chocolate fondant in lines over the plain fondant. Immediately drag the dull edge of a knife back and forth through the fondant, perpendicular to the chocolate lines, to create a wavy pattern. Scrape off the excess fondant from the sides of the pastry with a knife, then allow the top to set for about 5 minutes.

With a chef’s knife, cut the pastry top into 6 – 10 equal pieces, depending on the size. Wipe the knife blade after each pass to keep the cuts clean. Arrange the top pieces on the chilled layers, then stick the whole thing in the freezer for about an hour – this will make it much easier to slice. When firm, cut into pieces with a serrated knife. Arrange the pieces on a serving platter and chill until ready to serve.


Leave a reply to Hamilton Courtney Cancel reply