
May’s Daring Bakers’ Challenge was pretty twisted – Ruth from The Crafts of Mommyhood challenged us to make challah! Using recipes from all over, and tips from “A Taste of Challah,” by Tamar Ansh, she encouraged us to bake beautifully braided breads.
After this challenge, I can’t say “challah” without thinking “holla!”. I had so much fun with this one!
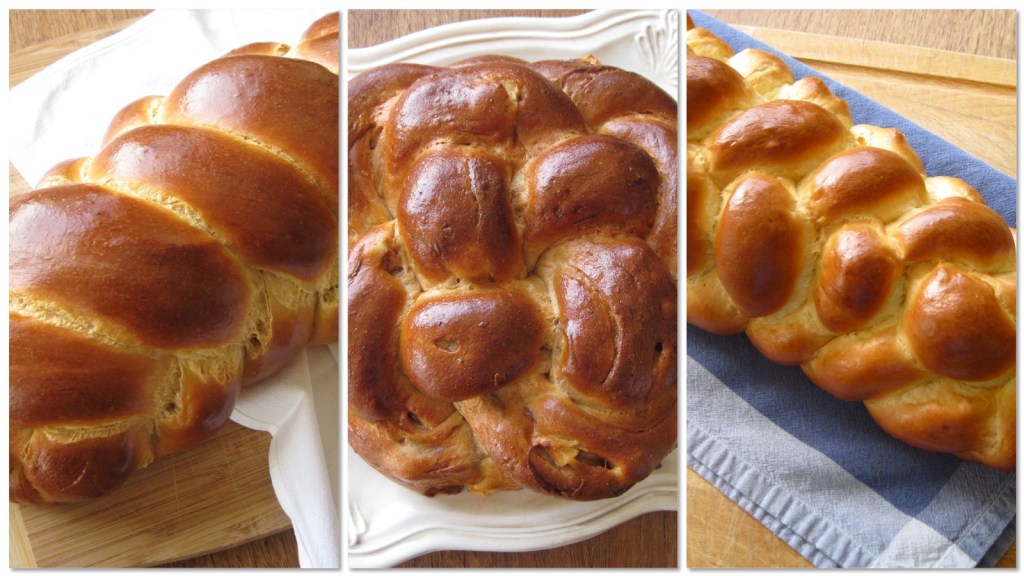
I made three different kinds of challah: plain honey white challah, whole wheat challah filled with apples, cinnamon, and maple syrup, and sourdough challah. Even more fun than all the different varieties were the different braiding techniques that Ruth, our host, encouraged us to try. I went for a six-strand braid, a five-strand braid, and a four-strand braided round. If you’ve never shaped bread like this before, challah is a great way to start: the dough was really easy to work with and good for braiding.

I enjoyed this challenge a lot. After it was announced, I was literally awake all night thinking about what kind of challah I would make (how much of a nerd am I?!). There is something SO satisfying and gratifying about taking a beautiful loaf of bread out of the oven, and challah, being as gorgeous as it is, is especially wonderful for boosting your ego ;). And not only does it look great, it tastes awesome! Light yet substantial and slightly sweet – wonderful for eating fresh but also perfect for french toast (try this baked version from Smitten Kitchen – awesome!).

I usually make bread using my KitchenAid and the dough hook, but I decided to make all of these by hand to start getting a better idea of the way dough is supposed to feel (I often think I add too much flour when I use the mixer). Making bread by hand is easy, and kneading the dough (the “hard” part) is enjoyable in a sort of hypnotic, cathartic way – especially challah dough, which is quite soft and elastic.

A few tips I picked up along the way:
1) If your challah splits or cracks in the oven, it’s a sign of underproofing (purely cosmetic – I actually thought it looked pretty awesome!). To avoid this, proof the loaf until you can poke it with you finger and the indent remains.

2) The challah dough is much easier to roll into logs for braiding if it is just a little bit sticky. I used a spray bottle of water to very lightly mist my rolling surface, which gave the dough something to grab onto as I rolled it (I discovered this on my third challah – I wish I’d figured it out earlier!).

Thank you Ruth for this AWESOME AWESOME challenge! I loved it and I hope to make many more challot (did you know that the plural of challah is challot? See, you learn something new everyday!) in the future! Check out the Daring Kitchen for this month’s challot 🙂
Here’s the recipes… (hold onto your hats, this is a long one!)
Honey White Challah
Adapted from Tammy’s Recipes. Makes 1 giant loaf.

In a measuring cup, mix together:
1/4 cup warm water
1 1/2 tsp granulated white sugar
1 tbsp yeast
Proof for about 5 minutes until foamy, then pour it into a large bowl along with:
1/2 cup warm water
1/4 cup honey
1 1/2 tsp vegetable oil
2 beaten eggs
3/4 tsp salt
Stir to mix, then stir in:
2 1/2 cups all purpose flour
Mix to create a cohesive, kneadable dough. You may need to add a little more flour if the dough is too sticky.

Knead the dough on a floured surface for about 10 minutes until smooth and elastic, adding a light dusting of flour only when the dough starts to stick to your hands or the surface. Place the dough in a lightly oiled bowl, cover with plastic, and let rise in a warm place for 1 1/2 hours or until doubled.

Punch down the dough and divide it into six equal portions. Roll each portion out flat, then roll it up tightly like a jelly-roll to form six snakes of dough about 18″ long. If you want a tapered, football shaped loaf, taper the ends of each snake (I left mine un-tapered).

Braid according to the instructions in this post. Place the loaf on a greased or lined baking sheet, cover lightly, and proof for 30 minutes or longer, until your finger leaves an indent when you poke it. Brush thoroughly with an egg wash (1 egg mixed with 1 tbsp water).

Bake at 325˚F for 30 – 40 minutes, until well-browned and hollow-sounding when tapped on the bottom. Cool on a rack.

* * *
Whole Wheat Challah with Maple, Apples, and Cinnamon
Adapted from Ruth’s “Go-To” Whole Wheat Challah, which is adapted from D’s Whole Wheat Challah. The maple flavour in the dough was pretty subtle so I’ve increased the amount – if you are lucky enough to have maple extract, a little bit added here would be great. Brown sugar or honey would be good substitutes for the maple syrup. This is a filled challah meaning that every strand is rolled up with a filling of apples, cinnamon, and maple syrup. Makes 1 large loaf.

Dough
In a measuring cup, mix together:
1/2 cup warm water
2 1/4 tsp yeast
Proof for about 5 minutes until foamy.
In a large bowl, combine:
1/3 cup maple syrup
1 egg + 1 egg yolk
1/4 cup melted butter, cooled
1 tsp salt
Add the proofed yeast mixture and stir in:
1 cup all purpose flour
1 cup whole wheat flour
1/4 cup rolled oats (any kind)

Stir to create a cohesive, kneadable dough, adding more all purpose flour as needed if the dough is too sticky. Knead the dough on a floured surface for about 10 – 12 minutes until smooth and elastic, adding a light dusting of flour only when the dough starts to stick to your hands or the surface.

Place the dough in a lightly oiled bowl, cover with plastic, and let rise in a warm place for 2 hours or until doubled. Punch the dough down and let rise again for 30 minutes to an hour.

Filling
Peel and core:
2 tart apples
Cut them into a 1/2″ dice and mix with:
3/4 tsp cinnamon
1 1/2 tbsp maple syrup
Set aside.

Assembly
Punch down the dough again and divide into four equal portions. Roll each one out into a 16″ – 18″ oval. Place 1/4 of the apple filling along one long edge of the dough, then roll it up to enclose the apples, pressing gently to squeeze out any air.

For the four-strand braided round, place the four strands as shown (notice the under-over pattern). To braid, move in one direction to place all the “under” strands on top of the “over” strands (moving counter-clockwise here):

Repeat, this time moving in the other direction (clockwise here). Keep going until you run out of dough:

Tuck the ends of dough in towards the middle, and very bravely and confidently flip the whole thing over, tucking the sides underneath to make it neat and compact:

Place on a greased or lined baking sheet, cover lightly with plastic, and proof for an hour or so, until you can poke it with your finger and the indent remains. Brush thoroughly with an egg wash (1 egg mixed with 1 tbsp water).

Bake at 350˚F for 30 – 50 minutes (the round shape may take a bit longer), until well-browned and hollow-sounding when tapped on the bottom. Cool on a rack.

* * *
Sourdough Challah
Adapted from Maggie Glezer’s “A Blessing of Bread”, via zolablue at The Fresh Loaf. This recipe requires a firm starter, which can be made by converting a 100% hydration “batter-style” starter (this takes at least a few days – instructions can be found here). There is some planning that goes into making this bread: the day before you want to bake, refresh your starter in the morning, then that night mix up the levain. Let it ferment overnight and then proceed with the recipe, which takes about 8 1/2 hours start to finish on baking day, most of which is resting time. It’s well worth it though – the flavour in this challah is awesome! Makes 1 large loaf (can be divided into smaller loaves or rolls as well).

Levain
The night before baking day, make the levain. In a bowl, mix together:
35 grams active firm starter, refreshed 8 – 12 hours earlier
80 grams warm water
Stir or knead to somewhat dissolve the starter in the water, then stir in:
135 grams bread flour
Knead this dough (it will be firm) until it is smooth. Weigh out 200 grams for use in this recipe and place it in a sealed container at least four times its volume (the remaining starter can be saved for the next time you bake). Let the levain ferment for 8 – 12 hours (overnight), until it has tripled in volume and is starting to flatten out and deflate.

Final Dough
In a large bowl, whisk together:
3 large eggs
55 grams vegetable oil
65 grams honey
5 grams salt
60 grams warm water
With a wooden spoon, mix in:
400 grams bread flour
Stir until a shaggy, sticky dough forms.

Turn the dough out onto a floured surface, flatten it out a bit and put the fermented levain in the middle. Fold the dough around the levain to enclose it, then knead until the dough is smooth (no more than 10 minutes), adding more flour as needed if it is too sticky. The dough should feel smooth and firm yet still easy to knead.

Place the dough in a warm bowl (soak your mixing bowl in hot water while you are kneading – a glass or ceramic bowl will hold the heat better than metal) and cover it with plastic. Let it ferment in a warm place for 2 hours. It probably won’t rise much, if at all.
For a 5-strand braid, divide the fermented dough into 5 equal pieces (just under 190 grams each) and roll them out into logs about 16″ long. Gather them together at one end and hold them with one hand. To braid, repeat these three moves:
1) Take the far right strand and move it left over top of 3 strands.

2) Take the far left strand and move it right over top of 2 strands.

3) Move the strand that is second from the left over top of the middle strand.

Keep going until you run out of dough, then tuck the ends under securely. Right now it looks like a regular 3-strand braid, but tip it to one side and you will see the twisted rope effect on top of the loaf (down each side looks like a 3-strand braid).

Place the braid, twisted rope up, on a silicon or parchment-lined baking sheet and cover it lightly with plastic. Proof in a warm place for about 5 hours, until about tripled in size (I think mine only doubled and it was fine) and an indent remains in the dough when you poke it with your finger. Brush thoroughly with an egg wash (1 egg and 1 tbsp water) and bake in a preheated 350˚F oven for 35 – 45 minutes, until deep brown and hollow-sounding when tapped on the bottom.

Cool on a rack before slicing.

* * *
Submitted to YeastSpotting.


Leave a reply to frugalfeeding Cancel reply