Sourdough Danish Pastries, Part II

This is the second post in a series of three – click to read Part I and Part III.

As promised, here’s the follow-up to my last post on Danish pastries: how to shape and fill the Danishes. So fun!

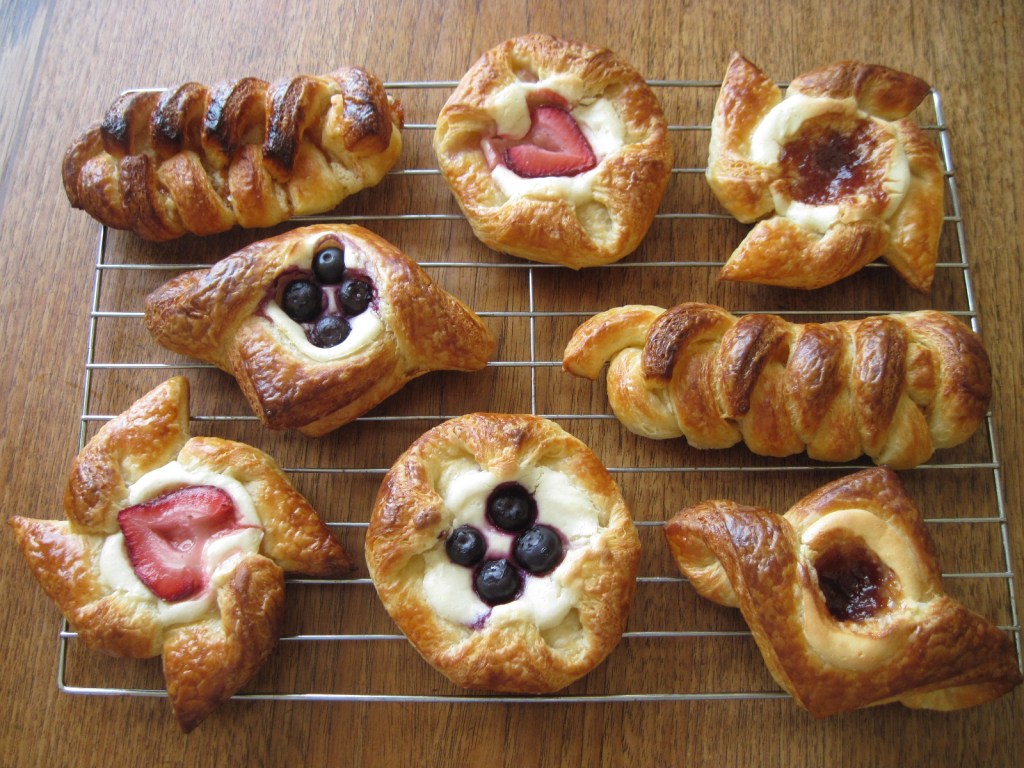
I got really excited about the different Danish shapes I was going to make, so I tried a whole bunch of them. They were all pretty successful so I’m confident that I can pass along my skillz ;). I only used half the batch of dough to make these (I couldn’t justify making sixteen Danishes for only two of us) so I will be experimenting with the rest of the dough sometime soon… stay tuned for Part III! 😉

Danish Pastry Shapes

You will need:

1 batch of Sourdough Danish Pastry dough, rolled out and cut into 4″ squares as outlined in the recipe

1 batch of Cream Cheese Filling (see below)

jam, fruit, and/or berries of your choice, fresh or frozen

After shaping the Danishes, place them on a parchment-lined baking sheet and let them proof, covered in plastic, in a warm area until they are puffy and the butter layers are visible (at least a few hours). Fill each Danish with about 1 tbsp of Cream Cheese Filling and top with jam, fruit, or berries. Brush with egg wash (1 egg and 1 tbsp water) and bake as directed in this post.

The Square

Take a square of pastry and fold each point into the middle. Press lightly to seal. Proof, fill, egg wash, and bake as directed.

The Pinwheel

Take a square of pastry and make a cut from each corner into the middle (don’t cut all the way through the middle though). Fold every other point into the middle and press lightly. Proof, fill, egg wash, and bake as directed.

The Vol-au-Vent

Fold a square of pastry in half on  the diagonal to make a triangle, but do not seal it. Make two cuts parallel to the sides of the triangle, about 1/2″ from the edge of the pastry. Unfold the pastry  – you will have two v-shaped cuts. Fold both sides over the middle, tucking one under the other. Proof, fill, egg wash, and bake as directed.

The Braid

Cut 5 slits (giving 6 strands) down two edges of a pastry square, leaving about 1/2″ uncut pastry in the middle. Spread 2 – 3 tsp of filling down the center (don’t overfill it or it will fall apart). Stretch each strand gently and then cross one over the other on top of the filling. Repeat, tucking the very last strand under the bottom of the Danish to secure. Proof, egg wash, and bake as directed.

Cream Cheese Filling

Adapted from Wild Yeast. Makes about 1 1/3 cups, which is plenty for one batch of 16 Danishes.

In a mixer bowl, combine:

250 g soft cream cheese

113 g granulated white sugar

19 g soft butter

28 g flour

21 g beaten egg (about 1/2 an egg – remember that leftover 1/2 egg from the pastry dough?)

1 tsp vanilla extract

Beat it all together with the whisk attachment until smooth and fluffy. Spoon or pipe onto the Danishes as required.

39 responses to “Sourdough Danish Pastries, Part II”

  1. mamabuckwheat Avatar
    mamabuckwheat

    How could you not justify making 16 for the two of you?….they look AMAZING.

    1. Korena in the Kitchen Avatar

      Ha, I figured that 8 each was overkill! All that butter… 😉

      1. mamabuckwheat Avatar
        mamabuckwheat

        MMMMM All that butter! 🙂

    2. x Avatar
      x

      The beauty of individually sized portions of yeast doughs like this, unlike things like cakes and quick breads, is that you can bake exactly the amount you will eat today. The rest can be refrigerated and baked up fresh over the next 3-4 days without any quality loss.

      A typical Danish recipe satisfies us 6 days if we agree to limit ourselves to 1 per day. I shape 3 days worth on day 1 and place what I’m not baking that day in the refrigerator. Unused dough goes in the freezer until day 3, thaw overnight, and repeat from the shaping step. Of course, you can put the shaped ones in the freezer, too, but you might decide you want different fillings later. It’s literally no extra work to have fresh buns baked every day.

      No matter how well you wrap them, baked goods start losing their allure after about a day. If your Danishes have to be refrigerated because their fillings do (eg. cream cheese, custard), the flakiness just won’t last. You’re less likely to impulse eat, too, if you limit what gets baked on a given day. Your taste buds and your waistline will thank me.

  2. putneyfarm Avatar

    Great post. Lovely photos and great detail on the process.

  3. Sibella Avatar

    Thanks for this post Korena! Now I’ve learned some new techniques of shaping danish pastry. Great photos as always!
    Have a lovely, lovely day! 🙂

  4. wendyjv Avatar
    wendyjv

    You are SO good at explanations! Couldn’t be clearer. Or more beautiful! 🙂

  5. Just A Smidgen Avatar

    This is one of my newest favorite posts! These look so simple uncooked.. but they turn out just gorgeous all baked up and puffy!! I would love to try these!

  6. frugalfeeding Avatar

    More! Yay! Korena, you make beautiful pastries – seriously! Thanks for the guide – I shall bookmark for the future.

    1. Korena in the Kitchen Avatar

      I hope it comes in handy 🙂

      1. frugalfeeding Avatar

        I’m sure it will – the windmill ones are my favourite 🙂

          1. frugalfeeding Avatar

            We have SO much in common – haha.

            1. Korena in the Kitchen Avatar

              OMG! Do you like food?! I LIKE FOOD TOO!

              1. frugalfeeding Avatar
  7. chefconnie Avatar

    Oh my. What a great post. I am definately making these! Yay thanks for sharing.

    1. Korena in the Kitchen Avatar

      Thanks Connie, very fun to make 🙂

  8. Karen Avatar

    The pastries are beautiful and the details of how to shape them is perfect. Thanks.

    1. Korena in the Kitchen Avatar

      Thanks for stopping by Karen 🙂

  9. Stephanie @ Dessert Before Dinner Avatar

    These pastries are in my oven right now. Looking forward to having them for breakfast in 15 minutes. This was my first adventure with laminated dough and I think it turned out splendidly.

    1. Korena in the Kitchen Avatar

      Oh wonderful!! Let me know how they turn out!

      1. Stephanie @ Dessert Before Dinner Avatar

        They turned out fantastic. I did mine with raspberry preserves, fresh blueberries, and an apricot/peach/passion fruit compote. The apricot was by far the best. Boyfriend approved too!

        1. Korena in the Kitchen Avatar

          I’m so glad! The apricot-peach-passion fruit combo sounds amazing, I wish I had one right now!

  10. HeatherAnne Avatar
    HeatherAnne

    I am a terrible cook, but these directions are so simple to understand, and the finished product so gorgeous, that I might just have to brave it! 🙂

    1. Korena in the Kitchen Avatar

      Aww, thank you! And good luck if you do try it – they are worth it, I promise 🙂

  11. Judy Le (@judydaatsme) Avatar

    These look so amazing! Can I just use regular puff pastry dough instead?

    1. Korena in the Kitchen Avatar

      Thanks! You could use puff pastry dough but because it has no yeast in it, it won’t quite be the same end result. But it would still work!

  12. myriame Avatar
    myriame

    bonjour , j’aime beaucoup , c’est quoi du Fromage a crème?????? Merci bonne journée

    1. Korena in the Kitchen Avatar

      “Fromage à tartiner” ou “fromage frais” c’est peut-être le nom correcte? C’est un fromage frais et tres cremeux qui peut être tartiné. C’est un produit du Nord Amerique…

  13. myriame Avatar
    myriame

    merci

  14. Liz van de val Avatar

    Oh dear, they look amazing, and if you know how to shape at least not so difficult. Practising is the best and they went out gorgious! Thanks for sharing and the nice diy pics.
    Liz

    1. Korena in the Kitchen Avatar

      Thanks for stopping by Liz 🙂

  15. Nancy Ross Avatar
    Nancy Ross

    Is there any other type of premade pastry one could use rather than having to make it? I’m a very busy teacher and sure would like to make these, but wondering if puff pastry dough or pie dough might substitute?

    1. Korena in the Kitchen Avatar

      Hi Nancy, store-bought puff pastry would be a fine substitute – it won’t be quite the same because puff pastry is not yeasted, but you’ll still get the flaky layers. I’ve also made a “quick” Danish pastry dough that might be a little more manageable on a busy schedule: https://korenainthekitchen.com/2013/02/14/lemon-heart-danishes/. I hope you get a chance to try these! 🙂

  16. Fügen Türkoğlu Avatar
    Fügen Türkoğlu

    ” Sourdough Danish ” this would be so yummy. Gonna try with my sourdough
    Thank you.

Leave a reply to Nancy Ross Cancel reply