 Audax Artifex was our January 2012 Daring Bakers’ host. Aud worked tirelessly to master light and fluffy scones (a/k/a biscuits) to help us create delicious and perfect batches in our own kitchens!
Audax, who can offer a wealth of information, tips, and tricks for every challenge (even when he’s not hosting it), did not disappoint with this one. When I saw that the challenge was scones, I honestly wondered how much I would learn, being that I already considered myself to have “mastered” scones – I learned to make them in grade 7 Home Ec, and have been turning them out very successfully ever since. The spirit of this challenge was to find a way to make scones that works best for you, and Audax did a ton of research on what makes a good scone and the techniques to use to make them more flaky or more tender and cake-like. All things I never knew before! He also went into the difference between a scone and a biscuit, which as far as I understand, mostly comes down to geography: they are essentially the same thing, but in America they are called biscuits, and anywhere with a British influence they are called scones. In general, I personally tend to think of scones as sweet (or served with sweet things) and biscuits as savory (or served with savory things).

 Despite the fact that scones (or biscuits, depending on who you’re talking to) are quite simple to make, this challenge actually gave me the most trouble out of any so far – probably because they *are* so simple and I already know how to make them, which somehow lead to me psyching myself out and losing my scone mojo! I made two trial batches of the challenge recipe, one that was supposed to be flakier and the other more tender and cake-like, and invited Lynette over for a scone-tasting tea party.
  Unfortunately, we were both disappointed with the scones. They were kind of tough and hard, which was surprising to me because I generally make really good scones. I think I got hung up on the instruction in the challenge recipe to handle the dough enough to develop some of the gluten, which helps the scones rise – usually I handle the dough very little and get great results! Turns out that my recipe and the challenge recipe are actually quite similar, so instead of re-inventing the wheel (or the scone, as it were), I decided to go back to *my* recipe – which I already know works best for me – and use some of Audax’s tips and techniques to come up with 1) a more flaky scone, and 2) a more tender, cakey scone. And lo-and-behold, my scone-making mojo returned. Whew! I was worried for a bit. The moral of the story? If it ain’t broke, don’t fix it. And trust your scone-making instincts! 😉
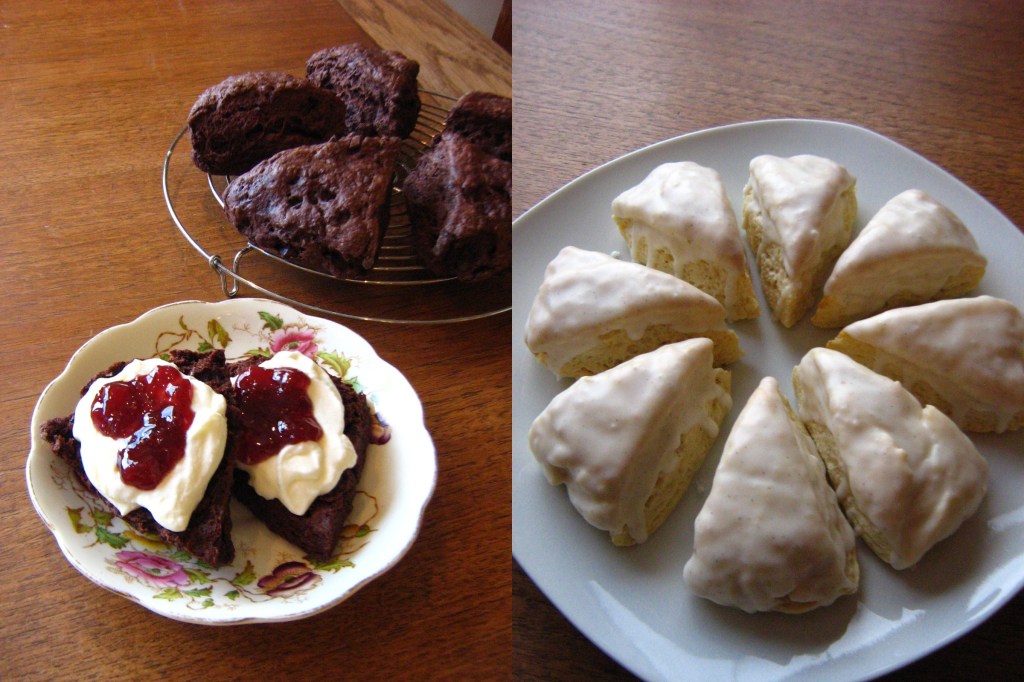
 It still took me some trial and error to get these scones just the way I wanted. I was dreaming of a deep, dark, chocolately, flaky scone, and also of a more cakey vanilla bean scone with vanilla glaze (inspired by the Pioneer Woman). I added too much liquid to my first batch of chocolate scones, so they were heavy rather than flaky. However, as soon as I bit into a scone from my second batch, I knew I had gotten it right: deep, dark, and chocolatey in taste but also light and layered in texture. The cocoa powder in the dough kept them from being quite as flaky as scones made with just flour, but they were perfect paired with some Devonshire cream (recipe to come!) and strawberry vanilla jam.
  The vanilla bean scones weren’t quite vanilla-y enough the first time around, and I made the glaze too thin to actually stay on the scones, so for my second batch, I steeped the vanilla seeds and pods in warm cream, and thickened up the glaze. The result? Subtle vanilla and tender scone perfection.
Thanks Audax for all the work you did in preparation for this challenge! Check out the Daring Kitchen for the original challenge recipe and the scone contributions this month – there are some awesome-looking variations!
Double Dark Chocolate Scones
The techniques used in this recipe – grating the butter, rubbing it into the flour, and folding the dough – can be used with any scone recipe to enhance their flakiness.
In a bowl, whisk together the dry ingredients:
3/4 cup all purpose flour
1/4 cup Dutch process cocoa powder (sifted to get rid of any lumps)
2 tbsp granulated sugar
2 tsp baking powder
pinch of salt
 With a box grater, shred:
3 tbsp cold unsalted butter
Toss the butter into the flour-cocoa mixture with a fork, then dive in there with your hands to “rub in” the butter: squeeze the butter and flour gently between your finger tips to create flat little “leaves” of butter coated in flour (this is easiest with cold, dry hands).  It should look like this:
 Stir in:
2 oz chopped dark chocolate (or chocolate chips)
 Pour in:
1/2 cup cold milk
Add the milk all at once and stir briskly with a fork – think of it as more of a folding action to incorporate the dry stuff from the bottom of the bowl with the milk. Stir just until it starts to come together in a loose dough.
 Turn the dough out onto a lightly floured surface and squeeze/knead gently once or twice to gather it together. Sprinkle it with a little flour and gently press it flat with your fingertips. Fold it in half and press flat again.
  Repeat for a total of three folds, then shape it into a circle about 2 cm thick. Cut it into six wedges with a sharp, lightly floured knife.
  Place on an ungreased cookie sheet and brush the tops lightly with milk (try not to let it drip down the sides – this will interfere with the rise).
  Bake at 425˚F for 12-14 minutes, until the bottoms sound hollow when tapped with your finger. Cool slightly on a rack, then serve warm with jam and cream.
Vanilla Bean Scones
Using a pastry cutter to cut the butter into tiny bits and a gentle kneading (4-5 times only) results in a more tender, cake-like crumb. Instead of vanilla beans, you can use vanilla extract (about 1 – 1 1/2 tsp) and skip the steeping step – but I love the look of the little black vanilla seeds (aka vanilla caviar, a fittingly decadent nickname!). These are “cream scones” because they are made with cream, but they can also be made with milk. If you don’t want to glaze them, you can brush the tops of the scones with a little extra cream before baking, to give them a nice golden finish.
Vanilla Bean Cream
This is used as the liquid in the scones, and to make the glaze. It needs to be heated and then cooled completely, so make it at least an hour ahead.
Scrape the seeds from 1 vanilla bean and mix them into 1/2 cup + 2 tbsp half and half cream. Throw the scraped pod in there too. Heat the vanilla cream up in the microwave until warm, and it steep with the vanilla for about 15-20 minutes, then refrigerate until completely cold. Remove the empty vanilla pod. Reserve 2 tbsp of the cream for the vanilla bean glaze, and use the remaining 1/2 cup in the scones.
Scones
In a bowl, combine:
1 cup all purpose flour
2 tbsp sugar
2 tsp baking powder
dash salt
Stir together with a whisk, then add:
3 tbsp cold unsalted butter, cubed
 Using a pastry cutter, cut the butter into the flour until it is in very small pieces and the mixture resembles coarse bread crumbs, like this:
 Pour in:
1/2 cup chilled vanilla bean cream
Add the cream all at once, then stir briskly with a fork, using more of a folding motion to incorporate the dry ingredients from the bottom of the bowl with the cream. Stir until it just starts to come together in a wet dough.
 Turn out the dough into a lightly floured surface and knead gently 4-5 times, until the dough comes together in a ball.
  Press it down with your fingers into a 2 cm thick round, and cut it into 8 wedges with a sharp knife.
  Place on an ungreased cookie sheet and bake at 425˚F for 12-14 minutes, until lightly browned on top and the bottom sounds hollow when tapped. Allow to cool completely on a rack, then glaze with vanilla bean glaze.
Vanilla Bean Glaze
In a small bowl, stir together:
1 cup icing sugar
1 1/2 – 2 tbsp vanilla bean cream (reserved from earlier)
You want the glaze to be fairly thick, but just runny enough so that it drips down the sides of the scones without all falling right off. Add a little more icing sugar or a few more drops of cream or milk if needed to get the desired consistency.
 Dip the tops of the scones in the glaze, then return to the rack (sitting over a plate to catch the drips) to set.
  The glaze will help keep the scones fresh, but they are best eaten on the same day they are baked.


Leave a reply to Todd M Cancel reply