 Erica of Erica’s Edibles was our host for the Daring Baker’s June challenge. Erica challenged us to be truly DARING by making homemade phyllo dough and then to use that homemade dough to make Baklava.
Did you read that? Homemade phyllo pastry… do you have any idea how thin that stuff is? It’s really really thin!!
Anyway. Baklava! I love it, but I’d never made it myself, so I was excited to give it a try. The challenge this month was in making the dough, and we could be as creative as we wanted with the baklava. I’ve had my eye on a cherry chocolate baklava recipe from Canadian Living for a long time, so I knew I wanted to try that flavour profile. I also wanted to do a more “traditional” one (based on the conversations in the Daring Bakers’ forums, there are many different traditional versions of baklava!), so I followed the suggested recipe and used walnuts, pistachios, and almonds.
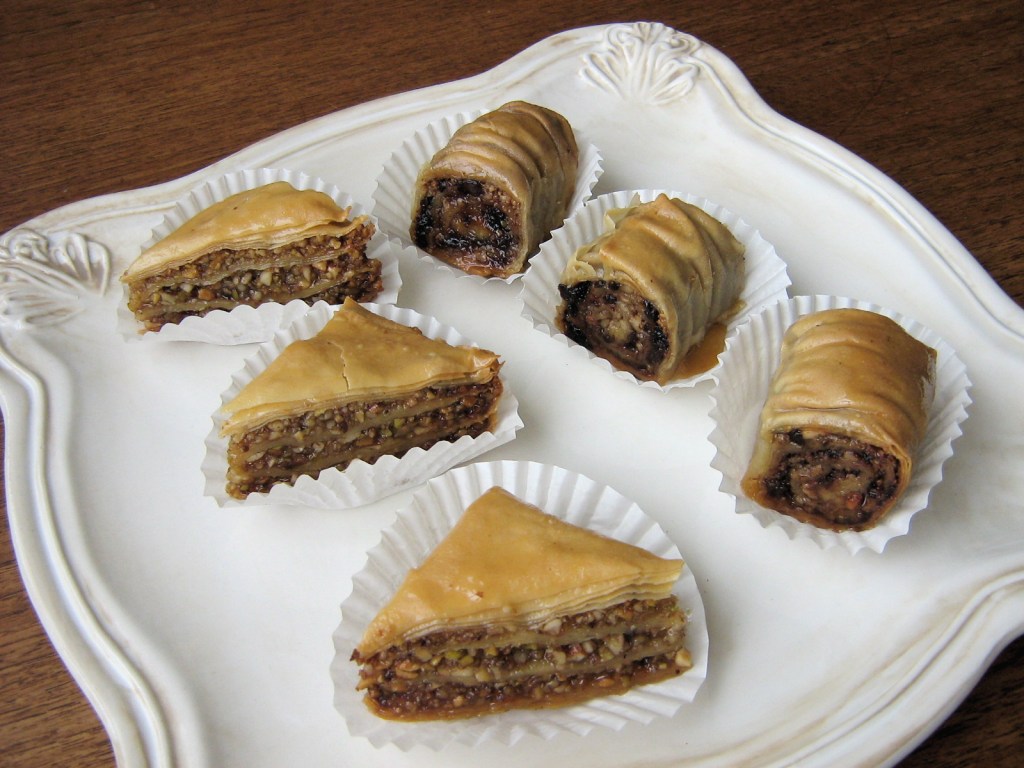
And then, of course, I had to get creative with the shape. I did the traditional flavour in the traditional stacked layers, and the cherry chocolate one in a roll. I made a 9″x5″ pan of each kind – turns out that one pan would have been plenty! And after spending 3 HOURS rolling out enough dough for two half batches, it was definitely enough!! This was a fun challenge though, and making something like homemade phyllo is exactly why I joined the Daring Bakers – but be warned: it is very time-consuming! I’m pretty strong and I’m actually quite handy with a rolling pin, so it wasn’t a question of me being wussy or too weak to roll out the dough. The rolling plus the stretching just took forever! And now my hands feel bruised and I won’t need to do any push-ups for a week…
Here are some tips on rolling the dough from my own experience and also from the Daring Bakers’ forum:
- The longer you let the dough rest before rolling, the better. At least 2 hours, probably more. I let mine rest for 2 hours, and I noticed that the dough was easier to roll towards the end (ie, 3 hours after I started) – probably a combination of longer resting time and improved rolling/stretching technique.
- Use type “00” or pizza flour – very finely milled to make stretching the dough easier. It’s possible to do it with all purpose (which is what I used), but this flour might make it faster/easier.
- Use a dowel (like a broomstick handle) to roll the dough. I used a regular rolling pin, and I wonder if the dowel would have made it faster. Other people who used a dowel instead seemed to have an easier time of it.
- To avoid holes in the phyllo dough sheets, allow the dough to rest a few times while you are rolling/stretching it. This relaxes the gluten strands and makes them more amenable to being stretched nice and thin.
- If you have a pasta roller, this would be a perfect time to use it. Your sheets will end up long and skinny, but depending on the size of your pan and the shapes you decide to make, it probably won’t make a difference – not taste-wise, anyway!
 So if you’re planning on doing this yourself, book off the whole day… (or just buy phyllo pastry from the store 😉 )
Some other baklava notes, mostly courtesy of Audax Artifex, who as usual was a veritable encyclopedia of useful information:
- Using clarified butter plus a few tablespoons of olive oil makes the baklava crispier than using regular butter, and apparently makes the baklava heat up better, which is important when adding the syrup.
- The amount of butter between the layers of phyllo will affect the texture of the finished baklava. A lighter hand with the butter will result in airier, more separated layers, whereas heavier on the butter will give you a denser, chewier texture – whichever you prefer.
- When you pour the syrup over the baked baklava, one should be hot, the other cool (I’m not sure why they can’t both be hot, but whatever). Because you can make the syrup and let it cool in the time that the baklava bakes, it makes sense to pour cooled syrup over hot baklava. This meeting of hot pastry and cool syrup allows the baklava to absorb the syrup better than if it were all at room temperature, and it makes a fun crackling noise.
- The syrup needs several hours to absorb into the pastry – overnight is good. Baklava for breakfast? Yes please!

 OK, enough details. Here’s the recipes!
Baklava with Homemade Phyllo Pastry
Note: These recipes are scaled to make one 9″x5″ pan of baklava, yielding 16-18 small pieces (for a 9″ square pan, double all the recipes). I made double batches of dough and syrup, and one batch of each filling variation to make two 9″x5″ pans of baklava.
Homemade Phyllo Dough
Adapted from “Kaffeehaus – Exquisite Desserts from the Classic Cafés of Vienna, Budapest and Prague” by Rick Rodgers. This dough can also be used to make strudel, which the Daring Bakers did here. Makes 18 approximately 10″x6″ sheets (I doubled the recipe to yield 18 sheets twice as large, hence the larger amount of dough in all the photos).
In the bowl of an electric mixer, combine:
1 1/3 cup flour (type “00” or pizza flour, if possible – all purpose flour will do, though)
1/8 tsp salt
Mix together with the paddle attachment on low speed.
In a small bowl, combine:
1/2 cup less 1 tbsp water
2 tbsp vegetable oil
1/2 tsp cider vinegar
Pour the water mixture slowly into the flour, still mixing on low speed.
 Continue stirring until it comes together in a soft dough with no dry flour bits left. You may need slightly less water, or slightly more (I had about 1 tbsp of water left over) – just add it slowly, bit by bit, to gauge how much you’ll need.
 Swap the paddle attachment for the dough hook and knead the dough on medium speed for about 10 minutes (if you’re doing this by hand, about 20 minutes), until you have a soft, silky, smooth dough.
 Remove it from the mixer and knead by hand on a floured surface for about 2 minutes, whacking the dough down hard on the counter a few times during kneading.
 Rub the dough with vegetable oil, wrap it in plastic, and let it rest for at least 2 hours – longer is better.
Rolling and Stretching the Dough:
Divide the ball of dough in half, cut each half into thirds, and each third into thirds again, to end up with 18 pieces. Roll each piece into a ball and place them on a plate, covered with plastic wrap.
 Flatten a ball out with your fingers and place on a well-floured surface. Roll out with a floured rolling pin or dowel until it’s about 9″x5″ (mine was twice as large), picking up the dough and re-flouring the surface underneath it every few strokes. Don’t be afraid of adding too much flour – keeping everything properly floured will make it much easier to roll, because if stuff starts to stick you’re in trouble! Let the dough rest for a minute or two if it starts getting difficult to roll out.
 When the dough sheet is as thin as you can roll it, gently lift it and stretch it with your fingers from underneath. Do this very s-l-o-w-l-y and gently, using more of a stroking motion than a pulling motion, and letting the dough rest every so often. Don’t worry if you get some rips and holes – you only really need one perfect sheet for the top layer of your baklava (it took me until sheet number 14 to get a perfect one, and only about two out of 18 had no holes!).
 When the dough is stretched thin enough to read through, place it on a floured baking sheet, and lightly sprinkle flour between each sheet to stop them from sticking together. The original recipe says that the sheets won’t dry out, but it took me forever to roll them out so I covered them lightly in plastic, just in case.
Walnut, Pistachio, and Almond Baklava Filling
Loosely based on Alton Brown’s recipe
Process in a food processor until finely chopped but not powdered:
1/2 cup walnuts
1/2 cup shelled pistachios
1/2 cup almonds
(Process each kind of nut separately to keep the walnuts from being pulverized before the almonds and pistachios are chopped.)
Combine the nuts with:
1/4 cup sugar
1 tsp cinnamon
pinch of allspice

Cherry Chocolate Baklava Filling
Loosely based on Cherry Chocolate Baklava from “The Complete Canadian Living Cookbook” by Elizabeth Baird and the Canadian Living Test Kitchen
Process in a food processor until finely chopped but not powdered:
1/2 cup almonds
1/2 cup pecans
(Process each kind of nut separately to keep the pecans from being pulverized before the almonds are chopped.)
Combine the nuts with:
1/4 cup dried cherries, finely chopped (not in the food processor, or you’ll end up with a gummy mess)
2 oz semi-sweet chocolate, finely chopped
1/4 cup sugar
1 tsp cinnamon

Spiced Honey Syrup
Makes enough for a 9″x5″ pan of baklava
In a medium-sized pan, combine:
1/2 cup sugar
1/2 cup honey
1/2 cup water
2 whole cloves (or a pinch of ground cloves)
1 cinnamon stick
2-3 inch strip of lemon rind (or orange)
1 tbsp lemon juice (or orange)
Bring to a boil over medium high heat, stirring to dissolve the sugar. Boil for 10 minutes, then remove from the heat and allow to cool. Remove the spices and lemon rind. (Best to make the syrup while the baklava is baking.)

To Assemble:
Note: if using store-bought phyllo, which is thinner than homemade, use a few extra sheets to make more layers.
Traditional Stacked, Layered Baklava
18 sheets of phyllo pastry
Filling of your choice
Clarified butter (start with about 1/2 cup butter and clarify it, following this tutorial) mixed with 1 tbsp olive oil
9″x5″ baking pan
Cut the phyllo sheets to fit the bottom of the pan – do this a few sheets at a time with a very sharp knife so that the edges of the phyllo don’t stick together. Reserve one perfect sheet for the top layer of the baklava.
Lightly butter the bottom of the pan. Place a sheet of phyllo in the pan and butter (lightly for a flakier baklava, heavily for a denser baklava). Repeat with four more sheets, until you have five layers.
 Sprinkle with 1/3 of the filling.
 Layer and butter four more phyllo sheets in the pan, cover with 1/3 of filling, layer/butter four more phyllo sheets, cover with last 1/3 of filling, and layer/butter the five remaining phyllo sheets, using a perfect phyllo sheet for the top layer. With the dull edge of a knife, tuck in the edges of the phyllo where they touch the sides of the pan.
With a very sharp knife, cut the baklava into pieces (squares, triangles, diamonds…). Brush the top with butter and bake (see baking instructions below).

Baklava Rolls
18 sheets of phyllo pastry
Filling of your choice
Clarified butter (start with 1/2 cup butter and clarify it, following this tutorial) mixed with 1 tbsp olive oil
9″x5″ baking pan
Cut the phyllo sheets so that the short edge is a few inches wider than the pan – do this a couple sheets at a time with a very sharp knife so that the edges of the phyllo don’t stick together. Don’t worry about saving a perfect sheet for the top – the outside of the rolls will be crinkly and any holes or tears in the phyllo won’t show.
Butter (lightly for a flakier baklava, heavily for a denser baklava) and layer two or three phyllo sheets, then sprinkle with about 2 tbsp of filling, leaving one inch of bare pastry at each end.
 Place a chopstick (or wooden spoon handle, dowel, knitting needle*…) at one end of the phyllo and begin to roll it up loosely, lightly buttering the outside of the roll as you go.

 Scrunch the roll, accordion style, with your fingers, and then slide it off the chopstick/whatever into the (lightly buttered) pan.

 With a very sharp knife, cut the rolls into short lengths, brush the top with butter, and bake (see baking instructions below).
 * The diameter of your rolling implement will affect the final texture of your baklava roll. For a denser roll, use something with a small diameter, like a chopstick. For a less dense, flakier roll, use something with a larger diameter, like a wooden spoon handle or broom handle. See this video for a demo of making baklava rolls.

To Bake:
Baking instructions courtesy of Audax Artifex
Bake the baklava for 90 minutes, as follows:
30 minutes at 390˚F
30 minutes at 300˚F
30 minutes at 210˚F
After the first 30 minutes, re-cut the baklava following the cuts you already made. Rotate the pan a few times throughout baking. After 90 minutes, raise the temperature back up to 390˚F to make the baklava sizzling hot and brown the top, as needed.
While the baklava bakes, prepare the syrup and allow it to cool (it’s OK if it’s still a bit warm). When the hot baklava comes out of the oven, immediately pour the cool syrup over it, concentrating on getting it in the cuts in the baklava. It should make a crackling sound when the syrup hits the baklava. For the traditional stacked, layered baklava, you may not need all of the syrup – stop pouring if the syrup comes above the top layer of phyllo.
 Let the baklava cool to room temperature, then cover it lightly and leave it for several hours or overnight to soak up the syrup. Store the baklava at room temperature in an airtight container for up to two weeks. Putting each piece in a cupcake liner makes it a little less messy.
 If you want, drizzle melted chocolate on top of the cherry chocolate baklava – I was losing patience and ready to eat it, so I skipped this step 😉
The Verdict:
Well, I had four pieces for breakfast the next morning, so I’m gonna say it’s pretty good! 😉 The walnut/almond/pistachio baklava is delicious and better than the baklava I’ve had at Greek restaurants, and the tartness of the cherries and bitterness of the chocolate contrasts well with the sweet syrup in the cherry chocolate baklava. The phyllo dough is surprisingly light and crispy, and the texture of the baklava is really good – it doesn’t shatter into a million little crumbs, but it’s nice and crunchy and flaky. The rolls are slightly denser than the layered baklava, I think because I was a little heavier-handed with the butter, and also I was squishing them into the pan. I will definitely make baklava again with store-bought phyllo, and if I had a pasta maker, I’d give the homemade phyllo another shot… it might be a while before I venture into rolling it out by hand again!!


 Thanks Erica for this great challenge – I wouldn’t have otherwise thought it possible to make phyllo dough at home!
For the details of the June 2011 Daring Bakers’ challenge, click here.


Leave a reply to Valerie Cancel reply