Korena in the Kitchen

  • Home
  • Recipes
  • About
  • Contact
You are here: Home / Archives for yeast

Decorated Challah

January 30, 2013 By Korena in the Kitchen 18 Comments

decorated challah
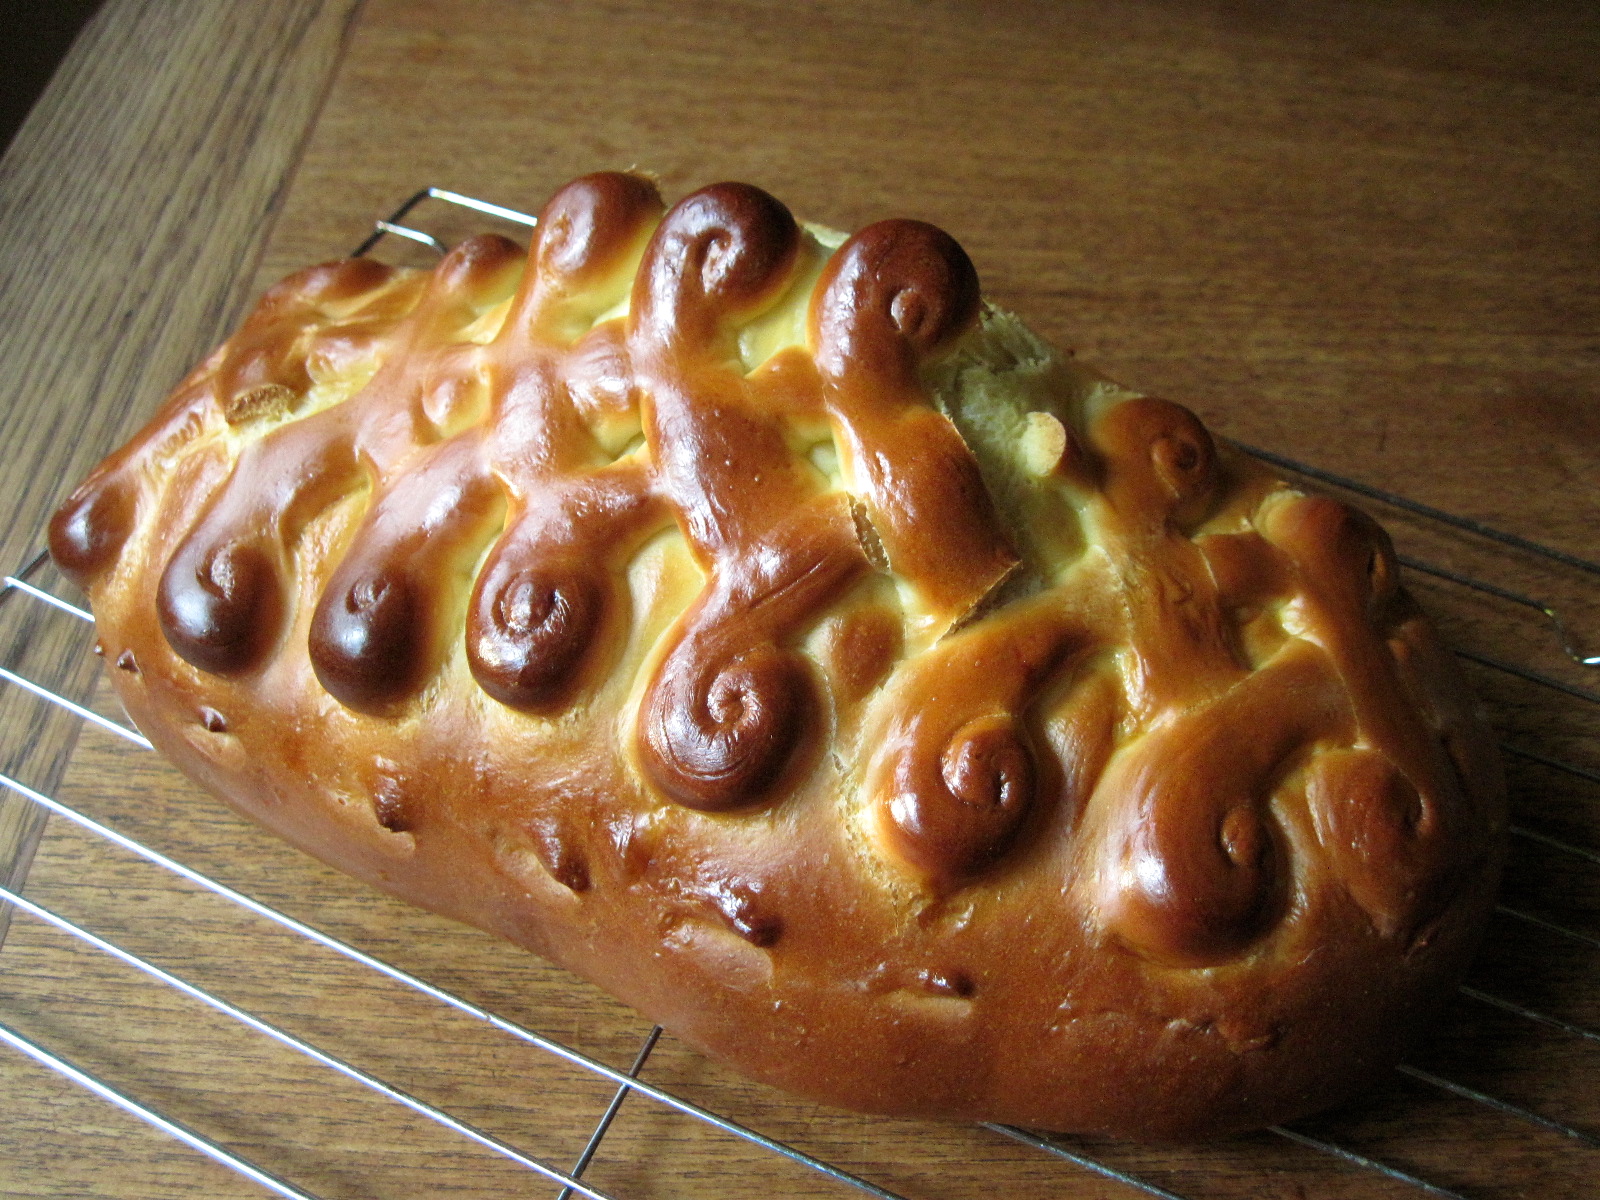
I always forget about Bread Baking Day, but this month it is being hosted by Jenni of the Gingered Whisk, so I made the effort to participate. The theme Jenni chose this month is bread with a decorated crust. I’ve been inspired by the gorgeous loaves of bread on this blog for a long time so this was the perfect opportunity to give it a try.

…

Read More »

Filed Under: Bread, Recipes Tagged With: baking, Bread Baking Day #56, challah, decorated bread, tutorial, yeast

Daring Bakers: Challah Back Y’all!

May 27, 2012 By Korena in the Kitchen 77 Comments

May’s Daring Bakers’ Challenge was pretty twisted – Ruth from The Crafts of Mommyhood challenged us to make challah! Using recipes from all over, and tips from “A Taste of Challah,” by Tamar Ansh, she encouraged us to bake beautifully braided breads.

After this challenge, I can’t say “challah” without thinking “holla!”. I had so much fun with this one!

I made three different kinds of challah: plain honey white challah, whole wheat challah filled with apples, cinnamon, and maple syrup, and sourdough challah. Even more fun than all the different varieties were the different braiding techniques that Ruth, our host, encouraged us to try. I went for a six-strand braid, a five-strand braid, and a four-strand braided round. If you’ve never shaped bread like this before, challah is a great way to start: the dough was really easy to work with and good for braiding….

Read More »

Filed Under: Bread, Daring Bakers / Daring Kitchen Challenges, Recipes Tagged With: 4-strand braided round, 5-strand braid, 6-strand braid, baking, bread, challah, Daring Bakers, filled challah, fruit, grains, honey white challah, recipe, sourdough challah, whole wheat challah, yeast

Chocolate Hot Cross Buns

April 7, 2012 By Korena in the Kitchen 7 Comments

Once again, the start of spring and the approach of Easter mean that it’s hot cross bun season. I had pretty good success last year making hot cross buns, so I gave them another try – but this time I added chocolate, because almost anything is better when you add chocolate. Prior to this, I had never actually had a chocolate hot cross bun, but I have seen them in bakeries and heard wonderful things about them (apparently they are very popular in Australia). There doesn’t seem to be a huge amount of recipes available on the internet, so I decided to come up with my own. I added cocoa powder and chocolate chips (plus dried cherries and apricots) to my existing hot cross bun recipe, along with a healthy dose of cinnamon and cardamom, with which I have recently become enamoured and which happens to go very well with chocolate. And for the cross on top, white chocolate….

Read More »

Filed Under: Chocolate, Other Baked Goods & Sweets, Recipes Tagged With: baking, cardamom, chocolate, chocolate hot cross buns, cinnamon, Easter, hot cross buns, recipe, yeast

Variation on a Theme

January 24, 2012 By Korena in the Kitchen 1 Comment

We live near a Cobs Bread bakery, and before I started baking my own bread, we were in there at least once a week to buy fresh bread. One of our favorites was the cranberry sourdough loaf: slightly tangy bread studded with tart, sweet cranberries, wonderful for a sandwich or toast with cheese or butter and jam. I figured this was something I could recreate myself at home using the no-knead crusty artisan bread dough from Artisan Bread in 5 Minutes a Day, which develops a slight sourdough flavour from being stored in the fridge (I’ve been experimenting with using my sourdough starter in the dough, which I will most definitely share when I have it figured out!).

Really, it’s so easy that I’m almost embarrassed – you simply roll out the dough, sprinkle it with dried cranberries, and roll it up again – but it’s so good and would be tweaked to suit any kind of addition to the bread, savory or sweet. I can imagine a beautiful olive or cheese loaf, or rosemary and roasted garlic, or sundried tomato and parmesan, or cinnamon raisin, or chocolate and orange zest, or…

I actually like this version of cranberry sourdough even better than the Cobs bread. It’s chewier and crustier, and you can add as many cranberries as your little heart desires, plus the feeling of accomplishment that comes from baking a loaf of bread makes it a hundred times more delicious. Try it and see!

Crusty Cranberry Bread

Before making this bread, familiarize yourself with the method in this post: Crusty No-Knead Bread… in 5 Minutes a Day! Technique inspired by this post.

First of all, stir yourself up a batch of no-knead crusty artisan bread dough and let it sit overnight or longer in the fridge to develop some sourdough-ish flavour. When you are ready to bake, cut off a 1 – 1 1/3 lb piece of dough (I used 1 1/3-ish lbs), sprinkle it gently with flour, and form it into a ball with your hands by pulling down the top and sides and pinching them underneath. This should only take a few seconds. Place the dough ball on a lightly floured surface and press it into a rectangle with your fingers (don’t knead it!). You want to use just enough flour to keep the dough from sticking to your work surface, but not any more than is necessary, otherwise the dough will be too dry. Use a lightly floured rolling pin to roll it into a rectangle about 1 cm thick (the dimensions don’t matter). Sprinkle the dough with a few handfuls of chopped dried cranberries, covering the dough evenly right to the edges, then roll it up tightly from one short end. Pick the roll up in your hands and tuck the ends under. Using the same technique you used earlier to form the lump of plain dough into a ball, gently pull the top and sides of the cranberry’d dough and tuck them underneath to form a smooth ball. Sprinkle sparingly with a little bit of flour if it sticks to your hands too much, and don’t worry if a few cranberries burst through. Place the dough on a square of parchment paper and let it rest, uncovered, for 40-90 minutes for a 1 lb loaf, and up to 2 hours for a 1 1/3 lb loaf. You will know it has rested enough if it jiggles slightly when you tug on the parchment paper. With 20 minutes to left in the rest period, prepare the oven by placing a pizza stone on the center rack and a roasting pan on a lower rack. Preheat the oven to 450˚F. When the dough is fully rested and the oven is hot, sprinkle the dough lightly with flour and slash it 1/4″ deep with a serrated knife. Place the dough and parchment paper on the preheated pizza stone, then pour a mug of hot tap water into the roasting pan. The steam will make the crust shiny and crisp. Bake for 30-55 minutes (depending on the size of your loaf), until dark brown and crusty. Cool completely on a rack before slicing.


Filed Under: Bread, Recipes Tagged With: artisan bread, Artisan Bread in 5 Minutes a Day, baking, bread, cranberries, recipe, yeast

Crusty No-Knead Bread… in 5 Minutes a Day!

January 6, 2012 By Korena in the Kitchen 37 Comments

I bought the book Artisan Bread in 5 Minutes a Day a few years ago after seeing a post on Steamy Kitchen about the caramel pecan cinnamon rolls that come from the book. I made the rolls and immediately knew I had to have the book, they were so good. The premise of the recipes in the book is to stir up a batch of very wet (high hydration) dough which you store in the fridge and then pull off a chunk to bake as desired. The wet dough plus the long rising and fermentation time develops the gluten in the dough without the need for kneading (heh!) and results in a delicious bread with a chewy crust and airy interior (which I’m still working to perfect) that literally only takes about five minutes of active time – the rest is just… rest. I have been making this bread exclusively for about two and a half months now, and we have not bought any bread in that time – just a lot of flour!

Artisan Bread in 5 Minutes a Day gives recipes for dozens of different bread doughs, ranging from peasant breads to multigrain breads to flatbreads and pizzas to breads enriched with butter, honey and eggs (such as challah and brioche, great for making caramel pecan rolls!), all of which can be varied with different flavours and additions (herbs, spices, dried fruit, cheese, olives, etc) to create pretty much whatever you can dream up. This recipe is for the basic Master Dough, which is a lean dough (just flour, water, yeast and salt) that can be baked into boules (as shown), baguettes, couronnes (like a giant bagel), or even used as pizza crust. It makes great sandwiches when it is fresh, and wonderful toast when it is a day or so old. One batch of dough makes enough for four small one pound loaves, which each last me and Nate about two days.

Bread often gets put in the black books of healthy eating, but not all bread is created equal. Floppy white grocery store bread that travels to the store in a bag and lasts two weeks without getting stale or mouldy is totally inferior to crusty, fresh-baked, open-crumbed artisan bread – not just aesthetically but also as a food source. I recently learned that the longer it takes for bread to rise and ferment, the better it is for you. This is because the yeasts and bacteria in the bread actually break down and partially digest the carbs and sugars, and the longer they have to do this, the easier the bread is to digest. This is especially true if the bread contains whole grains, which become more nutritionally available to your body with a long fermentation time (otherwise they’re just fiber). Artisan bread, with its long production time (usually several hours, and sometimes days!), is therefore easier to digest and more nutritious than bagged grocery store bread, which is made so expediently that the yeast doesn’t have time to break anything down, and is also pumped so full of additives and preservatives that it can’t break down, period.

Another thing I learned is that the crust plays an important role. A chewy, crunchy bread crust forces you to actually chew your food (mechanical digestion), and also stimulates saliva, which starts breaking down the nutrients (chemical digestion), making the job of your stomach much easier – again, being hard to digest is one reason many people avoid bread. Soft, floppy, crustless bread that you don’t even have to chew is definitely going to sit in your stomach and make you feel ill, so don’t even bother with it: go straight for the crusty, delicious artisan bread and do your stomach and your taste buds a favour!

(I apologize for spending the last two paragraphs talking about digestion – I know it’s not the most appetizing thing to read about on a food blog, but I thought it was cool, so… yeah ;). )

Anyway, here is the recipe. Definitely try it, and also check out the Artisan Bread in 5 Minutes a Day website, where the book’s authors post all kinds of awesome tips, tricks, videos, and additional recipes for their breads :).

No-Knead Crusty Artisan Bread

This is my adapted version of the Master Recipe from Artisan Bread in 5 Minutes a Day. I use a reduced amount of salt, a mixture of all purpose and whole wheat flours, and have increased the amount of water to get the moisture level right (see notes below). I also bake the dough on parchment paper, rather than using a pizza peel to transfer the loaf to and from the pizza stone in the oven. You will need a large bowl or container (4-6 quarts in size) with a lid in which to mix and store the dough, and preferably a pizza stone (aka a baking stone) on which to bake the bread (but there are other ways to bake it too – see notes below). The dough can be stored for up to 2 weeks in the fridge – the longer it is stored, the more of a sourdough flavour it gets. Makes about 4 lbs of dough – enough for 4 x 1 lb loaves.

In a large (4-6 quart) bowl or container with a lid, mix together:

3 1/3 cups warm water (this is the amount that works for me with higher protein Canadian all-purpose flour – your experience may vary)

1 tbsp coarse sea salt

1 1/2 tbsp granulated yeast – instant, regular, whatever

Don’t worry if it doesn’t all dissolve nicely.

In a slightly smaller bowl, combine:

5 1/2 cups unbleached all-purpose flour (unbleached is important!)

1 cup whole wheat flour

(or 6 1/2 cups unbleached all-purpose flour only)

Measure the flour by “scooping and sweeping”, like so:

Dump the flour into the water mixture and stir it briskly until it is evenly moistened. You can get in there with your hands if you need to – just resist the urge to knead! The resulting dough should be very wet and sticky. Put the lid on the bowl/container – you don’t want an air-tight seal, but you do want the dough covered completely so it doesn’t dry out (I usually put a jar of peanut butter on top of the bowl to keep the lid down!). Leave the dough to rise at room temperature for 2 hours or until the top starts to flatten out and deflate a little bit, after which it will look something like this: All those bubbles are going to make your bread lovely and airy, so don’t squish it down, whatever you do. Place the covered container in the fridge and refrigerate for at least a few hours – the dough can be baked with after the first 2 hour rise but is much easier to handle after being chilled. Store in the fridge up to 2 weeks.

When you are ready to bake bread, take the dough out of the fridge and sprinkle a small part of the surface with flour so it doesn’t stick to your hands (you will notice that the dough has sunk quite a bit – this is fine because as long as you don’t press it down, all the bubbles are still intact!). Grab the floured dough and pull out about 1 lb of dough (the size of a grapefruit). I use scissors to cut off the chunk of dough. Try not to squash the dough too much, and don’t knead it! Pick it up in your hands, dust it with a little bit more flour and quickly shape it into a ball (or “boule”) by gently pulling the top of the dough and tucking it underneath. Try to do this by handling it as little as possible (this takes some practice) – it should take about 5 seconds tops. Place the ball of dough, tucked ends down, into a piece of parchment paper. Let it rest, uncovered, at room temperature for 40-90 minutes. With about 20 minutes left in the rest period, prepare the oven. Place a pizza stone on a central shelf, and on any other shelf that won’t interfere with the rising bread (below is good!), place a metal roasting pan. Heat the oven to 450˚F and let it preheat for at least 20 minutes (your pizza stone may take longer to heat up completely).When the oven is preheated and the dough is fully rested, dust the shaped boule with flour and slash it about 1/4″ deep with a serrated knife – this allows the bread to expand in the oven in a predictable fashion, rather than splitting open randomly. Depending on the age of the stored dough, at the end of the rest period it may not have changed much in size or shape (fresher dough) or it may have flattened out (older dough), but it should jiggle if you tug on the parchment paper. Place the dough and parchment paper on the preheated pizza stone, then pour a mug full of hot tap water into the roasting pan, and shut the door quickly to trap the steam. The steam helps make the crust crisp and brown. Bake for 30-45 minutes, until the bread is a very deep brown. You will notice that it has expanded quite a bit – this is called oven spring. Let the bread cool completely on a rack before slicing it. This bread only lasts 2-3 days in our house, so we keep it uncovered on the counter, sitting cut-side down on a cutting board. This way the crust stays crisp and the cut end doesn’t get stale.

Some notes:

Feel free to make a 1 1/2 – 2 lb loaf – just let it rest and bake longer.

The original recipe was developed using American flour, but Canadian flour is higher in protein (about 12% versus 8-9%) and therefore absorbs more water, so I use 1/3 cup more water than the original recipe calls for. It may take a few tries to play around with the amount of water that works for you – see this post for more information.

If you under-bake the bread, the crust will lose its crispness as it cools. It should be quite dark brown and caramelized-looking when it comes out of the oven. The crust will also lose its crispness if you cut into it while it’s still warm.

The more large air holes inside the bread (an “airy crumb”), the better. This can be achieved with a wetter dough to start with or a longer resting time. One tip is to shape the dough in the morning, then cover it lightly with plastic and let it rest all day in the fridge, then bake it in the evening. This ensures a good long rest and lots of air hole formation. See this post for more tips.

If you don’t have a pizza stone, you can bake this bread in a Dutch oven, which works really well. I’ve also just used a regular baking sheet and the bread came out fine, but a pizza stone gives it a better crust. My pizza stone is handmade of terracotta and was a Christmas present from my parents. I love it!

Filed Under: Bread, Recipes Tagged With: artisan bread, Artisan Bread in 5 Minutes a Day, baking, no-knead bread, recipe, yeast

Daring Bakers: Povitica

October 27, 2011 By Korena in the Kitchen 30 Comments

The Daring Baker’s October 2011 challenge was Povitica, hosted by Jenni of The Gingered Whisk. Povitica is a traditional Eastern European Dessert Bread that is as lovely to look at as it is to eat!

My first thought when I saw this month’s challenge was, “What the hell is povitica?”. When I found out that it was a walnut-filled bread, I have to admit that I was not super excited about it – we had just done croissants last month, and I was hankering for something drenched in chocolate. However, once I started seeing some of the beautiful loaves showing up on the Daring Baker’s members’ forum and reading all the various iterations of, “OH MY GOD THIS IS SO GOOD!!!”, I decided to pull up my socks like a big girl and get over my attitude problem. And I’m really glad I did, because this is a beautiful, delicious bread!…

Read More »

Filed Under: Bread, Daring Bakers / Daring Kitchen Challenges, Other Baked Goods & Sweets, Recipes Tagged With: baking, bread, Daring Bakers, enriched dough, potica, povitica, recipe, walnut, yeast

Daring Bakers: Homemade Croissants!

September 27, 2011 By Korena in the Kitchen 32 Comments

The Daring Bakers go retro this month!  Thanks to one of our very talented non-blogging members, Sarah, the Daring Bakers were challenged to make Croissants using a recipe from the Queen of French Cooking, none other than Julia Child!

I have been wanting to try making croissants for a long time, so this was the perfect challenge! It became immediately apparent, however, that croissants can be very finicky. To make then, you encase butter in dough and then roll it out and fold it and let it rest and roll it out and fold it and let it rest and repeat several more times, all the while making sure that the butter in the dough doesn’t get too soft and melt or get too hard and shatter and that you keep it evenly layered, so that in the end you hopefully end up with beautiful, flaky, light crescents of buttery, airy, honeycomb-textured pastry. No wonder croissants are considered daunting by many home bakers!…

Read More »

Filed Under: Bread, Daring Bakers / Daring Kitchen Challenges, Other Baked Goods & Sweets, Recipes Tagged With: baking, croissants, Daring Bakers, dough, food, recipe, yeast

Breakfast Pizza

February 20, 2011 By Korena in the Kitchen 3 Comments

Quite a while ago I stumbled across a recipe for a breakfast pizza topped with bacon, eggs, and cheese. Of course I can’t remember where I originally saw it, but I filed it away in my brain for later. I’ve been craving pizza lately, and as Nate and I went out for breakfast yesterday, I figured I would make something at home this morning, and breakfast pizza fit the bill.

The pizza dough recipe comes from my trusted friend Martha’s Everyday Food magazine. I mixed it up the night before and let it rise overnight in the fridge, rather than delaying breakfast by waiting for it to rise in the morning. Originally it was for grilled barbequed pizza, but I’ve figured out how to bake it very successfully in the oven. The trick is high heat (500˚ F) and baking the pizza on parchment paper rather than on a baking sheet (I’m sure a pizza stone would also work, but I don’t have one). As this makes a thin crust pizza, it’s best not to overload it with toppings – I adhere to the same principle of less is more for pizza as I do for burritos 😉

This recipe makes two 10-inch oval pizzas topped with two eggs each, enough for two pretty generous servings. If you are not so hungry, you could shape the dough into a slightly smaller circle (8 or 9 inches in diameter) and use only one egg in the centre of each pizza. The variations are pretty infinite: you could divide the dough into 3 or 4 pieces and make small little pizzas (5-6 inches in diameter, 1 egg each) to serve alongside fruit or hashbrowns or something, or you could make one giant pizza and top it with 4 or more eggs to feed a crowd (if you are going to double the recipe, I would still recommend making two pizzas, as it might start getting out of control size-wise). If you are in the habit of having guests for breakfast or feeding a large number of family members, this would be a good recipe to try because it’s ready all at once (unlike pancakes or waffles or omelettes which cook one or two at a time) and can be eaten with your hands….

Read More »

Filed Under: Breakfast & Brunch, Recipes Tagged With: bacon, breakfast, eggs, food, pizza, pizza dough, recipe, spinach, yeast

Pizza Dough

February 20, 2011 By Korena in the Kitchen Leave a Comment

This recipe was posted to go along with the Breakfast Pizza, but obviously it can be used as a base for any kind of pizza!

Pizza Dough

Originally this dough was for grilled barbequed pizza, but I’ve modified it to bake in the oven. This version is half of the original recipe, so feel free to double it (FYI, 1 cup + 2 tbsp doubled is 2 1/4 cups). Makes 1/2 lb of dough, enough for tw0 8 to 10-inch pizzas. Adapted from Everyday Food magazine, July/August 2010, Issue 74, page 96. Original recipe available here.

1/2 cup warm tap water

1/2 tsp honey

1 1/8 tsp instant dry yeast

1 tsp olive oil

1/2 tsp coarse salt

1 cup + 2 tbsp bread flour or all purpose flour (I usually sub in 1/2 cup whole wheat flour)

Pour warm tap water into a medium bowl (water should be quite warm – almost bath water warm). Stir in the honey and sprinkle with yeast. Let sit for 5 minutes, until foamy (my yeast usually ends up looking more sludgey than foamy, but it still works fine!).

Whisk olive oil and salt into the yeast mixture. Add flour and mix with a wooden spoon until it comes together in a ball. Turn out onto a lightly floured surface and knead a few times until it comes together in an elastic ball. Transfer to an oiled medium bowl, cover with plastic wrap, and let rise in a warm place for 45 minutes, or until doubled in size. Punch down, cover, and let rise another 30 minutes while you prepare the pizza toppings. (Alternatively, let rise overnight in the refrigerator, remove from the fridge, punch down, then allow to sit at room temperature for about 30 minutes before proceeding.)

Turn out the dough onto a lightly floured surface and divide into 2 equal pieces. Let rest for a few minutes before using.

Stretch and roll dough to desired shape, add toppings, and bake on parchment paper in a preheated 500˚ F oven for about 10 minutes, until bottom of dough is golden brown.

Filed Under: Bread, Recipes Tagged With: cooking, dough, food, pizza, pizza dough, recipe, yeast

  • « Previous Page
  • 1
  • 2
  • 3
  • 4

Welcome to my kitchen!

I'm Korena: cook, baker, dirty-dishes-maker. My favourite things include flour, butter, sugar, and chocolate. Read More…

  • Bloglovin
  • Email
  • Facebook
  • Instagram
  • Pinterest
  • RSS

Subscribe by Email!

Top Posts

Greek Kataifi
Daring Bakers: Ukrainian Easter Paska
Daring Bakers: Asian Coconut Custard Buns
Daring Bakers: Sfogliatelle Ricci and Lobster Tail Pastries
Cream Cheese Swiss Meringue Buttercream Frosting, Take 2: Success!
10 Years! {Nigella Lawson's Coffee and Walnut Layer Cake}

Search

Categories

Archives

Blogs I Like

  • 101 Cookbooks
  • Baking with Sibella
  • Bitter Baker
  • Bread and Companatico
  • Chocolate & Zucchini
  • Chocolate & Zucchini
  • De La Casa
  • Dinner With Julie
  • Dinner: A Love Story
  • Food in Jars
  • FrugalFeeding
  • Homesick Texan
  • Joy the Baker
  • Poires au Chocolat
  • Rufus' Food and Spirits Guide
  • Simple Bites
  • Simply Recipes
  • smitten kitchen
  • Steamy Kitchen
  • Tartelette
  • Tea & Cookies
  • The Pioneer Woman Cooks
  • The Wednesday Chef
  • Venison for Dinner
  • Bloglovin
  • Email
  • Facebook
  • Instagram
  • Pinterest
  • RSS

Subscribe by Email!

Search

Home | Recipes About | Contact |

All content © Korena Vezerian and Korena in the Kitchen, 2011 – 2021. Please contact me before duplicating any content, including pictures. Excerpts and links may be used, provided that full and clear credit is given to Korena Vezerian and Korena in the Kitchen with appropriate and specific direction to the original content.

Copyright © 2025 · Foodie Pro Theme On Genesis Framework · WordPress · Log in


Loading Comments...