Korena in the Kitchen

  • Home
  • Recipes
  • About
  • Contact
You are here: Home / Archives for no-knead bread

Whole Grain Levain for Bread Baking Day #54

November 30, 2012 By Korena in the Kitchen 9 Comments

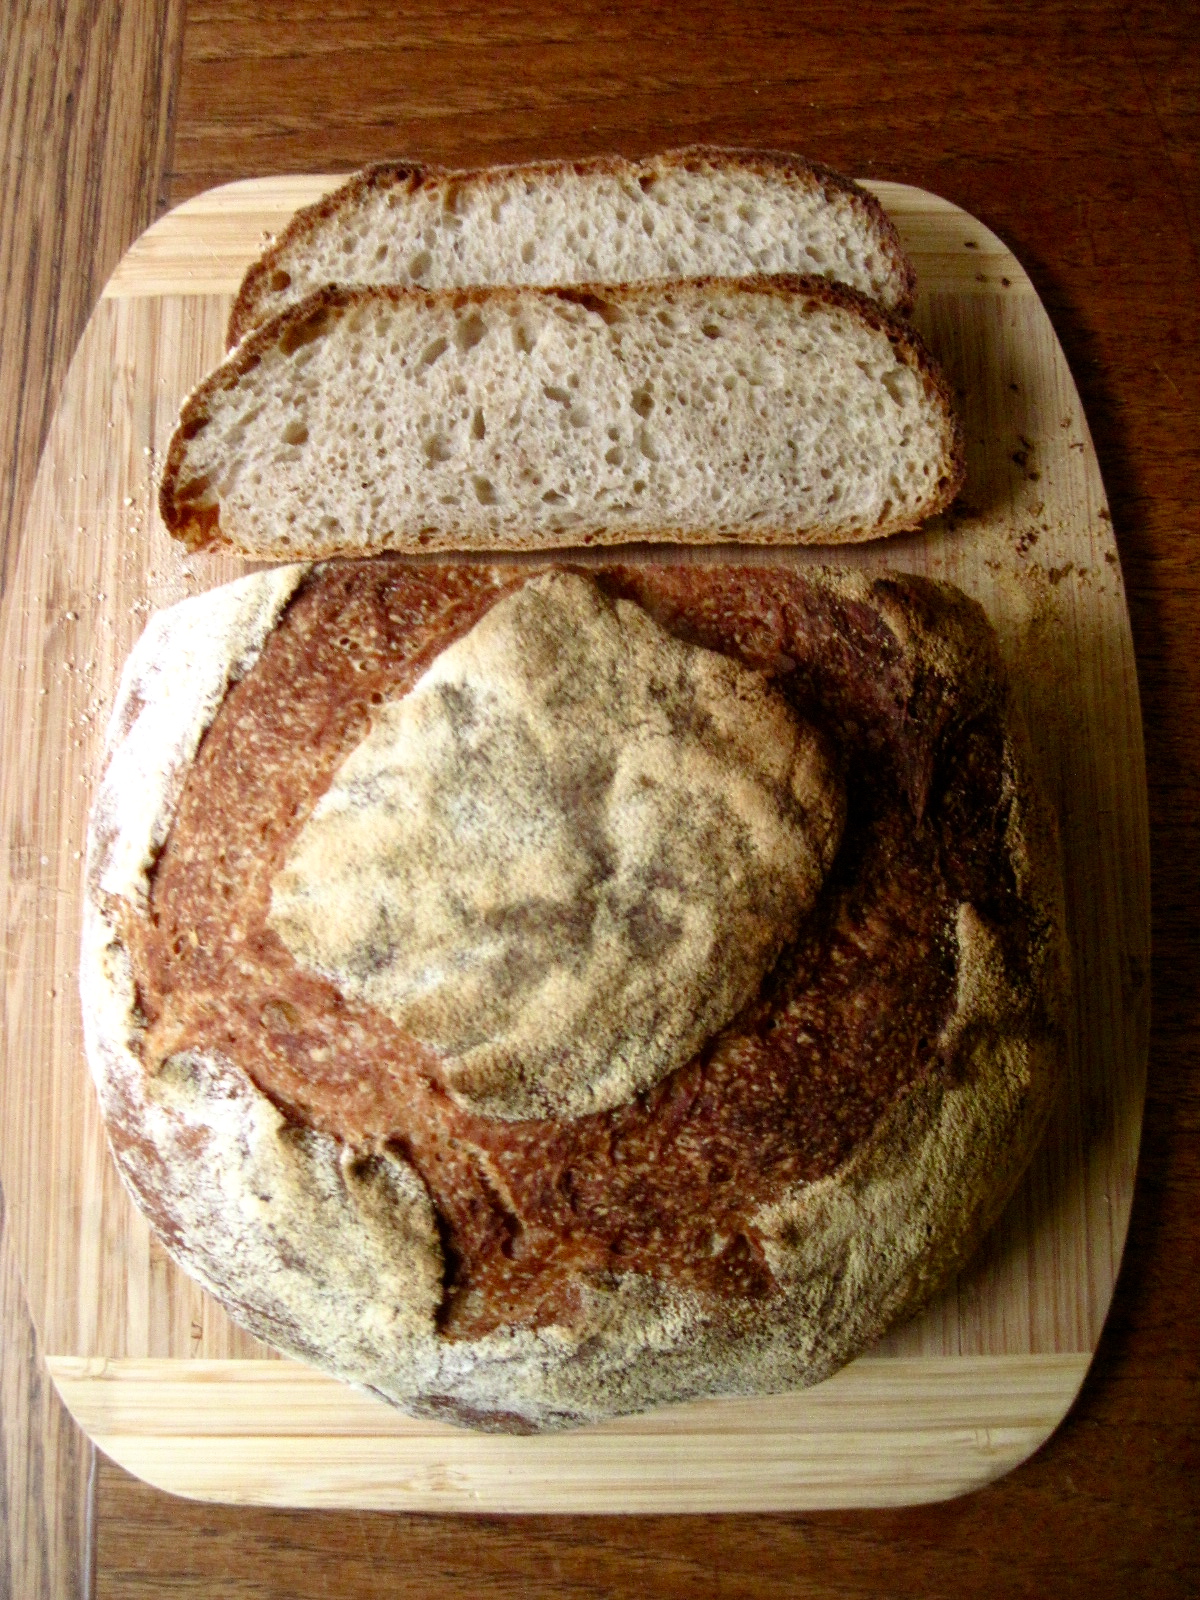
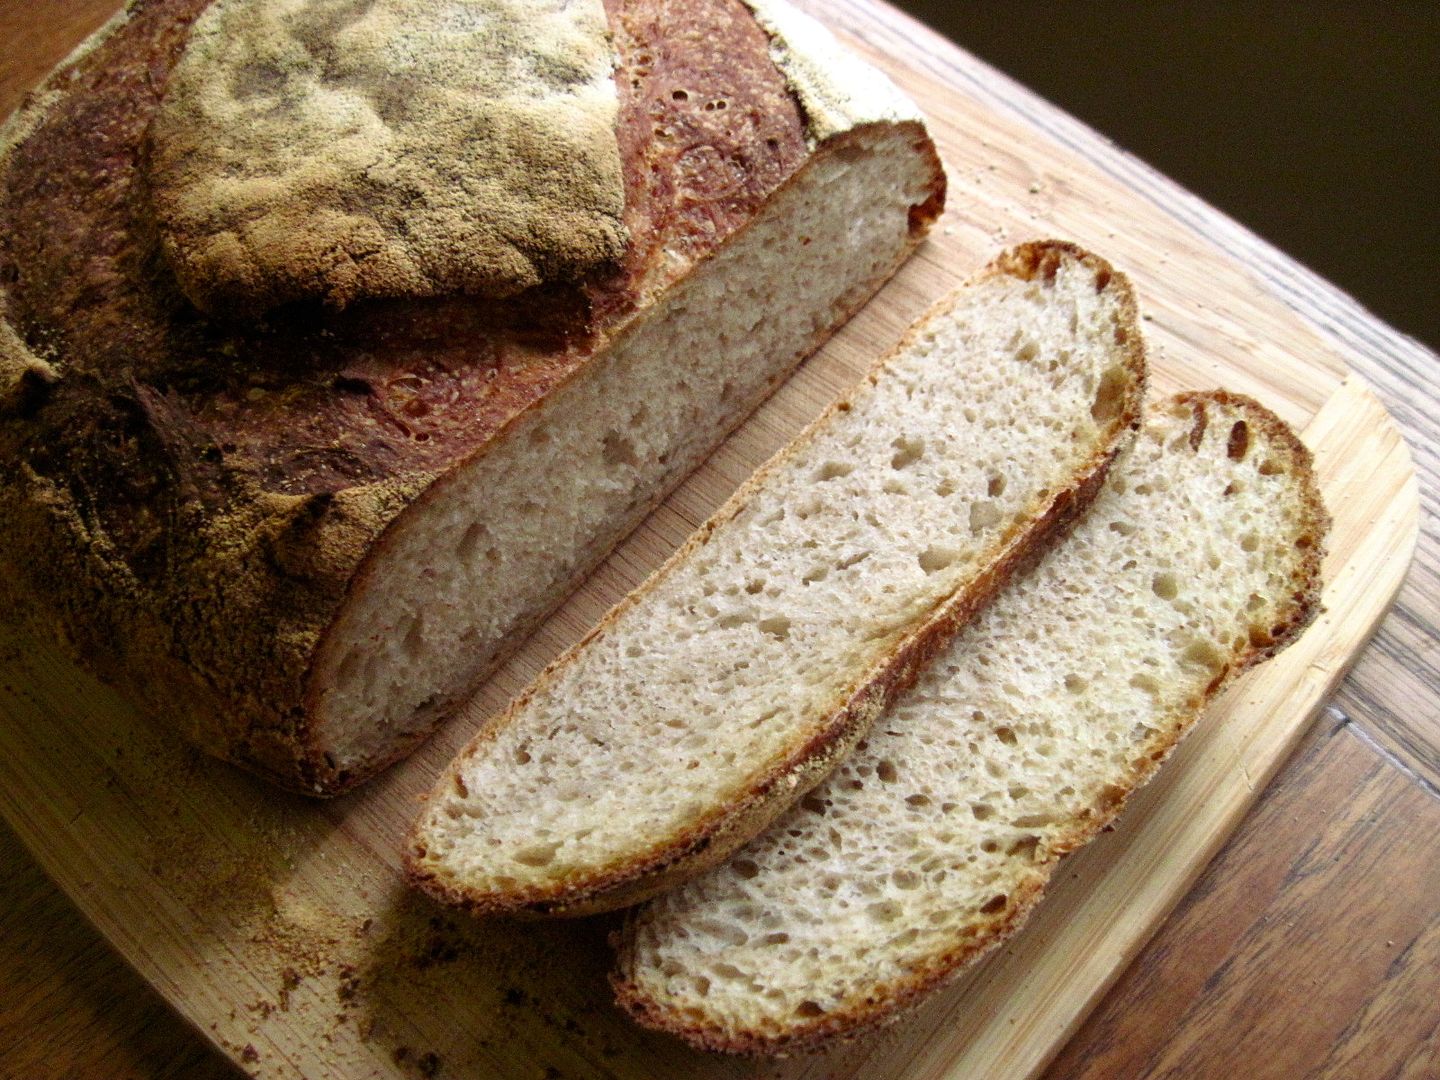
For a while I’ve been searching for a “country style” rustic sourdough loaf with some whole grain in it to bake as our daily bread, and after lots of trial and error, I finally settled on this formula, based on a recipe from Chez Pim. I was already planning on sharing it when I discovered that November’s theme for Bread Baking Day #54 is overnight bread, which is perfect, because this bread, being of my favorite no-knead, long-rest variety, fits right into that category.

…

Read More »

Filed Under: Bread, Recipes Tagged With: Bread Baking Day, food, levain, no-knead bread, overnight bread, recipe, sourdough bread, whole grain, wild yeast

6-Strand Braided Challah Loaf

March 16, 2012 By Korena in the Kitchen 18 Comments

This is, sadly, the final installment of my challah dough series. I wasn’t going to do a plain challah loaf – I was going to continue in the vein of sticky buns with unique fillings – but then I found a video demonstrating a six-strand challah braid that I got all excited about and had to try. The dough was easy to work with, and I was really pleased at how the braid turned out.

When it came to eating it, I was reminded that along with being a great base for sticky buns and such, this dough makes a really really good loaf of bread – soft yet firm with a nice fine crumb and great favour. It also makes amazing toast, and if it had lasted long enough, probably would have made wonderful french toast too.

While this loaf may look or sound complicated, it’s really not – a six-strand braid is simply two steps repeated over and over again. For the sake of this tutorial, I made it into four steps, because first you do the two steps on the right, then repeat them on the left. But however you look at it, if you can do a regular three-strand braid, this should be no problem. And no matter how your braid turns out, you’ll have a loaf of delicious challah bread in the end, which is the important part!

6-Strand Braided Challah Loaf

To make this braid, you will need one 1 1/2 lb portion of chilled challah dough.

Place the chilled dough on a lightly floured surface and divide it into 6 equal pieces.

With your palms, shape and roll each piece into a tapered log about 10 inches long. Try to use a minimal amount of flour when doing this – just enough to stop it from sticking.

Line your 6 tapered logs up vertically side by side and pinch them together at the end facing away from you. Keep hold of this pinched end with one hand.

Now start braiding:

Step 1: Take the strand that is second from the right and move it all the way over to the far left, like so:

Step 2: Take the strand that is on the far right and move it to the middle, like so:

Step 3: This is the mirror image of Step 1, done on the left side. Take the strand that is second from the left and move it to the far right:

Step 4: Again, this is a mirror image of Step 2 but on the left. Take the strand that is on the far left and move it to the middle:

Now you are back at Step 1. Repeat Steps 1 through 4 several times. You will start to see a pattern emerging:

Don’t pull on the strands or stretch them too much when you are braiding – you want to keep the braid loose so that the dough has room to expand when it bakes. If the braid is too tight, it will “explode” in the oven.

When you get to the end, pinch the ends together. You should have a tapered, slightly foot ball-shaped loaf.

You can gently “bump” the tapered ends with your palms to shorten up the loaf and give it a higher cross section.

The bottom of the braid will look like this. Cool, hey?

Place the braid on a piece of parchment paper, cover it lightly with plastic, and let it rest for about an hour and a half.

Preheat the oven to 350˚F. Brush the challah with egg wash (1 egg beaten with 1 tbsp water) and, if desired, sprinkle it with poppy seeds or sesame seeds.

Bake for 25-35 minutes, until shiny and dark golden brown.

Cool completely before slicing.

Filed Under: Bread, Recipes Tagged With: 6-strand braid, Artisan Bread in 5 Minutes a Day, baking, bread, challah, no-knead bread, recipe

Crusty No-Knead Bread… in 5 Minutes a Day!

January 6, 2012 By Korena in the Kitchen 37 Comments

I bought the book Artisan Bread in 5 Minutes a Day a few years ago after seeing a post on Steamy Kitchen about the caramel pecan cinnamon rolls that come from the book. I made the rolls and immediately knew I had to have the book, they were so good. The premise of the recipes in the book is to stir up a batch of very wet (high hydration) dough which you store in the fridge and then pull off a chunk to bake as desired. The wet dough plus the long rising and fermentation time develops the gluten in the dough without the need for kneading (heh!) and results in a delicious bread with a chewy crust and airy interior (which I’m still working to perfect) that literally only takes about five minutes of active time – the rest is just… rest. I have been making this bread exclusively for about two and a half months now, and we have not bought any bread in that time – just a lot of flour!

Artisan Bread in 5 Minutes a Day gives recipes for dozens of different bread doughs, ranging from peasant breads to multigrain breads to flatbreads and pizzas to breads enriched with butter, honey and eggs (such as challah and brioche, great for making caramel pecan rolls!), all of which can be varied with different flavours and additions (herbs, spices, dried fruit, cheese, olives, etc) to create pretty much whatever you can dream up. This recipe is for the basic Master Dough, which is a lean dough (just flour, water, yeast and salt) that can be baked into boules (as shown), baguettes, couronnes (like a giant bagel), or even used as pizza crust. It makes great sandwiches when it is fresh, and wonderful toast when it is a day or so old. One batch of dough makes enough for four small one pound loaves, which each last me and Nate about two days.

Bread often gets put in the black books of healthy eating, but not all bread is created equal. Floppy white grocery store bread that travels to the store in a bag and lasts two weeks without getting stale or mouldy is totally inferior to crusty, fresh-baked, open-crumbed artisan bread – not just aesthetically but also as a food source. I recently learned that the longer it takes for bread to rise and ferment, the better it is for you. This is because the yeasts and bacteria in the bread actually break down and partially digest the carbs and sugars, and the longer they have to do this, the easier the bread is to digest. This is especially true if the bread contains whole grains, which become more nutritionally available to your body with a long fermentation time (otherwise they’re just fiber). Artisan bread, with its long production time (usually several hours, and sometimes days!), is therefore easier to digest and more nutritious than bagged grocery store bread, which is made so expediently that the yeast doesn’t have time to break anything down, and is also pumped so full of additives and preservatives that it can’t break down, period.

Another thing I learned is that the crust plays an important role. A chewy, crunchy bread crust forces you to actually chew your food (mechanical digestion), and also stimulates saliva, which starts breaking down the nutrients (chemical digestion), making the job of your stomach much easier – again, being hard to digest is one reason many people avoid bread. Soft, floppy, crustless bread that you don’t even have to chew is definitely going to sit in your stomach and make you feel ill, so don’t even bother with it: go straight for the crusty, delicious artisan bread and do your stomach and your taste buds a favour!

(I apologize for spending the last two paragraphs talking about digestion – I know it’s not the most appetizing thing to read about on a food blog, but I thought it was cool, so… yeah ;). )

Anyway, here is the recipe. Definitely try it, and also check out the Artisan Bread in 5 Minutes a Day website, where the book’s authors post all kinds of awesome tips, tricks, videos, and additional recipes for their breads :).

No-Knead Crusty Artisan Bread

This is my adapted version of the Master Recipe from Artisan Bread in 5 Minutes a Day. I use a reduced amount of salt, a mixture of all purpose and whole wheat flours, and have increased the amount of water to get the moisture level right (see notes below). I also bake the dough on parchment paper, rather than using a pizza peel to transfer the loaf to and from the pizza stone in the oven. You will need a large bowl or container (4-6 quarts in size) with a lid in which to mix and store the dough, and preferably a pizza stone (aka a baking stone) on which to bake the bread (but there are other ways to bake it too – see notes below). The dough can be stored for up to 2 weeks in the fridge – the longer it is stored, the more of a sourdough flavour it gets. Makes about 4 lbs of dough – enough for 4 x 1 lb loaves.

In a large (4-6 quart) bowl or container with a lid, mix together:

3 1/3 cups warm water (this is the amount that works for me with higher protein Canadian all-purpose flour – your experience may vary)

1 tbsp coarse sea salt

1 1/2 tbsp granulated yeast – instant, regular, whatever

Don’t worry if it doesn’t all dissolve nicely.

In a slightly smaller bowl, combine:

5 1/2 cups unbleached all-purpose flour (unbleached is important!)

1 cup whole wheat flour

(or 6 1/2 cups unbleached all-purpose flour only)

Measure the flour by “scooping and sweeping”, like so:

Dump the flour into the water mixture and stir it briskly until it is evenly moistened. You can get in there with your hands if you need to – just resist the urge to knead! The resulting dough should be very wet and sticky. Put the lid on the bowl/container – you don’t want an air-tight seal, but you do want the dough covered completely so it doesn’t dry out (I usually put a jar of peanut butter on top of the bowl to keep the lid down!). Leave the dough to rise at room temperature for 2 hours or until the top starts to flatten out and deflate a little bit, after which it will look something like this: All those bubbles are going to make your bread lovely and airy, so don’t squish it down, whatever you do. Place the covered container in the fridge and refrigerate for at least a few hours – the dough can be baked with after the first 2 hour rise but is much easier to handle after being chilled. Store in the fridge up to 2 weeks.

When you are ready to bake bread, take the dough out of the fridge and sprinkle a small part of the surface with flour so it doesn’t stick to your hands (you will notice that the dough has sunk quite a bit – this is fine because as long as you don’t press it down, all the bubbles are still intact!). Grab the floured dough and pull out about 1 lb of dough (the size of a grapefruit). I use scissors to cut off the chunk of dough. Try not to squash the dough too much, and don’t knead it! Pick it up in your hands, dust it with a little bit more flour and quickly shape it into a ball (or “boule”) by gently pulling the top of the dough and tucking it underneath. Try to do this by handling it as little as possible (this takes some practice) – it should take about 5 seconds tops. Place the ball of dough, tucked ends down, into a piece of parchment paper. Let it rest, uncovered, at room temperature for 40-90 minutes. With about 20 minutes left in the rest period, prepare the oven. Place a pizza stone on a central shelf, and on any other shelf that won’t interfere with the rising bread (below is good!), place a metal roasting pan. Heat the oven to 450˚F and let it preheat for at least 20 minutes (your pizza stone may take longer to heat up completely).When the oven is preheated and the dough is fully rested, dust the shaped boule with flour and slash it about 1/4″ deep with a serrated knife – this allows the bread to expand in the oven in a predictable fashion, rather than splitting open randomly. Depending on the age of the stored dough, at the end of the rest period it may not have changed much in size or shape (fresher dough) or it may have flattened out (older dough), but it should jiggle if you tug on the parchment paper. Place the dough and parchment paper on the preheated pizza stone, then pour a mug full of hot tap water into the roasting pan, and shut the door quickly to trap the steam. The steam helps make the crust crisp and brown. Bake for 30-45 minutes, until the bread is a very deep brown. You will notice that it has expanded quite a bit – this is called oven spring. Let the bread cool completely on a rack before slicing it. This bread only lasts 2-3 days in our house, so we keep it uncovered on the counter, sitting cut-side down on a cutting board. This way the crust stays crisp and the cut end doesn’t get stale.

Some notes:

Feel free to make a 1 1/2 – 2 lb loaf – just let it rest and bake longer.

The original recipe was developed using American flour, but Canadian flour is higher in protein (about 12% versus 8-9%) and therefore absorbs more water, so I use 1/3 cup more water than the original recipe calls for. It may take a few tries to play around with the amount of water that works for you – see this post for more information.

If you under-bake the bread, the crust will lose its crispness as it cools. It should be quite dark brown and caramelized-looking when it comes out of the oven. The crust will also lose its crispness if you cut into it while it’s still warm.

The more large air holes inside the bread (an “airy crumb”), the better. This can be achieved with a wetter dough to start with or a longer resting time. One tip is to shape the dough in the morning, then cover it lightly with plastic and let it rest all day in the fridge, then bake it in the evening. This ensures a good long rest and lots of air hole formation. See this post for more tips.

If you don’t have a pizza stone, you can bake this bread in a Dutch oven, which works really well. I’ve also just used a regular baking sheet and the bread came out fine, but a pizza stone gives it a better crust. My pizza stone is handmade of terracotta and was a Christmas present from my parents. I love it!

Filed Under: Bread, Recipes Tagged With: artisan bread, Artisan Bread in 5 Minutes a Day, baking, no-knead bread, recipe, yeast

Welcome to my kitchen!

I'm Korena: cook, baker, dirty-dishes-maker. My favourite things include flour, butter, sugar, and chocolate. Read More…

  • Bloglovin
  • Email
  • Facebook
  • Instagram
  • Pinterest
  • RSS

Subscribe by Email!

Top Posts

Greek Kataifi
Daring Bakers: Ukrainian Easter Paska
Daring Bakers: Asian Coconut Custard Buns
Daring Bakers: Sfogliatelle Ricci and Lobster Tail Pastries
Cream Cheese Swiss Meringue Buttercream Frosting, Take 2: Success!
10 Years! {Nigella Lawson's Coffee and Walnut Layer Cake}

Search

Categories

Archives

Blogs I Like

  • 101 Cookbooks
  • Baking with Sibella
  • Bitter Baker
  • Bread and Companatico
  • Chocolate & Zucchini
  • Chocolate & Zucchini
  • De La Casa
  • Dinner With Julie
  • Dinner: A Love Story
  • Food in Jars
  • FrugalFeeding
  • Homesick Texan
  • Joy the Baker
  • Poires au Chocolat
  • Rufus' Food and Spirits Guide
  • Simple Bites
  • Simply Recipes
  • smitten kitchen
  • Steamy Kitchen
  • Tartelette
  • Tea & Cookies
  • The Pioneer Woman Cooks
  • The Wednesday Chef
  • Venison for Dinner
  • Bloglovin
  • Email
  • Facebook
  • Instagram
  • Pinterest
  • RSS

Subscribe by Email!

Search

Home | Recipes About | Contact |

All content © Korena Vezerian and Korena in the Kitchen, 2011 – 2021. Please contact me before duplicating any content, including pictures. Excerpts and links may be used, provided that full and clear credit is given to Korena Vezerian and Korena in the Kitchen with appropriate and specific direction to the original content.

Copyright © 2025 · Foodie Pro Theme On Genesis Framework · WordPress · Log in


Loading Comments...