Korena in the Kitchen

  • Home
  • Recipes
  • About
  • Contact
You are here: Home / Archives for Artisan Bread in 5 Minutes a Day

Cranberry White Chocolate Lemon Tea Braid

December 13, 2016 By Korena in the Kitchen 6 Comments

Cranberry White Chocolate Lemon Tea Braid | Korena in the Kitchen

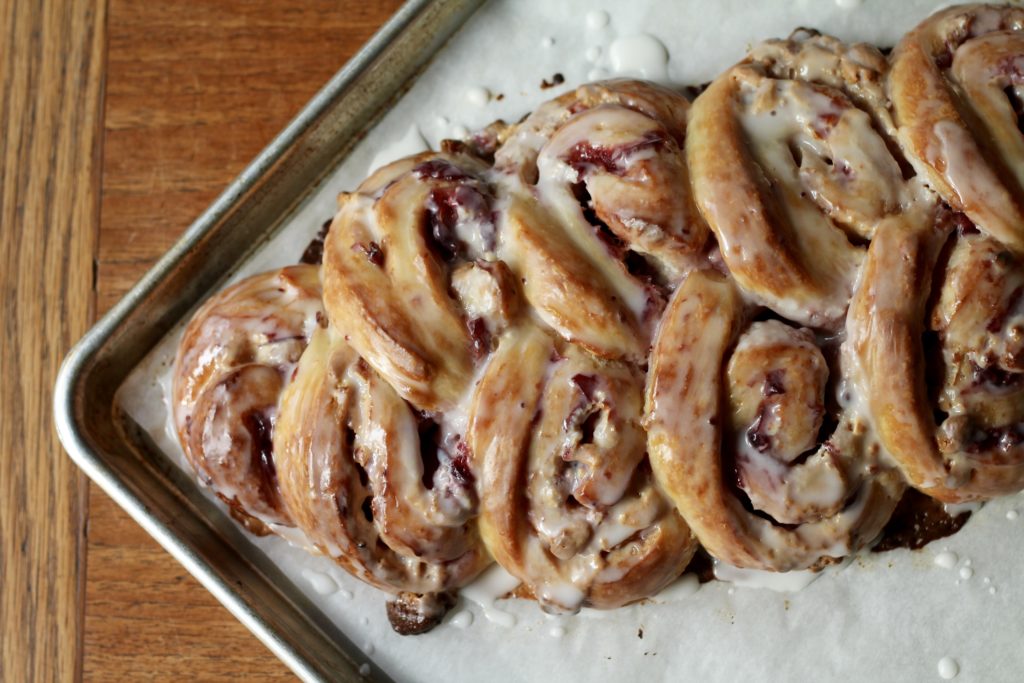
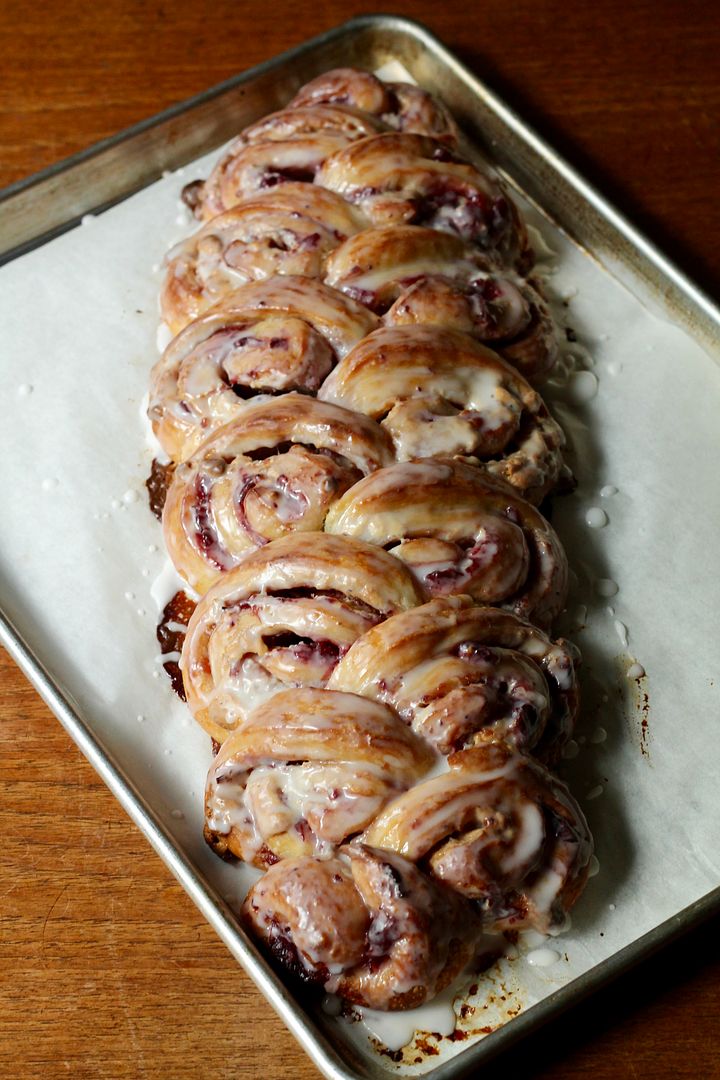
Along with the perfect Christmas dessert and the best Christmas cookies, every year I’m on the look out for a delicious holiday breakfast or brunch pastry – and this year, I think I may have stumbled on it kind of by accident. I had half a batch of challah dough in my freezer, a container of cranberry sauce leftover from Thanksgiving, and I’d just seen a photo of the beautiful poppy seed tea “braid” from Luisa Weiss‘ Classic German Baking – and it all came together in a swirly braid filled with cranberry sauce, white chocolate chunks, and lemon zest, glazed with a lemony icing. It was a huge loaf, so I gave some to friends and planned to take the rest to work to share with my colleagues… but plans changed when Nate and I discovered how good it was, and we ate it all ourselves! (Sorry, colleagues!)

Cranberry White Chocolate Lemon Tea Braid | Korena in the Kitchen

…

Read More »

Filed Under: Bread, Breakfast & Brunch, Recipes Tagged With: Artisan Bread in 5 Minutes a Day, baking, bread, breakfast, challeh, Christmas baking, cranberry, holiday baking, lemon, recipe, tea bread, tea loaf, white chocolate

Brunch for Forty

March 14, 2015 By Korena in the Kitchen 13 Comments

Brunch for Forty | Korena in the KitchenLast weekend I had the opportunity to cater a day-after-the-wedding brunch for a friend’s family. I love this kind of thing because not only do I get to bake and cook to my heart’s content, but I also get to do a lot of figuring out: coming up with a menu, researching recipes, scaling them up and down, and writing out list after list. Calculating exactly how many eggs I will need to make a dozen quiche plus four dozen cinnamon brioche buns is the kind of math I can get behind. I found a great resource in Ellen’s Kitchen for estimating quantities for large gatherings, although it doesn’t say much for my math skills when my estimates, in most cases, ended up being about twice what they should have been! But it’s better to have more food than not enough, right?

Cinnamon Brioche Buns | Korena in the Kitchen
…

Read More »

Filed Under: Breakfast & Brunch, Recipes Tagged With: Artisan Bread in 5 Minutes a Day, baking, brioche, brunch, catering, cinnamon buns, cooking, DIY, large gatherings, quiche

6-Strand Braided Challah Loaf

March 16, 2012 By Korena in the Kitchen 18 Comments

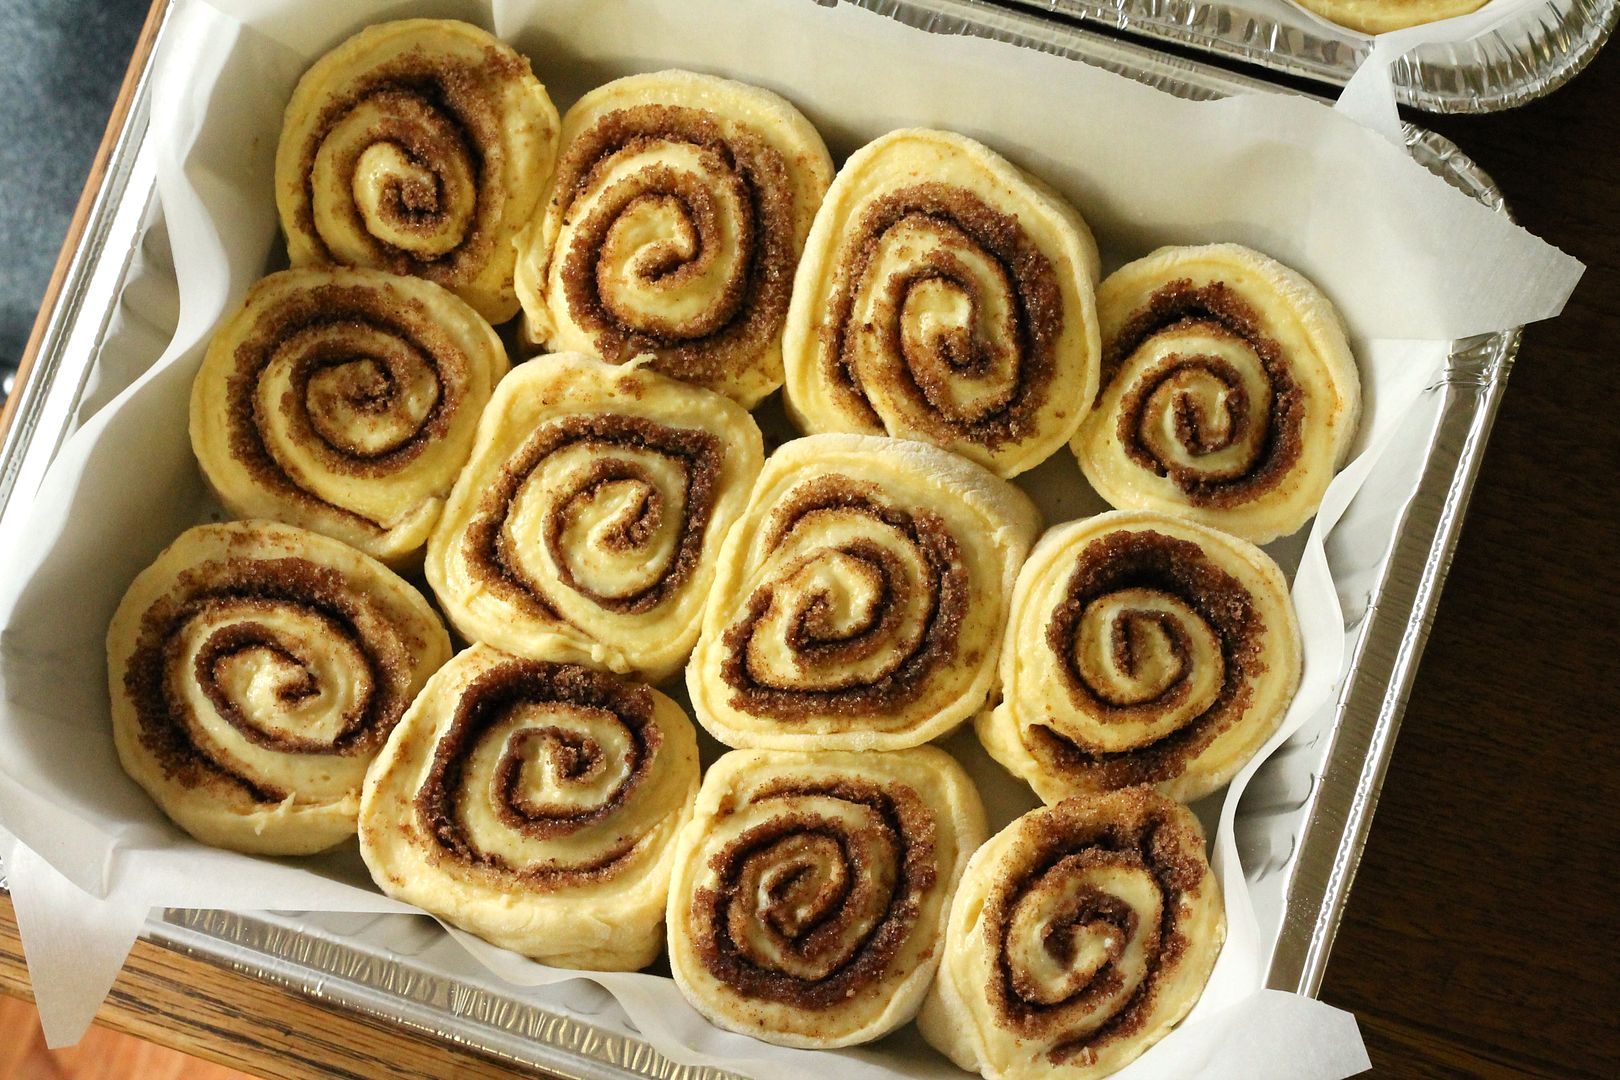
This is, sadly, the final installment of my challah dough series. I wasn’t going to do a plain challah loaf – I was going to continue in the vein of sticky buns with unique fillings – but then I found a video demonstrating a six-strand challah braid that I got all excited about and had to try. The dough was easy to work with, and I was really pleased at how the braid turned out.

When it came to eating it, I was reminded that along with being a great base for sticky buns and such, this dough makes a really really good loaf of bread – soft yet firm with a nice fine crumb and great favour. It also makes amazing toast, and if it had lasted long enough, probably would have made wonderful french toast too.

While this loaf may look or sound complicated, it’s really not – a six-strand braid is simply two steps repeated over and over again. For the sake of this tutorial, I made it into four steps, because first you do the two steps on the right, then repeat them on the left. But however you look at it, if you can do a regular three-strand braid, this should be no problem. And no matter how your braid turns out, you’ll have a loaf of delicious challah bread in the end, which is the important part!

6-Strand Braided Challah Loaf

To make this braid, you will need one 1 1/2 lb portion of chilled challah dough.

Place the chilled dough on a lightly floured surface and divide it into 6 equal pieces.

With your palms, shape and roll each piece into a tapered log about 10 inches long. Try to use a minimal amount of flour when doing this – just enough to stop it from sticking.

Line your 6 tapered logs up vertically side by side and pinch them together at the end facing away from you. Keep hold of this pinched end with one hand.

Now start braiding:

Step 1: Take the strand that is second from the right and move it all the way over to the far left, like so:

Step 2: Take the strand that is on the far right and move it to the middle, like so:

Step 3: This is the mirror image of Step 1, done on the left side. Take the strand that is second from the left and move it to the far right:

Step 4: Again, this is a mirror image of Step 2 but on the left. Take the strand that is on the far left and move it to the middle:

Now you are back at Step 1. Repeat Steps 1 through 4 several times. You will start to see a pattern emerging:

Don’t pull on the strands or stretch them too much when you are braiding – you want to keep the braid loose so that the dough has room to expand when it bakes. If the braid is too tight, it will “explode” in the oven.

When you get to the end, pinch the ends together. You should have a tapered, slightly foot ball-shaped loaf.

You can gently “bump” the tapered ends with your palms to shorten up the loaf and give it a higher cross section.

The bottom of the braid will look like this. Cool, hey?

Place the braid on a piece of parchment paper, cover it lightly with plastic, and let it rest for about an hour and a half.

Preheat the oven to 350˚F. Brush the challah with egg wash (1 egg beaten with 1 tbsp water) and, if desired, sprinkle it with poppy seeds or sesame seeds.

Bake for 25-35 minutes, until shiny and dark golden brown.

Cool completely before slicing.

Filed Under: Bread, Recipes Tagged With: 6-strand braid, Artisan Bread in 5 Minutes a Day, baking, bread, challah, no-knead bread, recipe

Lemon Rosemary Sticky Bun Twists

March 9, 2012 By Korena in the Kitchen 23 Comments

Lemon and rosemary might not be a flavour combination you’re familiar with in a sweet context, but man oh man, does it ever work! I stumbled across a recipe for Meyer Lemon Rosemary Sticky Buns and bookmarked it immediately because it sounded so intriguing, and I planned to make them using one portion of challah dough. Then I saw Sawsan’s beautiful cinnamon twists and decided to use her technique instead of just making plain old spirals.

The result is these very tasty, very pretty Lemon Rosemary Sticky Bun Twists.

I used Meyer lemons for these, and it’s the first time I’ve ever gotten my hands on them. I’ve been hearing about Meyer lemons for quite a while, but had never seen them in any grocery stores – until a week ago, when they started popping up everywhere! A Meyer lemon is a cross between a lemon and a mandarin orange, and has a sweeter, tart taste and thinner skin than a regular lemon. Quite honestly, I’m still not sure what all the fuss is about. They are tasty, but they don’t quite have the tang that a regular lemon does, and I think a good, ripe, organic lemon would give you just as much (maybe better?) lemon flavour. If you love Meyer lemons, go ahead and use them here, but don’t worry if you can’t find them – regular lemons will be just fine!

These smelled AMAZING coming out of the oven, and once I’d smothered them in a lemon-cream cheese glaze, they were pretty irresistible. The first sweet bite revealed subtle lemon and floral rosemary, the combination of which somehow reminded me of rosewater. Really unique, and really delicious. I found the flavour to be even better the next day (if they last that long, that is!).

Lemon Rosemary Sticky Bun Twists

Filling and glaze adapted from Eats Well With Others; twist technique from Chef in Disguise. This recipe uses one approximately 1 1/2 -pound portion of challah dough. Makes 8 twists.

When handling the dough, DO NOT knead it. While a certain amount of man-handling is necessary to roll and twist the dough, try to be as gentle as possible and use only a minimal amount of extra flour to keep it from sticking. If you feel you’ve over-worked the dough, let it have a longer rest before baking.

On a lightly floured surface, place:

approximately 1 1/2 lbs of chilled challah dough

Divide the dough into three roughly equal pieces, and gently shape/roll each piece into a 10-inch circle, using just enough flour to stop it from sticking. If the dough resists rolling, let it rest for a few minutes, then come back to it. Set the rounds aside while you make the filling.

Filling

In a bowl, combine:

1 cup white granulated sugar

1/4 tsp nutmeg

zest of 2 lemons

1 tbsp minced fresh rosemary

Mix together with your fingers until it resembles damp sand, then stir in:

2 tbsp lemon juice

Have ready:

3 tbsp unsalted butter, softened

Assembly

Place one round of dough on your lightly floured work surface. Spread it with about 1 tbsp softened butter, then with half of the lemon-rosemary-sugar filling.

Top it with a second round and spread it with 1 tbsp butter and the other half of the filling. Place the final round on top and spread it with the last 1 tbsp butter. With a large, sharp knife, cut the round into 8 wedges. Flour the knife blade if needed, and make single downward cuts to keep things as neat as possible. With the tip of the knife, cut a ~1-inch slit in the middle of each triangular piece.

Pull on the sides of the triangle to widen the hole, then tuck the point of the triangle into the hole. Gently pull it through to form the twist.

Arrange the 8 pieces in a circle with their sides touching on a parchment-lined baking sheet. Pinch together the two points at the base of each triangle.

Cover the twists lightly with plastic wrap and let rest for about 1 hour at room temperature (or refrigerate for several hours or overnight). It’s OK if some of the sugar-lemon mixture seeps out while the twists are resting.

Preheat the oven to 375˚F and bake the twists for 20-30 minutes, until nicely browned and baked through in the middle.

While the twists are baking, prepare the glaze.

Glaze

In a small bowl, cream until light and fluffy:

2 oz cream cheese

With a whisk, beat in:

1 tbsp lemon juice

Mix until smooth.

Add:

1/2 cup confectioner’s sugar

The glaze should be about the consistency of honey. Drizzle the glaze over the warm twists.

These are fantastic warm from the oven, and if you happen to have any leftover, the lemon-rosemary flavour is even better the next day.

Filed Under: Breakfast & Brunch, Other Baked Goods & Sweets, Recipes Tagged With: Artisan Bread in 5 Minutes a Day, baking, breakfast, brunch, challah dough, lemon and rosemary, recipe, sticky buns

Variation on a Theme

January 24, 2012 By Korena in the Kitchen 1 Comment

We live near a Cobs Bread bakery, and before I started baking my own bread, we were in there at least once a week to buy fresh bread. One of our favorites was the cranberry sourdough loaf: slightly tangy bread studded with tart, sweet cranberries, wonderful for a sandwich or toast with cheese or butter and jam. I figured this was something I could recreate myself at home using the no-knead crusty artisan bread dough from Artisan Bread in 5 Minutes a Day, which develops a slight sourdough flavour from being stored in the fridge (I’ve been experimenting with using my sourdough starter in the dough, which I will most definitely share when I have it figured out!).

Really, it’s so easy that I’m almost embarrassed – you simply roll out the dough, sprinkle it with dried cranberries, and roll it up again – but it’s so good and would be tweaked to suit any kind of addition to the bread, savory or sweet. I can imagine a beautiful olive or cheese loaf, or rosemary and roasted garlic, or sundried tomato and parmesan, or cinnamon raisin, or chocolate and orange zest, or…

I actually like this version of cranberry sourdough even better than the Cobs bread. It’s chewier and crustier, and you can add as many cranberries as your little heart desires, plus the feeling of accomplishment that comes from baking a loaf of bread makes it a hundred times more delicious. Try it and see!

Crusty Cranberry Bread

Before making this bread, familiarize yourself with the method in this post: Crusty No-Knead Bread… in 5 Minutes a Day! Technique inspired by this post.

First of all, stir yourself up a batch of no-knead crusty artisan bread dough and let it sit overnight or longer in the fridge to develop some sourdough-ish flavour. When you are ready to bake, cut off a 1 – 1 1/3 lb piece of dough (I used 1 1/3-ish lbs), sprinkle it gently with flour, and form it into a ball with your hands by pulling down the top and sides and pinching them underneath. This should only take a few seconds. Place the dough ball on a lightly floured surface and press it into a rectangle with your fingers (don’t knead it!). You want to use just enough flour to keep the dough from sticking to your work surface, but not any more than is necessary, otherwise the dough will be too dry. Use a lightly floured rolling pin to roll it into a rectangle about 1 cm thick (the dimensions don’t matter). Sprinkle the dough with a few handfuls of chopped dried cranberries, covering the dough evenly right to the edges, then roll it up tightly from one short end. Pick the roll up in your hands and tuck the ends under. Using the same technique you used earlier to form the lump of plain dough into a ball, gently pull the top and sides of the cranberry’d dough and tuck them underneath to form a smooth ball. Sprinkle sparingly with a little bit of flour if it sticks to your hands too much, and don’t worry if a few cranberries burst through. Place the dough on a square of parchment paper and let it rest, uncovered, for 40-90 minutes for a 1 lb loaf, and up to 2 hours for a 1 1/3 lb loaf. You will know it has rested enough if it jiggles slightly when you tug on the parchment paper. With 20 minutes to left in the rest period, prepare the oven by placing a pizza stone on the center rack and a roasting pan on a lower rack. Preheat the oven to 450˚F. When the dough is fully rested and the oven is hot, sprinkle the dough lightly with flour and slash it 1/4″ deep with a serrated knife. Place the dough and parchment paper on the preheated pizza stone, then pour a mug of hot tap water into the roasting pan. The steam will make the crust shiny and crisp. Bake for 30-55 minutes (depending on the size of your loaf), until dark brown and crusty. Cool completely on a rack before slicing.


Filed Under: Bread, Recipes Tagged With: artisan bread, Artisan Bread in 5 Minutes a Day, baking, bread, cranberries, recipe, yeast

Crusty No-Knead Bread… in 5 Minutes a Day!

January 6, 2012 By Korena in the Kitchen 37 Comments

I bought the book Artisan Bread in 5 Minutes a Day a few years ago after seeing a post on Steamy Kitchen about the caramel pecan cinnamon rolls that come from the book. I made the rolls and immediately knew I had to have the book, they were so good. The premise of the recipes in the book is to stir up a batch of very wet (high hydration) dough which you store in the fridge and then pull off a chunk to bake as desired. The wet dough plus the long rising and fermentation time develops the gluten in the dough without the need for kneading (heh!) and results in a delicious bread with a chewy crust and airy interior (which I’m still working to perfect) that literally only takes about five minutes of active time – the rest is just… rest. I have been making this bread exclusively for about two and a half months now, and we have not bought any bread in that time – just a lot of flour!

Artisan Bread in 5 Minutes a Day gives recipes for dozens of different bread doughs, ranging from peasant breads to multigrain breads to flatbreads and pizzas to breads enriched with butter, honey and eggs (such as challah and brioche, great for making caramel pecan rolls!), all of which can be varied with different flavours and additions (herbs, spices, dried fruit, cheese, olives, etc) to create pretty much whatever you can dream up. This recipe is for the basic Master Dough, which is a lean dough (just flour, water, yeast and salt) that can be baked into boules (as shown), baguettes, couronnes (like a giant bagel), or even used as pizza crust. It makes great sandwiches when it is fresh, and wonderful toast when it is a day or so old. One batch of dough makes enough for four small one pound loaves, which each last me and Nate about two days.

Bread often gets put in the black books of healthy eating, but not all bread is created equal. Floppy white grocery store bread that travels to the store in a bag and lasts two weeks without getting stale or mouldy is totally inferior to crusty, fresh-baked, open-crumbed artisan bread – not just aesthetically but also as a food source. I recently learned that the longer it takes for bread to rise and ferment, the better it is for you. This is because the yeasts and bacteria in the bread actually break down and partially digest the carbs and sugars, and the longer they have to do this, the easier the bread is to digest. This is especially true if the bread contains whole grains, which become more nutritionally available to your body with a long fermentation time (otherwise they’re just fiber). Artisan bread, with its long production time (usually several hours, and sometimes days!), is therefore easier to digest and more nutritious than bagged grocery store bread, which is made so expediently that the yeast doesn’t have time to break anything down, and is also pumped so full of additives and preservatives that it can’t break down, period.

Another thing I learned is that the crust plays an important role. A chewy, crunchy bread crust forces you to actually chew your food (mechanical digestion), and also stimulates saliva, which starts breaking down the nutrients (chemical digestion), making the job of your stomach much easier – again, being hard to digest is one reason many people avoid bread. Soft, floppy, crustless bread that you don’t even have to chew is definitely going to sit in your stomach and make you feel ill, so don’t even bother with it: go straight for the crusty, delicious artisan bread and do your stomach and your taste buds a favour!

(I apologize for spending the last two paragraphs talking about digestion – I know it’s not the most appetizing thing to read about on a food blog, but I thought it was cool, so… yeah ;). )

Anyway, here is the recipe. Definitely try it, and also check out the Artisan Bread in 5 Minutes a Day website, where the book’s authors post all kinds of awesome tips, tricks, videos, and additional recipes for their breads :).

No-Knead Crusty Artisan Bread

This is my adapted version of the Master Recipe from Artisan Bread in 5 Minutes a Day. I use a reduced amount of salt, a mixture of all purpose and whole wheat flours, and have increased the amount of water to get the moisture level right (see notes below). I also bake the dough on parchment paper, rather than using a pizza peel to transfer the loaf to and from the pizza stone in the oven. You will need a large bowl or container (4-6 quarts in size) with a lid in which to mix and store the dough, and preferably a pizza stone (aka a baking stone) on which to bake the bread (but there are other ways to bake it too – see notes below). The dough can be stored for up to 2 weeks in the fridge – the longer it is stored, the more of a sourdough flavour it gets. Makes about 4 lbs of dough – enough for 4 x 1 lb loaves.

In a large (4-6 quart) bowl or container with a lid, mix together:

3 1/3 cups warm water (this is the amount that works for me with higher protein Canadian all-purpose flour – your experience may vary)

1 tbsp coarse sea salt

1 1/2 tbsp granulated yeast – instant, regular, whatever

Don’t worry if it doesn’t all dissolve nicely.

In a slightly smaller bowl, combine:

5 1/2 cups unbleached all-purpose flour (unbleached is important!)

1 cup whole wheat flour

(or 6 1/2 cups unbleached all-purpose flour only)

Measure the flour by “scooping and sweeping”, like so:

Dump the flour into the water mixture and stir it briskly until it is evenly moistened. You can get in there with your hands if you need to – just resist the urge to knead! The resulting dough should be very wet and sticky. Put the lid on the bowl/container – you don’t want an air-tight seal, but you do want the dough covered completely so it doesn’t dry out (I usually put a jar of peanut butter on top of the bowl to keep the lid down!). Leave the dough to rise at room temperature for 2 hours or until the top starts to flatten out and deflate a little bit, after which it will look something like this: All those bubbles are going to make your bread lovely and airy, so don’t squish it down, whatever you do. Place the covered container in the fridge and refrigerate for at least a few hours – the dough can be baked with after the first 2 hour rise but is much easier to handle after being chilled. Store in the fridge up to 2 weeks.

When you are ready to bake bread, take the dough out of the fridge and sprinkle a small part of the surface with flour so it doesn’t stick to your hands (you will notice that the dough has sunk quite a bit – this is fine because as long as you don’t press it down, all the bubbles are still intact!). Grab the floured dough and pull out about 1 lb of dough (the size of a grapefruit). I use scissors to cut off the chunk of dough. Try not to squash the dough too much, and don’t knead it! Pick it up in your hands, dust it with a little bit more flour and quickly shape it into a ball (or “boule”) by gently pulling the top of the dough and tucking it underneath. Try to do this by handling it as little as possible (this takes some practice) – it should take about 5 seconds tops. Place the ball of dough, tucked ends down, into a piece of parchment paper. Let it rest, uncovered, at room temperature for 40-90 minutes. With about 20 minutes left in the rest period, prepare the oven. Place a pizza stone on a central shelf, and on any other shelf that won’t interfere with the rising bread (below is good!), place a metal roasting pan. Heat the oven to 450˚F and let it preheat for at least 20 minutes (your pizza stone may take longer to heat up completely).When the oven is preheated and the dough is fully rested, dust the shaped boule with flour and slash it about 1/4″ deep with a serrated knife – this allows the bread to expand in the oven in a predictable fashion, rather than splitting open randomly. Depending on the age of the stored dough, at the end of the rest period it may not have changed much in size or shape (fresher dough) or it may have flattened out (older dough), but it should jiggle if you tug on the parchment paper. Place the dough and parchment paper on the preheated pizza stone, then pour a mug full of hot tap water into the roasting pan, and shut the door quickly to trap the steam. The steam helps make the crust crisp and brown. Bake for 30-45 minutes, until the bread is a very deep brown. You will notice that it has expanded quite a bit – this is called oven spring. Let the bread cool completely on a rack before slicing it. This bread only lasts 2-3 days in our house, so we keep it uncovered on the counter, sitting cut-side down on a cutting board. This way the crust stays crisp and the cut end doesn’t get stale.

Some notes:

Feel free to make a 1 1/2 – 2 lb loaf – just let it rest and bake longer.

The original recipe was developed using American flour, but Canadian flour is higher in protein (about 12% versus 8-9%) and therefore absorbs more water, so I use 1/3 cup more water than the original recipe calls for. It may take a few tries to play around with the amount of water that works for you – see this post for more information.

If you under-bake the bread, the crust will lose its crispness as it cools. It should be quite dark brown and caramelized-looking when it comes out of the oven. The crust will also lose its crispness if you cut into it while it’s still warm.

The more large air holes inside the bread (an “airy crumb”), the better. This can be achieved with a wetter dough to start with or a longer resting time. One tip is to shape the dough in the morning, then cover it lightly with plastic and let it rest all day in the fridge, then bake it in the evening. This ensures a good long rest and lots of air hole formation. See this post for more tips.

If you don’t have a pizza stone, you can bake this bread in a Dutch oven, which works really well. I’ve also just used a regular baking sheet and the bread came out fine, but a pizza stone gives it a better crust. My pizza stone is handmade of terracotta and was a Christmas present from my parents. I love it!

Filed Under: Bread, Recipes Tagged With: artisan bread, Artisan Bread in 5 Minutes a Day, baking, no-knead bread, recipe, yeast

Welcome to my kitchen!

I'm Korena: cook, baker, dirty-dishes-maker. My favourite things include flour, butter, sugar, and chocolate. Read More…

  • Bloglovin
  • Email
  • Facebook
  • Instagram
  • Pinterest
  • RSS

Subscribe by Email!

Top Posts

Greek Kataifi
Daring Bakers: Ukrainian Easter Paska
Daring Bakers: Asian Coconut Custard Buns
Daring Bakers: Sfogliatelle Ricci and Lobster Tail Pastries
Cream Cheese Swiss Meringue Buttercream Frosting, Take 2: Success!
10 Years! {Nigella Lawson's Coffee and Walnut Layer Cake}

Search

Categories

Archives

Blogs I Like

  • 101 Cookbooks
  • Baking with Sibella
  • Bitter Baker
  • Bread and Companatico
  • Chocolate & Zucchini
  • Chocolate & Zucchini
  • De La Casa
  • Dinner With Julie
  • Dinner: A Love Story
  • Food in Jars
  • FrugalFeeding
  • Homesick Texan
  • Joy the Baker
  • Poires au Chocolat
  • Rufus' Food and Spirits Guide
  • Simple Bites
  • Simply Recipes
  • smitten kitchen
  • Steamy Kitchen
  • Tartelette
  • Tea & Cookies
  • The Pioneer Woman Cooks
  • The Wednesday Chef
  • Venison for Dinner
  • Bloglovin
  • Email
  • Facebook
  • Instagram
  • Pinterest
  • RSS

Subscribe by Email!

Search

Home | Recipes About | Contact |

All content © Korena Vezerian and Korena in the Kitchen, 2011 – 2021. Please contact me before duplicating any content, including pictures. Excerpts and links may be used, provided that full and clear credit is given to Korena Vezerian and Korena in the Kitchen with appropriate and specific direction to the original content.

Copyright © 2025 · Foodie Pro Theme On Genesis Framework · WordPress · Log in


Loading Comments...