Korena in the Kitchen

  • Home
  • Recipes
  • About
  • Contact
You are here: Home / Archives for artisan bread

Current Events + Sourdough Bread

June 16, 2020 By Korena in the Kitchen 11 Comments

I’ve had this sourdough bread post drafted for months now, but there’s a lot going on in the world and it has felt kind of futile to post baking recipes in the midst of it all. The cookies I made or the cake I baked seem to pale in importance against the current major civil unrest due to systemic racism and police brutality. As a Canadian, it’s tempting to sit back and smugly think that the rampant anti-Black racism we see in the US is not a problem here, but as a WHITE Canadian, I have to seriously check that impulse because we have our own terrible history and ongoing legacy of institutional racism and police violence against Indigenous, Black, and people of colour in this country.

Add all this to the fact that I am a little bit distracted at the moment because – SURPRISE! – I’m currently very pregnant and expecting a baby fairly imminently, and you might understand why I haven’t posted anything in a while 😉

Simple Sourdough Boule | Korena in the Kitchen

…

Read More »

Filed Under: Bread, Recipes Tagged With: artisan bread, baking, bread, recipe, sourdough

Attempted Baguettes

September 7, 2013 By Korena in the Kitchen 12 Comments

IMG_5316Oh, hi. I’ve been kind of absent in these parts this week – I’m back at work full-time (did I mention I had four months off over the summer? Yeah, tough life!) and being out of the house for almost 10 hours a day while still trying to indulge in my blogging habit is taking some getting used to (I know, I know, suck it up Korena!). I just haven’t found the time or energy to finish a post, even though I have a backlog of recipes waiting to be posted. Oh well. First world problems, right?

Anyway, onto the topic of this post: the baguette. A seemingly simple cylinder of dough, tapered at both ends, baked to a shatteringly crisp, crusty perfection. However, having the inquiring mind that I do, I researched the heck out of just how to create said seemingly simple cylinder, and in the process, psyched myself out a bit (kind of like I did with macarons, another French creation). It wasn’t until I came across Richard Bertinet’s shaping instructions that I felt comfortable enough to try it out, and thankfully, it was actually much easier than I imagined.

…

Read More »

Filed Under: Bread, Recipes Tagged With: artisan bread, baguette, baking, bread, epi, fougasse, kneading, recipe, Richard Bertinet, yeast

Ciabatta Bread

April 17, 2013 By Korena in the Kitchen 43 Comments

Ciabatta Bread
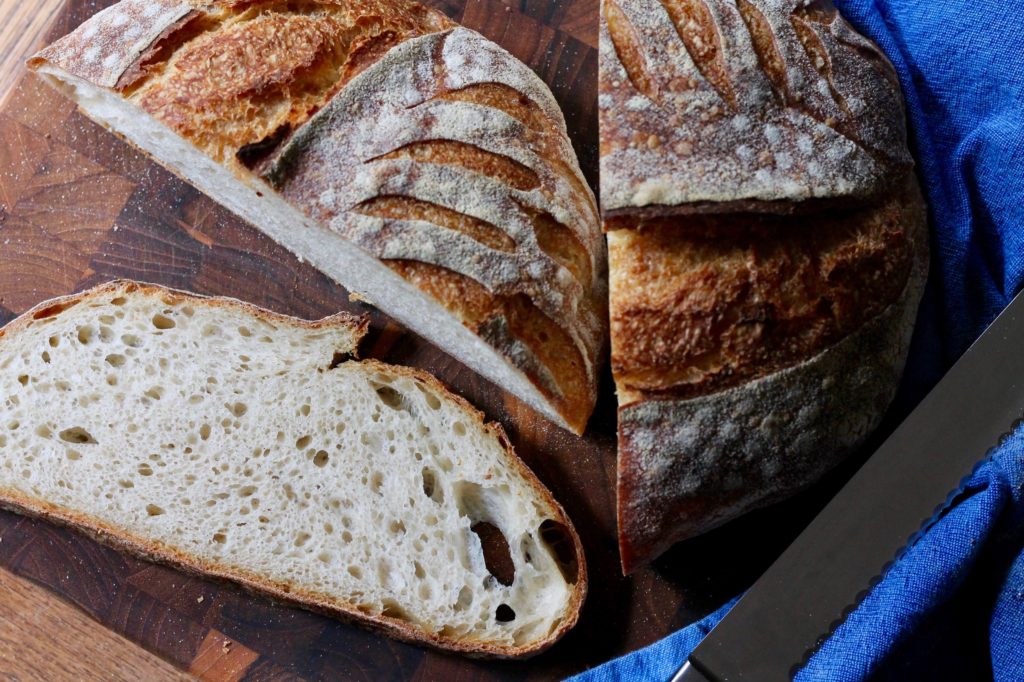
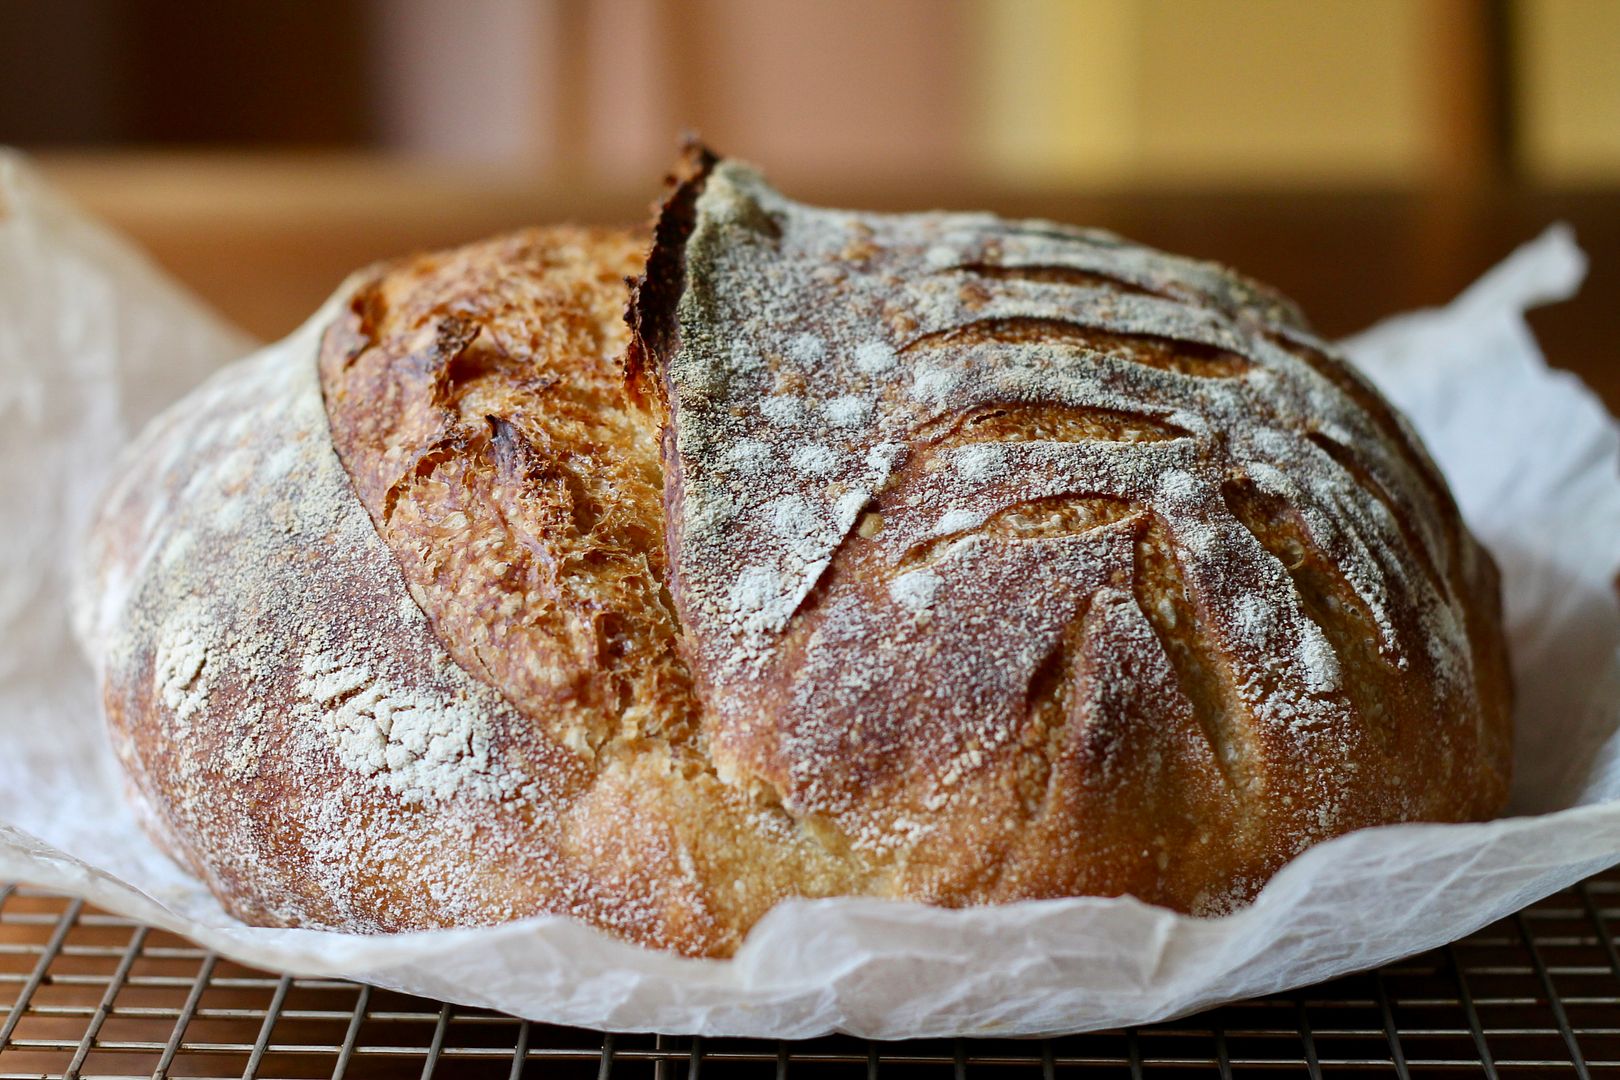
Oh how I’ve missed baking bread every week!

This beautiful, holey, airy, chewy bread is exactly what homemade bread should be: rustic and delicious and better than anything you can buy in the store, partly because it only contains five ingredients (flour, water, yeast, salt, and olive oil) but mostly because you made it yourself. That’s the part about baking bread that I love the best.

…

Read More »

Filed Under: Bread, Recipes Tagged With: artisan bread, baking, bread, ciabatta, pain a l'ancienne, Peter Reinhart, recipe, yeast

Shawnigan Sourdough Bread

September 11, 2012 By Korena in the Kitchen 26 Comments

While I have been keeping my sourdough starter pretty busy baking with Sourdough Surprises every month, it occurred to me that I haven’t actually used it to make a lot of bread, especially considering that I bake bread at least twice a week to keep us in sandwiches and toast. Lately I have been making some variation of Jim Lahey’s no-knead bread (that famous one that was in the New York Times), using yeast and just throwing a little bit of sourdough discard in with the dough for some added flavour, but not actually using the sourdough starter for its leavening power. I really really love Lahey’s no-knead bread (even more than the 5 Minutes a Day bread) so I decided to try to convert it to sourdough. This in itself proved to be a learning process, because it meant converting the recipe from volume measures to weight, and it involved percentages and math, which is not really my strong suit. But I must have done something right because, lo and behold, it worked! The bread came out beautifully crusty, with a soft, chewy, light interior crumb and a nice full flavour thanks to the starter.

…

Read More »

Filed Under: Bread, Recipes Tagged With: artisan bread, baking, bread, converting yeast to sourdough, home baking, recipe, rustic bread, sourdough

Variation on a Theme

January 24, 2012 By Korena in the Kitchen 1 Comment

We live near a Cobs Bread bakery, and before I started baking my own bread, we were in there at least once a week to buy fresh bread. One of our favorites was the cranberry sourdough loaf: slightly tangy bread studded with tart, sweet cranberries, wonderful for a sandwich or toast with cheese or butter and jam. I figured this was something I could recreate myself at home using the no-knead crusty artisan bread dough from Artisan Bread in 5 Minutes a Day, which develops a slight sourdough flavour from being stored in the fridge (I’ve been experimenting with using my sourdough starter in the dough, which I will most definitely share when I have it figured out!).

Really, it’s so easy that I’m almost embarrassed – you simply roll out the dough, sprinkle it with dried cranberries, and roll it up again – but it’s so good and would be tweaked to suit any kind of addition to the bread, savory or sweet. I can imagine a beautiful olive or cheese loaf, or rosemary and roasted garlic, or sundried tomato and parmesan, or cinnamon raisin, or chocolate and orange zest, or…

I actually like this version of cranberry sourdough even better than the Cobs bread. It’s chewier and crustier, and you can add as many cranberries as your little heart desires, plus the feeling of accomplishment that comes from baking a loaf of bread makes it a hundred times more delicious. Try it and see!

Crusty Cranberry Bread

Before making this bread, familiarize yourself with the method in this post: Crusty No-Knead Bread… in 5 Minutes a Day! Technique inspired by this post.

First of all, stir yourself up a batch of no-knead crusty artisan bread dough and let it sit overnight or longer in the fridge to develop some sourdough-ish flavour. When you are ready to bake, cut off a 1 – 1 1/3 lb piece of dough (I used 1 1/3-ish lbs), sprinkle it gently with flour, and form it into a ball with your hands by pulling down the top and sides and pinching them underneath. This should only take a few seconds. Place the dough ball on a lightly floured surface and press it into a rectangle with your fingers (don’t knead it!). You want to use just enough flour to keep the dough from sticking to your work surface, but not any more than is necessary, otherwise the dough will be too dry. Use a lightly floured rolling pin to roll it into a rectangle about 1 cm thick (the dimensions don’t matter). Sprinkle the dough with a few handfuls of chopped dried cranberries, covering the dough evenly right to the edges, then roll it up tightly from one short end. Pick the roll up in your hands and tuck the ends under. Using the same technique you used earlier to form the lump of plain dough into a ball, gently pull the top and sides of the cranberry’d dough and tuck them underneath to form a smooth ball. Sprinkle sparingly with a little bit of flour if it sticks to your hands too much, and don’t worry if a few cranberries burst through. Place the dough on a square of parchment paper and let it rest, uncovered, for 40-90 minutes for a 1 lb loaf, and up to 2 hours for a 1 1/3 lb loaf. You will know it has rested enough if it jiggles slightly when you tug on the parchment paper. With 20 minutes to left in the rest period, prepare the oven by placing a pizza stone on the center rack and a roasting pan on a lower rack. Preheat the oven to 450ËšF. When the dough is fully rested and the oven is hot, sprinkle the dough lightly with flour and slash it 1/4″ deep with a serrated knife. Place the dough and parchment paper on the preheated pizza stone, then pour a mug of hot tap water into the roasting pan. The steam will make the crust shiny and crisp. Bake for 30-55 minutes (depending on the size of your loaf), until dark brown and crusty. Cool completely on a rack before slicing.


Filed Under: Bread, Recipes Tagged With: artisan bread, Artisan Bread in 5 Minutes a Day, baking, bread, cranberries, recipe, yeast

Crusty No-Knead Bread… in 5 Minutes a Day!

January 6, 2012 By Korena in the Kitchen 37 Comments

I bought the book Artisan Bread in 5 Minutes a Day a few years ago after seeing a post on Steamy Kitchen about the caramel pecan cinnamon rolls that come from the book. I made the rolls and immediately knew I had to have the book, they were so good. The premise of the recipes in the book is to stir up a batch of very wet (high hydration) dough which you store in the fridge and then pull off a chunk to bake as desired. The wet dough plus the long rising and fermentation time develops the gluten in the dough without the need for kneading (heh!) and results in a delicious bread with a chewy crust and airy interior (which I’m still working to perfect) that literally only takes about five minutes of active time – the rest is just… rest. I have been making this bread exclusively for about two and a half months now, and we have not bought any bread in that time – just a lot of flour!

Artisan Bread in 5 Minutes a Day gives recipes for dozens of different bread doughs, ranging from peasant breads to multigrain breads to flatbreads and pizzas to breads enriched with butter, honey and eggs (such as challah and brioche, great for making caramel pecan rolls!), all of which can be varied with different flavours and additions (herbs, spices, dried fruit, cheese, olives, etc) to create pretty much whatever you can dream up. This recipe is for the basic Master Dough, which is a lean dough (just flour, water, yeast and salt) that can be baked into boules (as shown), baguettes, couronnes (like a giant bagel), or even used as pizza crust. It makes great sandwiches when it is fresh, and wonderful toast when it is a day or so old. One batch of dough makes enough for four small one pound loaves, which each last me and Nate about two days.

Bread often gets put in the black books of healthy eating, but not all bread is created equal. Floppy white grocery store bread that travels to the store in a bag and lasts two weeks without getting stale or mouldy is totally inferior to crusty, fresh-baked, open-crumbed artisan bread – not just aesthetically but also as a food source. I recently learned that the longer it takes for bread to rise and ferment, the better it is for you. This is because the yeasts and bacteria in the bread actually break down and partially digest the carbs and sugars, and the longer they have to do this, the easier the bread is to digest. This is especially true if the bread contains whole grains, which become more nutritionally available to your body with a long fermentation time (otherwise they’re just fiber). Artisan bread, with its long production time (usually several hours, and sometimes days!), is therefore easier to digest and more nutritious than bagged grocery store bread, which is made so expediently that the yeast doesn’t have time to break anything down, and is also pumped so full of additives and preservatives that it can’t break down, period.

Another thing I learned is that the crust plays an important role. A chewy, crunchy bread crust forces you to actually chew your food (mechanical digestion), and also stimulates saliva, which starts breaking down the nutrients (chemical digestion), making the job of your stomach much easier – again, being hard to digest is one reason many people avoid bread. Soft, floppy, crustless bread that you don’t even have to chew is definitely going to sit in your stomach and make you feel ill, so don’t even bother with it: go straight for the crusty, delicious artisan bread and do your stomach and your taste buds a favour!

(I apologize for spending the last two paragraphs talking about digestion – I know it’s not the most appetizing thing to read about on a food blog, but I thought it was cool, so… yeah ;). )

Anyway, here is the recipe. Definitely try it, and also check out the Artisan Bread in 5 Minutes a Day website, where the book’s authors post all kinds of awesome tips, tricks, videos, and additional recipes for their breads :).

No-Knead Crusty Artisan Bread

This is my adapted version of the Master Recipe from Artisan Bread in 5 Minutes a Day. I use a reduced amount of salt, a mixture of all purpose and whole wheat flours, and have increased the amount of water to get the moisture level right (see notes below). I also bake the dough on parchment paper, rather than using a pizza peel to transfer the loaf to and from the pizza stone in the oven. You will need a large bowl or container (4-6 quarts in size) with a lid in which to mix and store the dough, and preferably a pizza stone (aka a baking stone) on which to bake the bread (but there are other ways to bake it too – see notes below). The dough can be stored for up to 2 weeks in the fridge – the longer it is stored, the more of a sourdough flavour it gets. Makes about 4 lbs of dough – enough for 4 x 1 lb loaves.

In a large (4-6 quart) bowl or container with a lid, mix together:

3 1/3 cups warm water (this is the amount that works for me with higher protein Canadian all-purpose flour – your experience may vary)

1 tbsp coarse sea salt

1 1/2 tbsp granulated yeast – instant, regular, whatever

Don’t worry if it doesn’t all dissolve nicely.

In a slightly smaller bowl, combine:

5 1/2 cups unbleached all-purpose flour (unbleached is important!)

1 cup whole wheat flour

(or 6 1/2 cups unbleached all-purpose flour only)

Measure the flour by “scooping and sweeping”, like so:

Dump the flour into the water mixture and stir it briskly until it is evenly moistened. You can get in there with your hands if you need to – just resist the urge to knead! The resulting dough should be very wet and sticky. Put the lid on the bowl/container – you don’t want an air-tight seal, but you do want the dough covered completely so it doesn’t dry out (I usually put a jar of peanut butter on top of the bowl to keep the lid down!). Leave the dough to rise at room temperature for 2 hours or until the top starts to flatten out and deflate a little bit, after which it will look something like this: All those bubbles are going to make your bread lovely and airy, so don’t squish it down, whatever you do. Place the covered container in the fridge and refrigerate for at least a few hours – the dough can be baked with after the first 2 hour rise but is much easier to handle after being chilled. Store in the fridge up to 2 weeks.

When you are ready to bake bread, take the dough out of the fridge and sprinkle a small part of the surface with flour so it doesn’t stick to your hands (you will notice that the dough has sunk quite a bit – this is fine because as long as you don’t press it down, all the bubbles are still intact!). Grab the floured dough and pull out about 1 lb of dough (the size of a grapefruit). I use scissors to cut off the chunk of dough. Try not to squash the dough too much, and don’t knead it! Pick it up in your hands, dust it with a little bit more flour and quickly shape it into a ball (or “boule”) by gently pulling the top of the dough and tucking it underneath. Try to do this by handling it as little as possible (this takes some practice) – it should take about 5 seconds tops. Place the ball of dough, tucked ends down, into a piece of parchment paper. Let it rest, uncovered, at room temperature for 40-90 minutes. With about 20 minutes left in the rest period, prepare the oven. Place a pizza stone on a central shelf, and on any other shelf that won’t interfere with the rising bread (below is good!), place a metal roasting pan. Heat the oven to 450ËšF and let it preheat for at least 20 minutes (your pizza stone may take longer to heat up completely).When the oven is preheated and the dough is fully rested, dust the shaped boule with flour and slash it about 1/4″ deep with a serrated knife – this allows the bread to expand in the oven in a predictable fashion, rather than splitting open randomly. Depending on the age of the stored dough, at the end of the rest period it may not have changed much in size or shape (fresher dough) or it may have flattened out (older dough), but it should jiggle if you tug on the parchment paper. Place the dough and parchment paper on the preheated pizza stone, then pour a mug full of hot tap water into the roasting pan, and shut the door quickly to trap the steam. The steam helps make the crust crisp and brown. Bake for 30-45 minutes, until the bread is a very deep brown. You will notice that it has expanded quite a bit – this is called oven spring. Let the bread cool completely on a rack before slicing it. This bread only lasts 2-3 days in our house, so we keep it uncovered on the counter, sitting cut-side down on a cutting board. This way the crust stays crisp and the cut end doesn’t get stale.

Some notes:

Feel free to make a 1 1/2 – 2 lb loaf – just let it rest and bake longer.

The original recipe was developed using American flour, but Canadian flour is higher in protein (about 12% versus 8-9%) and therefore absorbs more water, so I use 1/3 cup more water than the original recipe calls for. It may take a few tries to play around with the amount of water that works for you – see this post for more information.

If you under-bake the bread, the crust will lose its crispness as it cools. It should be quite dark brown and caramelized-looking when it comes out of the oven. The crust will also lose its crispness if you cut into it while it’s still warm.

The more large air holes inside the bread (an “airy crumb”), the better. This can be achieved with a wetter dough to start with or a longer resting time. One tip is to shape the dough in the morning, then cover it lightly with plastic and let it rest all day in the fridge, then bake it in the evening. This ensures a good long rest and lots of air hole formation. See this post for more tips.

If you don’t have a pizza stone, you can bake this bread in a Dutch oven, which works really well. I’ve also just used a regular baking sheet and the bread came out fine, but a pizza stone gives it a better crust. My pizza stone is handmade of terracotta and was a Christmas present from my parents. I love it!

Filed Under: Bread, Recipes Tagged With: artisan bread, Artisan Bread in 5 Minutes a Day, baking, no-knead bread, recipe, yeast

Welcome to my kitchen!

I'm Korena: cook, baker, dirty-dishes-maker. My favourite things include flour, butter, sugar, and chocolate. Read More…

  • Bloglovin
  • Email
  • Facebook
  • Instagram
  • Pinterest
  • RSS

Subscribe by Email!

Top Posts

Greek Kataifi
Daring Bakers: Ukrainian Easter Paska
Daring Bakers: Asian Coconut Custard Buns
Daring Bakers: Sfogliatelle Ricci and Lobster Tail Pastries
Cream Cheese Swiss Meringue Buttercream Frosting, Take 2: Success!
10 Years! {Nigella Lawson's Coffee and Walnut Layer Cake}

Search

Categories

Archives

Blogs I Like

  • 101 Cookbooks
  • Baking with Sibella
  • Bitter Baker
  • Bread and Companatico
  • Chocolate & Zucchini
  • Chocolate & Zucchini
  • De La Casa
  • Dinner With Julie
  • Dinner: A Love Story
  • Food in Jars
  • FrugalFeeding
  • Homesick Texan
  • Joy the Baker
  • Poires au Chocolat
  • Rufus' Food and Spirits Guide
  • Simple Bites
  • Simply Recipes
  • smitten kitchen
  • Steamy Kitchen
  • Tartelette
  • Tea & Cookies
  • The Pioneer Woman Cooks
  • The Wednesday Chef
  • Venison for Dinner
  • Bloglovin
  • Email
  • Facebook
  • Instagram
  • Pinterest
  • RSS

Subscribe by Email!

Search

Home | Recipes About | Contact |

All content © Korena Vezerian and Korena in the Kitchen, 2011 – 2021. Please contact me before duplicating any content, including pictures. Excerpts and links may be used, provided that full and clear credit is given to Korena Vezerian and Korena in the Kitchen with appropriate and specific direction to the original content.

Copyright © 2025 · Foodie Pro Theme On Genesis Framework · WordPress · Log in


Loading Comments...