
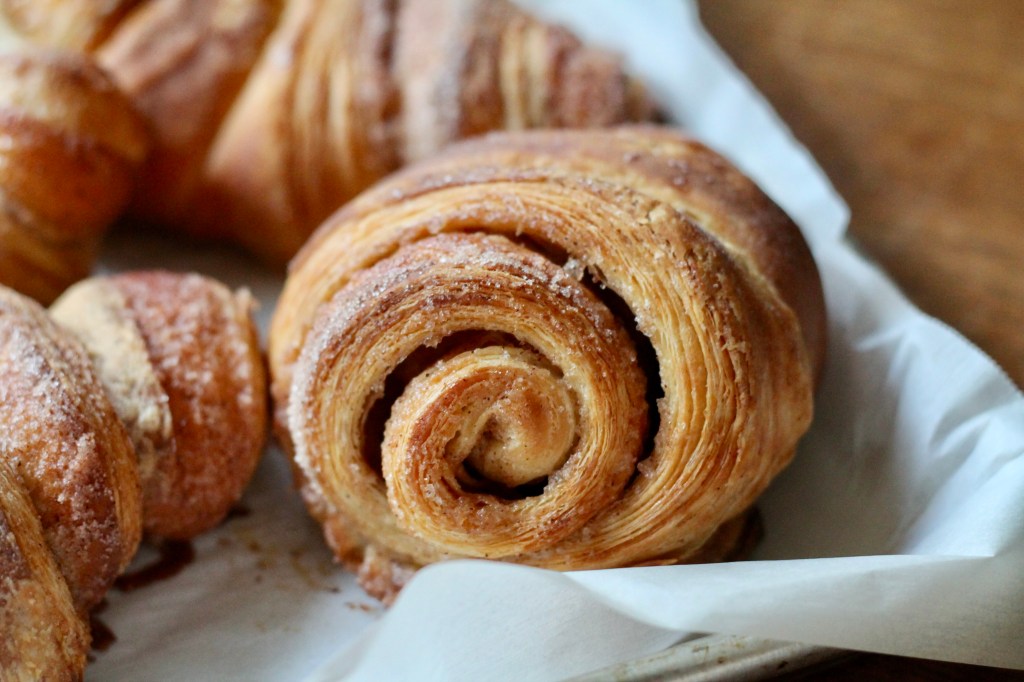
Imagine if a cinnamon bun and a croissant had a baby, only the baby was smarter, taller, better looking, and more popular than both its parents. This baby would be the Franzbrötchen, a cinnamon-sugar filled flaky pastry of German persuasion that is right up there among the best things I’ve ever baked.

This recipe comes from Classic German Baking by Luisa Weiss (aka The Wednesday Chef) and like all the other recipes I’ve tried from this book so far, it is wonderful. It starts with a beautiful laminated Danish pastry dough – known as Plunderteig in German (isn’t German FUN?!) – and ends with a fun shaping technique that involves rolling the dough up with sugar and cinnamon, cutting it into little logs, and then using the handle of a wooden spoon to squish each log in the middle, making the spiral ends flare out.

In the oven, the layers of dough puff up and out, turning the Franzbrötchen into crazy crescent shapes. The edges are flaky and crisp, the middle is chewy, and did I mention the little puddles of caramelized cinnamon-sugar? Add a cup of coffee and you’re basically in heaven.

Make these. You will not be sorry, and anyone else lucky enough to try one will love you for it. Full disclosure, none of these made it out of my house – Nate and I ate them all over the course of a few days. We regret nothing. Not even a little.

Franzbrötchen
Adapted just a smidge from Classic German Baking. Makes 12 buns. Click here for a printable PDF of the recipe.
In a large mixing bowl, combine:
4 2/3 cups (580 g) all purpose flour
1 tsp instant year
3 tbsp granulated sugar
3/4 tsp fine sea salt
Make a well in the middle.
In another bowl, whisk together:
3/4 c + 2 tbsp (200 ml) whole milk, lukewarm
2 eggs, room temperature
Pour the liquid ingredients into the dry ingredients, stirring as you pour.

Add 4 tbsp + 2 tsp (65 g) unsalted room temperature butter, cut into small chunks, and stir until it forms a shaggy dough. Knead in the bowl with your hands to bring it together, then turn out onto an unfloured work surface.

Knead until smooth, elastic, and no longer sticky (about 5 minutes). The dough will be slack and messy and very sticky at first, but resist adding any additional flour – kneading will do the trick.
Place the kneaded dough back into the bowl, cover with plastic, and let rise for 2 hours in a warm spot, until doubled in size (I put it in the oven with the oven light on and a bowl of hot water).

When the dough has risen, prepare the butter block. Place 1 cup + 2 tbsp (250 g) cold unsalted butter between two pieces of parchment paper, then bash it several times with a rolling pin. This will mechanically soften the butter and make it pliable without warming it up or melting it. Once the butter has flattened out and softened a bit, fold the parchment paper around it into an 8″ square packet. Turn the packet over so that the folded edges are underneath, then with the rolling pin, roll the butter out to the edges of the packet to make an 8″ butter square. Set it aside at room temperature, to keep it pliable.

Gently punch down the risen dough and scrape it out of the bowl onto a lightly floured surface. Knead a few times, then roll it out into a 13″ square. Unwrap the butter square and place it diagonally on top of the dough. Fold the corners of the dough over the butter to completely encase it, and pinch the seams to secure.

Dust the dough with flour and roll out into an 8″x12″ rectangle. Brush off any excess flour, then execute a letter fold: mentally divide the dough into thirds, then fold the top third down and the bottom third up. Wrap lightly in plastic wrap and place in the fridge to chill for 20 minutes.

Repeat this rolling out to 8″x12″ / folding in thirds / chilling for 20 minutes twice more, for a total of three times.

Preheat the oven to 400˚F (375˚F convection). Line 2 baking sheets with parchment paper.
After the dough has chilled for the third time, cut it in half and return half to the fridge. On a lightly floured surface, roll the other half into a 13″ square.
In a small bowl, combine the filling:
3/4 cup (150 g) granulated white sugar
2 tsp ground cinnamon
pinch fine sea salt
Sprinkle the dough evenly with half the cinnamon-sugar filling, right to the edges.

Roll up the dough into a tight cylinder and trim the ends to expose the butter layers and filling. Cut the roll crosswise into 6 pieces using a large sharp knife.

Take one of the cut pieces and press down in the middle of it with the handle of a wooden spoon, keeping the handle parallel to your work surface. This will make the spiral ends of the dough curl out and up. Stop pressing before the spoon goes all the way through the dough – you don’t want to cut the dough in half. Press down with your hands on the fanned-out sides of the roll to secure the shape. Transfer the shaped roll to the prepared baking sheet, and repeat with the remaining 5 pieces. Cover the shaped rolls with a dishcloth and let proof for 20 minutes.

Repeat with the remaining dough, filling, and second baking sheet. (NB, I baked all 12 rolls on the same baking sheet and they expanded like crazy in the oven, so 2 separate baking sheets is the way to go.)
Bake the first pan of proofed rolls in the preheated 400˚F (375˚F convection) oven for 20-25 minutes, until golden, puffed, and flaky, with caramelized bottoms. Transfer to a rack to cool, and repeat the baking process with the second pan of proofed rolls.

Franzbrötchen are best enjoyed the day they are baked, but we certainly weren’t complaining about eating them over the next several days. If you want to re-fresh day(s)-old Franzbrötchen, reheat in a 350˚F (325˚F convection) oven for 5 minutes. They can also be frozen in an airtight container for up to 2 months.


Leave a comment