
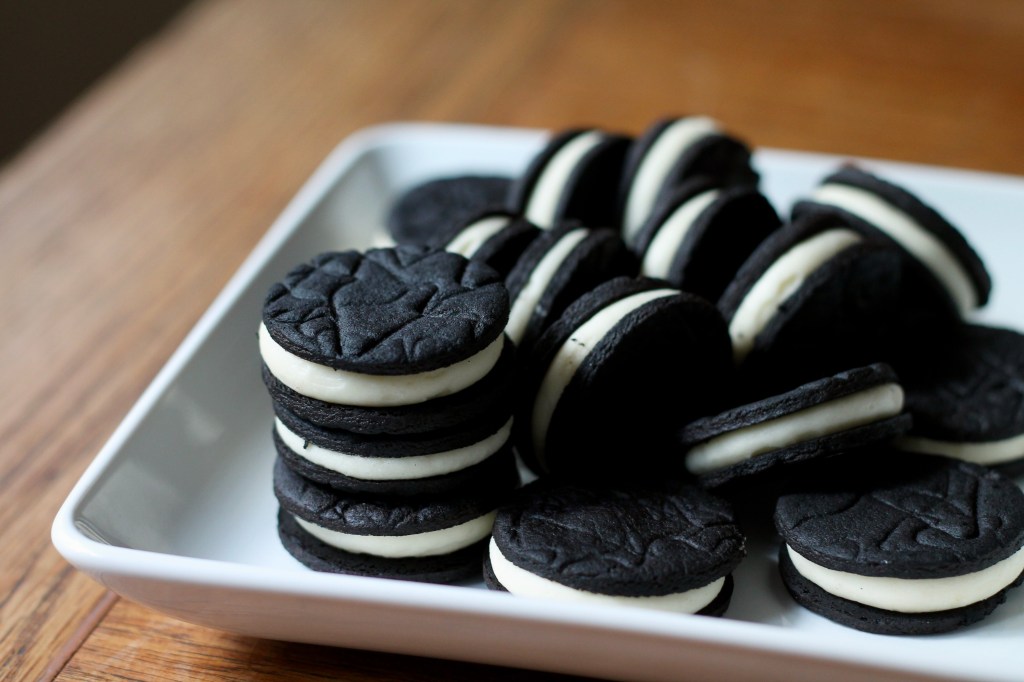
It’s been years since I ate a real Oreo, but I can say with 100% certainty that BraveTart’s Homemade Oreos are BETTER!
In the summer, I joined the Food52 Baking Club on Facebook, and every month we all bake out of a selected baking book and share our results and experiences with the recipes. It’s pretty fun, especially for a baking nerd like me, however I’ve fallen a little behind (a new book to bake from every month gets a bit overwhelming) and had committed to working my way through some of the past month’s cookbooks that were already on my shelves (including Dorie’s Cookies, Classic German Baking, and Tartine). Then November’s cookbook came around: the recently released BraveTart by Stella Parks, a trained pastry chef who writes a blog of the same name and is also an editor at Serious Eats, where she shares her knowledge of food history, baking science, and pastry technique. Basically, she really really knows her stuff – case in point, these Oreos, which are phenomenal. I wasn’t going to buy this month’s cookbook, but after making these cookies from the recipe posted on Serious Eats, it is now on my list (and no, this is not a paid advertisement).

An Oreo is two thin, bittersweet, crisp chocolate cookies sandwiched around a firm, creamy vanilla filling. Simple, right? Well yes, but getting it right comes down to technique and a little bit of science. Just the wafers alone contain three genius tricks to achieve perfection. First, a tiny bit of coconut extract in the cookie dough that makes the cookies taste like Oreos but not at all like coconut. Second, bleached all purpose flour to get a perfect mix of protein and starch for the best textured wafers. Third, regular Dutch cocoa powder plus baking soda, which alkalinizes the dough and causes it to darken when baked, instead of using “black” cocoa powder like many other copycat Oreo recipes call for (although I admit that I did use black cocoa powder here, because I had bought it especially for making DIY Oreos!). My 1 ½-inch cookies ended up looking a little miniature, but the resulting wafers are great – crisp and light, super chocolately and rather adultly bittersweet, and fantastic paired with the sweet, creamy filling.

The filling is similarly scienced-up, although did give me a bit of trouble. To prevent it from softening the wafers once filled and to keep it firm at room temperature, the filling is made with clarified butter, which is butter that has been melted and cooked to evaporate any milky liquid, leaving behind only pure butterfat. This warm melted clarified butter is then added to powdered sugar, which dissolves so that the filling is silky smooth yet thick and pipeable. My filling, however, got all melty and soupy (maybe because not all the liquid had cooked out of the butter?), so I chilled it until it thickened and then beat it until smooth. Because of this, I think my filling is a little fluffier and more aerated than intended so it makes these seem like Double Stuf Oreos – but they are DELICIOUS.
Stella makes her Oreos look absolutely stunning by using an embossed rolling pin (want!) to give the tops of the wafers that classic Oreo texture, however without such a rolling pin, I had to get creative. I used the dull edge of a squiggly-looking cookie cutter (in this case, an oddly-shaped Christmas tree) to stamp a random pattern over the rolled out dough, and it worked pretty well, albeit not quite as pretty.

I ate my way through waaaay too many of these homemade Oreos (thank goodness it makes a big batch!), but I’m not even a little bit sorry. In fact, I already can’t wait to make them again. AND, since it’s December and Christmas Cookie Season is officially upon us, I can’t help but think that these would be FANTASTIC with a little peppermint extract in the filling for a seasonal twist…
BraveTart’s Homemade Oreos
From BraveTart by Stella Parks, via Serious Eats. Makes about 50 sandwich cookies. Click here for a printable PDF of the recipe.
Chocolate Wafers
In the bowl of a stand mixer fitted with the paddle attachment, cream together:
115 g unsalted butter, softened to room temperature
100 g granulated sugar
55 g golden syrup
1/2 tsp baking soda
1/8 tsp fine sea salt
1/4 tsp coconut extract (optional but recommended)
Mix on medium speed until light and fluffy, about 5 minutes, scraping down the bowl with a rubber spatula at least once.

In a bowl, sift together:
165 g bleached all purpose flour
35 g Dutch cocoa powder

Stir into the butter-sugar mixture on low speed – it will look too dry at first, but will come together to form a smooth dough. Knead it against the side of the bowl to bring it together in a ball, then divide it in half.

Preheat the oven to 350˚F (325˚F convection). Liberally dust your work surface with more Dutch cocoa and place half the dough on it. Dust with more cocoa, the roll out to a thickness of 1/8″, using more cocoa powder as needed to prevent the rolling pin from sticking. Use the dull edge of a swirly-looking cookie cutter to stamp a pattern all over the dough. (Alternatively, if using an embossed rolling pin, roll the dough to 1/4″ thick with a regular rolling pin, then sprinkle with cocoa powder and use a single pass of the embossed pin to roll the dough to 1/8″ thick.)

Run an offset spatula underneath the dough to make sure it doesn’t stick to your work surface, then stamp out circles with a 1 1/2″ round cookie cutter. Transfer the cookies to a parchment-lined baking sheet, leaving 1/4″ between them (the cookies won’t spread or expand much). Gather up the scraps and set aside.

Repeat the process with the other half of the dough, then gather the scraps from both halves together and roll them out. Any subsequent dough scraps can be baked off and used to make chocolate cookie crumbs (or eaten as a baker’s treat!).
Bake in the middle of the preheated 350˚F (325˚F convection) oven for 12-15 minutes, until firm and dry. Allow the cookies to cool to room temperature on the cookie sheet. Flip half of the wafers over so they are good to go when the filling is ready.

Vanilla Filling
In a small saucepan over medium-low heat, melt 170 g unsalted butter. Bring the butter to a simmer, stirring occasionally, while it bubbles. If you notice it turning brown, reduce the heat. Keep cooking the butter until it stops making popping sounds – this means all the liquid has evaporated. Strain the butter into the bowl of an electric mixer fitted with the paddle attachment.

Add:
240 g powdered sugar
1 tsp vanilla extract
pinch fine sea salt
Mix in low speed to combine, then increase the speed to medium and beat for several minutes, until soft and creamy. Mine got much too liquid-y, so I chilled it and re-beat it a few times until it came to the right consistency.

Working quickly before the filling has a chance to set, scoop it into a piping bag fitted with a large round tip, and pipe generous dollops (about 1 scant tbsp) onto the bottoms of half the chocolate wafers. Sandwich with the top wafer and press gently until the filling reaches the edge of the cookie.

Let stand at room temperature until set (about 30 minutes), then store in an airtight container for up to 1 week at room temperature, a month in the fridge, or up to 3 months frozen. These are best served at room temperature.




Leave a comment