
Now that it’s officially fall, part of me is like, “where the heck did summer go so fast?” and the other part of me (the part that prefers slippers to shorts and likes putting on a jacket to go outside) is all, “FALL! I’VE BEEN WAITING SO LONG!” Other than the wardrobe options, I love this season because pretty much every year, someone or other gives me a bunch of baking apples from their tree or their parent’s tree or their cousin’s neighbour’s son’s teacher’s tree. Everyone has apples to give away and I will happily take them all, because it means I can make apple pie, and that is about my favourite thing to make.

One thing that has eluded me in past apple pies, however, is perfectly flaky, tender pastry – my pastry was always just a little bit tough. However, over the last year or so, I’ve gleaned two bits of information that turned out to be game-changers in terms of pastry-making: the first from my mother-in-law, whose trick for tender pastry is essentially to do as little as possible to the dough (ie, don’t over-handle it); and the second from the Kitchn’s Baking School last fall, where I learned to add only enough liquid to the dough so that it clumps together when squeezed. Then this summer, I spent every other weekend churning out multiple batches of pie dough to sell baked goods at a tiny little newborn farmer’s market, and I was able to put both tips into practice and perfect my technique – right down to the optimal number of pulses needed to blend the butter into the flour in the food processor.

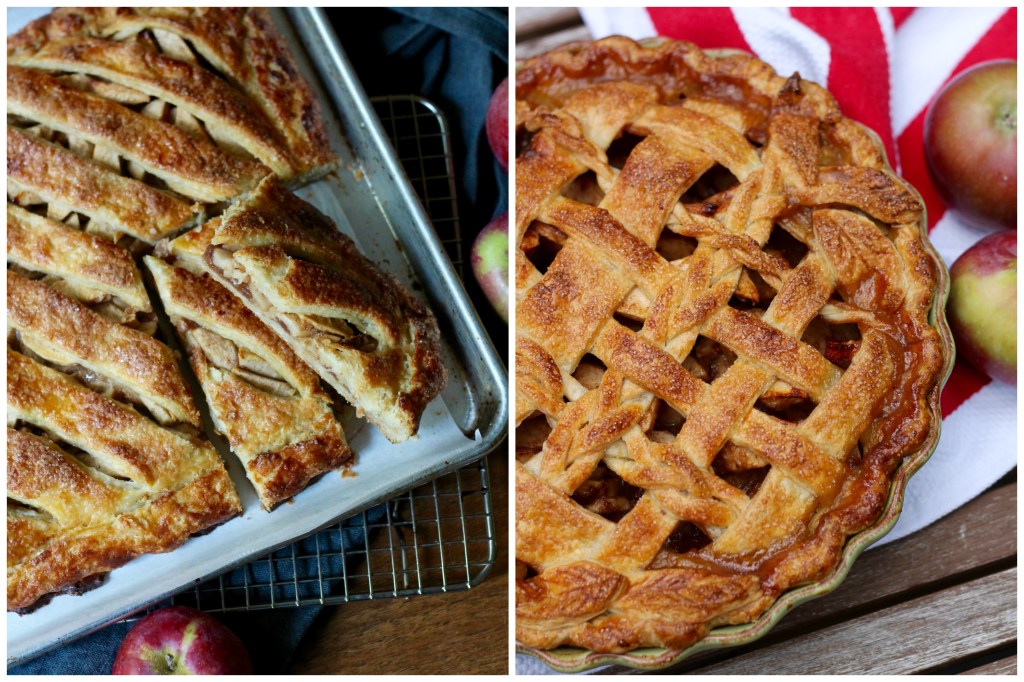
Seeing as I was recently the recipient of a giant bag of McIntosh apples from my boss’s mother’s tree, I thought I would share my perfect pastry tips and tricks in the form of apple pie. Two apple pies, in fact: a round one with a fancy lattice top (very trendy right now) and a big slab pie to take to work and share with my co-workers (surprise! everyone loves apple pie and it was a hit!).


I used my standby Canadian Living apple pie filling recipe – thickened with flour – for the round pie and Smitten Kitchen’s recipe – thickened with cornstarch – for the slab pie. I ended up liking the cornstarch version better because instead of the slightly muddy apple “gravy” that you get with a flour-thickened filling, the cornstarch made the juices shiny and translucent after baking, almost like apple jelly. Also, I added a pinch of cloves to the Canadian Living filling recipe and regretted it – I always forget how cloying they can be – but I liked the hint of allspice in the Smitten Kitchen recipe. Personal tastes aside, both are good recipes and they make the same amount of filling, so they can be used interchangeably in either a regular or a slab pie. I strongly encourage you to get your hands on some apples and try one or both recipes, because it is apple pie season, after all!

Flaky and Tender Pastry
Adapted from Canadian Living, with various tips and tricks I’ve picked up from all over. Makes enough for one 9-10″ double crust pie or two 9-10″ single crust pies.
I prefer to make pastry in the food processor because it’s really good at quickly and evenly distributing both the butter pieces and the liquid into the flour without over-working the gluten, which can create a tough crust – but you can do this by hand with a pastry blender and a fork, if you prefer.
The colder you can keep everything, the better – ie, keep the liquid ingredients and butter in the fridge until you add them to the mixture. If your hands are especially warm, run them under cold water (and dry them off) before frissaging the dough, and use a bench scraper to handle the dough where possible. Try to work quickly and efficiently so that you are handling the dough the least amount possible.
In a liquid measuring cup, whisk together:
1 egg, cold
2 tsp vinegar or lemon juice (I use apple cider vinegar because it is always the closest at hand)
enough ice cold water to make 135 ml
Place in the fridge to stay cold.

Cut 227 g (1 cup) cold unsalted butter into 1/2 inch cubes and place in the fridge to stay cold.
In the bowl of a food processor, pulse together:
375 g (3 cups) all purpose flour (if using cups, be sure to fluff the flour first, then scoop it into the measuring cup and level off the top for an accurate measurement)
1 tsp salt
1 tbsp granulated white sugar
Add the cold butter and pulse 30 times, until the butter is in roughly pea-sized pieces (some larger, some smaller). Give the mixture a few folds with a fork to make sure that there are no very large pieces of butter lurking at the bottom and give a few more pulses if necessary but don’t go overboard – you’ll be pulsing it again to mix in the liquid.

In a steady stream, pour the egg mixture through the feed tube into the flour-butter mixture while pulsing – about 20 pulses total, stopping when the mixture forms small curds. It should look dry and crumbly – do NOT allow it to process until it clumps together in its own. The mixture should stick together when squeezed in your hand.

Turn the contents of the food processor out onto a lightly floured work surface – again, it will look too dry and crumbly to possibly be pie dough, but have faith. Form the mixture into an oval mound and then frissage the dough – that is, press/smear it away from you using the heel of your hand to flatten and press the dough together. This will create thin layers of butter within the dough and also help the dough to come together without over-working the gluten in the flour.

With a bench scraper, lift and fold the frissage-d dough back onto itself and press into a rough pile, then repeat the frissage step once more. Lift/fold it back onto itself and press it firmly into a rectangle. It should now be cohesive enough to be recognizable as pie dough. If absolutely necessary, frissage it a third time.

Split the dough in half with your bench scraper, stand each half on its cut edge, and press into a round disc about 1 inch thick. The neater you can keep the edges now, the neater they will be when you roll the pastry out. Wrap the dough tightly in plastic wrap and chill in the fridge for at least 1 hour, or place in a Ziplock bag and freeze for up to 3 months (thaw in the fridge before using).

Fancy Lattice-Topped Apple Pie
Filling adapted from Canadian Living. Makes one 9″ double-crust pie.
You will need 1 recipe of the above pastry for this pie, split into 2 equal portions.

Preheat the oven to 425˚F (400˚F convection) with the rack in the bottom third of the oven.
In a large bowl, combine:
8 cups (3 1/2 – 4 lbs) peeled and thinly sliced baking apples
1/2 – 2/3 cup brown sugar, depending on the tartness of your apples
juice of 1 lemon
3 tbsp all purpose flour
1 tsp ground cinnamon
1/4 tsp ground cardamom
grating of fresh nutmeg
tiny pinch of cloves (optional)
pinch salt
Mix together well, and then set aside while you roll out your pastry.

On a floured surface, roll out one disc of chilled pastry into a 12″ circle. Roll it up around your rolling pin and transfer to a 9″ pie plate, pressing it to the bottom and sides. Trim the edges of the pastry to leave about 1″ of overhang. Pour in the apple filing and spread it out, mounding slightly towards the centre. Set aside.

Roll out the second disc of chilled pastry a little bit thinner, into a 14″ circle. Using a rotary cutter or small sharp knife, cut the pastry into strips of varying thickness – some thicker, some thinner. Cut 6 strands about 1/2″ thick, and/or (if you’re feeling brave) about 1/4″ thick, for braids. Transfer the strips to a parchment-lined baking sheet and refrigerate while you are braiding.

Take 3 of the braid strips and press them together at one end. Begin braiding loosely, taking care not to break the strands. When you run out of room, press the ends together. Transfer the finished braid to the baking sheet the fridge while you complete the other braids.

Lay half the strips and braids parallel across the filling in the pie shell – you can engineer a pattern if you want, but a random sequence of thin, thick, and braided strips works just fine. Fold every second strip back halfway across the filling, and place a strip or braid running horizontally across the filling. Bring the folded-back strips down, then fold the other strips back and lay another strip or braid horizontally across the filling. Repeat until you run out of room on one side of the pie, then turn it around and repeat on the other side.

With your fingers, firmly press the strips around the edge of the filling where they meet the bottom crust, then trim off any excess. Fold the pastry overhang back in towards the centre to create a lip, then flute it with your fingers as desired. Whisk together an egg wash (1 egg + 1 tbsp water + pinch salt) and brush it over the pastry.

If desired, roll out the pastry scraps and cut them into leaves, using the back of a paring knife to make lines for veins. Stick them onto the pie using the egg wash as glue, and give then a coating of egg was as well.

Sprinkle the pie with granulated sugar and place on a baking sheet (this will catch any drips and prevent you from having to clean your oven afterwards!).

Bake in the bottom third of the preheated 425˚F (400˚F convection) oven for 15 minutes, then turn down the temperature to 350˚F (325˚F convection) and bake another 40-60 minutes, until the pie is a deep golden brown and the juices in the middle are bubbling – this is important because otherwise the flour in the filling will not be cooked and it will be runny when it cools. If the top is browning too much before this happens, cover it with foil.

Allow the pie to cool on a rack before slicing into wedges.
Apple Slab Pie
Adapted from Smitten Kitchen. Makes one 10″x15″ slab pie that can be cut into at 12-16 pieces. Most recipes for a slab pie call for a 10″x15″ jelly roll pan, but I only have a half-sheet pan measuring 12″x17″, so I improvised.
You will need 1 1/2 recipes of the above pastry (ie, enough for 3 single crusts – this is the maximum amount that will fit into my 8-cup food processor), pressed into 2 rectangular slabs.

Preheat the oven to 375˚F (350˚F convection) with the rack in the middle. Line the bottom of a 12″x17″ half-sheet pan with parchment paper, and set aside.
In a large bowl, combine:
8 cups (3 1/2 – 4 lbs) peeled and thinly sliced apples
1/2 – 2/3 cup brown sugar, depending on the tartness of your apples
juice of 1 lemon
3 tbsp cornstarch
1 tsp ground cinnamon
1/4 tsp freshly grated nutmeg
1/4 tsp (or less) ground allspice
pinch salt
Mix well, then set aside.

On a floured surface, roll out one slab of pastry into a rectangle about 12″x17″ (trim the edges neatly if desired). Roll it up around your rolling pin and transfer it to your parchment-lined half-sheet pan. Scoop the apple filling on top and spread it out evenly, leaving at least 1″ around the edges of bare pastry. Don’t worry if the juices spill over the edges.

Roll out the second slab of pastry to the same size. With a rotary cutter or paring knife, cut diagonal strips in the center of the pastry, leaving a 2″ border of intact pastry around the edges. Roll up the pastry around your rolling pin, then unroll it over top of the apple filling. With your fingers, firmly press the edges of the top and bottom pastry together.

Trim off any overhang if you wish, then fold the pastry edge in towards the centre to make a lip. Flute with your fingers or crimp with a fork to make sure it is well-sealed together.

Brush the whole thing with an egg wash (1 egg + 1 tbsp water + pinch salt) then sprinkle with granulated sugar.

Bake in the preheated 375˚F oven for 40-60 minutes, until the pastry is golden brown and the juices in the middle are bubbling – this is important because otherwise the cornstarch in the filling will not be cooked and it will be runny when it cools. If the top is browning too much before this happens, cover it with foil.

Allow the pie to cool on a rack before cutting into squares or rectangles.

Leave a comment