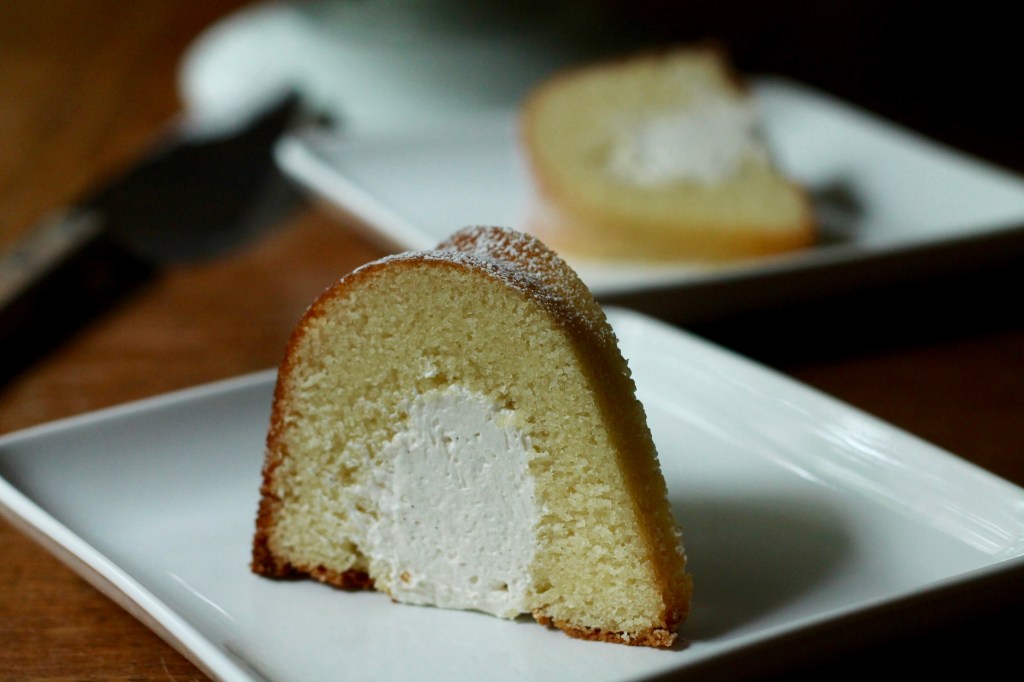
Never having eaten a Twinkie, and – perhaps more importantly – never having wanted to eat a Twinkie, I wasn’t all that tempted to make the Twinkie Bundt Cake when it started making the rounds on food blogs… until my cousin Cecilia posted Smitten Kitchen’s version on my Facebook wall, along with three little words: “I dare you!” It was a long weekend, I had no plans, and well, she dared me – so Operation Twinkie Bundt was born.

This is a relatively simple cake – a buttermilk bundt with a marshmallow cream-filled tunnel in the center – however I ran into trouble with it almost immediately. I was all excited to use the bundt pan I’d picked up for $3 at the thrift store but when I tried to dislodge the cake from the pan, I ended up with this:

Not exactly the result I was going for. I posted my mishap on social media where I received lots of commiseration (bundt cakes are notorious for being stuck to the pan) and a tip for Miracle Pan Release: equal parts shortening, vegetable oil, and flour whipped together into a paste that you use to grease your pan. So I tried again, this time with a new, heavier duty bundt pan (this is also key) slathered with Miracle Pan Release. I held my breath as I inverted the baked cake over a cooling rack and heard the satisfying little “thunk” of the cake sliding out onto the rack in one piece. Redemption!

So with the cake sorted, I turned my attention to the filling. The original Twinkie Bundt recipe from Shauna Sever‘s book, Pure Vanilla, called for a jar of marshmallow fluff whipped with butter; Smitten Kitchen used straight Swiss meringue instead. I decided to make homemade marshmallow fluff (coincidentally, also from a recipe by Shauna Sever), which is as easy as making meringue – you just beat a sugar syrup into whipped egg whites, only because the sugar syrup contains corn syrup, it gets the most wonderful, stretchy-chewy, marshmallow-y texture, which is lacking in plain meringue. I fancied it up with a double dose of vanilla (extract and seeds), then whipped it with some butter to make a marshmallow cream. Because I had two cakes (with varying degrees of structural integrity), I actually tried both the marshmallow cream and the straight up fluff as fillings, thinking that I would like the the fluff version better because it was more true to the texture of a real marshmallow… but the cream version won: somehow less sweet, less sticky, and buttery-creamy. I have no idea how authentically it mimics a real Twinkie, but I can tell you that it is so, so good with the buttermilk cake.

To fill the cake, you first have to do some careful excavation of the cake’s innards using a melon baller. I did this a bit gingerly because I didn’t want the filling to burst through the cake, but I’d recommend hollowing it out a little more because the best slices of cake were the ones with the most cream filling. Once you have a hollow tunnel in the cake, you pipe in the filling, then invert the whole thing onto a serving platter, where it looks deceivingly ordinary:

Until you cut it open to reveal this deliciousness:

I had essentially made two cakes by the end of all this, so I took the successful version to work to share, where it disappeared in record time and I had people coming up to me all week exclaiming about how good it was. So although it got off to a rocky start, I think we can put Operation Twinkie Bundt squarely in the “success” column. Thanks, Cecilia!

Twinkie Bundt
Buttermilk Bundt
Recipe from Smitten Kitchen. Makes 1 bundt cake.
Preheat the oven to 350˚F (325˚F convection). Generously grease a 10 cup bundt pan – a heavy duty, non-stick one is best and I highly recommend Miracle Pan Release for greasing the pan. Set the pan aside.
In the bowl of an electric mixer, cream together until very light and fluffy:
1 cup unsalted butter, soft
1 3/4 cups granulated white sugar
One at a time, beat in 2 whole eggs and 2 egg yolks (save the egg whites for the marshmallow fluff, below), scraping down the bowl and mixing until very fluffy.
Beat in:
1 tsp vanilla
2 tsp baking powder
1 tsp fine sea salt

Measure out 2 1/2 cups all purpose flour and 1 cup buttermilk. Mix 1/3 of the flour into the butter mixture, followed by half the buttermilk. Repeat with another 1/3 of the flour and the rest of the buttermilk, then finally mix in the last of the flour until just combined.

Scoop the batter into the prepared pan and spread it out evenly. Bake in the preheated 350˚F (325˚F convection) oven for 40-45 minutes, until golden brown and a cake tester inserted in the middle comes out clean. Let the cake cool in the pan for 10 minutes, then invert the cake out onto a cooling rack and let it cool completely.

Marshmallow Cream Filling
Marshmallow Fluff adapted from Shauna Sever, via Chowhound. Note that you will only need half this amount of marshmallow fluff for the marshmallow cream filling, so feel free to halve the fluff recipe.
First, we make marshmallow fluff. In the bowl of an electric mixer with the whisk attachment, combine:
2 egg whites
1/4 tsp cream of tartar
Beat on low speed until foamy, then increase to medium and beat just until soft peaks form.

Meanwhile, in a medium sized, heavy-bottomed saucepan, combine:
3/4 cup granulated white sugar
1/2 cup corn syrup
1/4 cup water
pinch fine sea salt
Bring it to a boil over high heat until it reaches 240˚F on a candy thermometer. Turn the mixer back on to low speed and drizzle in about 2 tbsp of the hot sugar syrup to temper the egg whites. Slowly pour in the rest of the syrup, aiming for it to land in the egg whites between the side of the bowl and the edge of the whisk.

Increase the mixer speed to medium and whip the mixture until it becomes stiff, stretchy, and glossy (about 7 minutes).

Add:
seeds scraped from 1 vanilla bean
1 1/2 tsp vanilla
Beat for another 2 minutes, until well combined. The marshmallow fluff can be stored in an airtight container in the fridge for up to 1 week (bring it back to room temperature before making the marshmallow cream filling).

To make the marshmallow cream filling, whip 1/2 cup softened unsalted butter until fluffy. On medium speed, beat in half the marshmallow fluff – it might collapse and look wet and curdled at first, but just let it mix for a while and it will emulsify. Beat in 1 tsp vanilla extract. Done!

Assembly
Flip the cake over so that the round side faces down. Using a melon baller or small spoon, scoop out several holes in the cake, then use your finger to excavate a tunnel between the holes.

Put the marshmallow cream filling into a large piping bag, then pipe it into the holes in the cake to fill the tunnel. Invert it into a serving platter, dust with some icing sugar, and cut into slices to serve.


Leave a comment