
At last, we are at the end of the Homemade Wedding Cake saga! To recap thus far, we’ve made vanilla butter cake, and we’ve also made vanilla buttercream, blackberry compote, chocolate ganache, and vanilla-bourbon syrup. Now it’s time to put them all together and make that wedding cake!

Our wedding didn’t really have a theme other than “getting married at a vineyard in early autumn”, so I wasn’t trying to match our cake to anything. I remembered seeing a beautiful Martha Stewart wedding cake with chocolate leaves on it, which seemed to fit with our non-theme AND was relatively simple to do – well, simple in that I could make the leaves ahead of time and wouldn’t be spending hours piping out intricate decorations or anything. So my first task was to pick a bunch of non-poisonous salal leaves (unsprayed rose or mint leaves would also be good choices) and coat them in tempered chocolate. The most challenging part was keeping the chocolate at the correct temperature so that it would be glossy and snappy (ie, tempered) without the whitish bloom that comes from it being too cold or too warm. I achieved this for the most part, but in the end it didn’t really matter too much, as long as there were enough leaves for the cake.

The morning before the wedding, I took the chilled cakes out of the fridge and “torted” them: split them, brushed each layer with vanilla-bourbon syrup, then layered them with vanilla buttercream, blackberry compote, and chocolate ganache. A crumb-coat followed by a final smooth layer of buttercream went on the outside, support dowels were inserted in the bottom layer, the top tier was stacked, and a long bamboo BBQ skewer was pushed through the center to make sure it all stayed in place. I stuck the leaves on in a spiral up the sides of the cake, and then held the cake on my lap as we drove five minutes down the road to the drop it off at the venue, where they kept it in the walk-in cooler overnight. The next day, the cake sat at room temperature for several hours during the reception, and everything was the perfect texture by the time we cut and ate it.

I have to say, after having made several other wedding cakes for other people that always ended up being schlepped in pieces to some other location and assembled in a foreign kitchen (or in one case, a hallway), it almost seemed too easy to be assembling a wedding cake in my own kitchen, with all my regular tools at my disposal. If you can swing this, I highly recommend it!
Tempered Chocolate Leaves
Wash and thoroughly dry about 50-60 sturdy, non-poisonous leaves. Set them aside to make sure any moisture evaporates while you melt the chocolate.

Chop about 500 g high quality dark chocolate (I used Bernard Callebaut caillets, which look like chocolate chips but aren’t) and set aside about 1/3 of it. Place the other 2/3 of the chocolate in a metal bowl and melt it over a bain marie of gently simmering water until the chocolate reaches 115-120˚F (46-49˚C). Remove from the heat and mix in the remaining 1/3 of the chocolate, allowing the mixture to cool to 81˚F (27˚C) and stirring frequently as it cools. Place the chocolate back over the bain marie and heat it up again, stirring, to between 89-91˚F (31-32˚C). It is now ready to use. Heat it back up gently when it starts too cool but don’t let it go above 91˚F (32˚C) or it will lose its temper and you’ll have to start again. I complicated things by setting the bowl of tempered chocolate in a larger bowl of warm water to try to keep it from cooling down, but it didn’t really work very well, so don’t do that. Just keep checking the temperature and stick it back on the bain marie for a minute or two if it gets too cool to work with.

Take one of your perfectly dry leaves and use a small spoon to spread chocolate over the underside of the leaf, taking care not to get chocolate over the edges onto the top of the leaf. Place the leaf, chocolate-side up, on a baking sheet lined with waxed paper. Repeat with the remaining leaves and allow them to cool and set at room temperature. Once set, they should be hard and glossy. Starting at the stem-end of each leaf, gently peel away from the chocolate.

Discard the real leaves and place the chocolate leaves in an airtight container until you are ready to use them. They can be stored at a cool room temperature for several weeks or longer, so definitely do this ahead of time.
Assembling the Cake
You will need:
Vanilla butter cakes, 2 round 6″ layers and 2 round 9″ layers
Tempered chocolate leaves (above)
1 x 6″ round and 1 x 9″ round cardboard cake boards (I made mine out of foam core poster-board)
1/4″ wooden dowels
1 long bamboo BBQ skewer
Serrated knife
Frosting spatulas – one straight and one offset
Piping bag with large round tip (or just a plain coupler) and medium round tip (#12)
Rotating cake decorating stand
Cake stand or serving platter
Torting and Frosting
Starting with the 9″ vanilla butter cake layers, split each cake layer in half horizontally with a serrated knife so that you end up with 4 layers. Place one of the layers, cut side up, on the 9″ round cake board and secure it to the board with a dab of vanilla buttercream. Using a pastry brush, moisten the cut surface of the cake with the vanilla-bourbon syrup.

Place some of the vanilla Swiss meringue buttercream in a piping bag fitted with a large round tip (I used the plain coupler) and pipe a border of buttercream around the edge of the cake, then spread a thin layer of blackberry compote over the cake within the buttercream border.
Take the second cake layer and spread a layer of vanilla buttercream on the non-cut side, then place it buttercream down / cut side up over the blackberry compote. Press gently to make sure it is level.

Brush the second cake layer with syrup and pipe a border of buttercream around the edge, then spread the cake with a layer of chocolate ganache up to the height of the buttercream border.

Place the third cake layer on top, cut side up again, and press gently to make sure it is level. Repeat the first layer with syrup, a buttercream border, and blackberry compote.
For the fourth and final cake layer, brush vanilla syrup on the cut side, then spread with a layer of vanilla buttercream and place it buttercream down over the blackberry compote.

Spread the top and sides of the cake with a thin layer of buttercream as a crumb coat to fill any gaps and seal in all the crumbs, then chill for about 15 minutes. Repeat with the 6″ cake.

Once chilled, frost the cake with a thick layer of buttercream. Start with a large dollop of buttercream on the top of the cake and use your spatula to spread it out evenly on top of the cake, making a little lip of buttercream overhanging the sides of the cake. Spread a thick layer of buttercream around the side,s then use your spatula to smooth everything out, leaving you with straight sides and a perfectly level top. Watch this video for a great tutorial on how to do this like a pro.

Repeat with the 6″ cake, and chill both cakes until firm.
Stacking
Place the chilled 9″ cake on your serving platter or cake stand, making sure it is centered. Place a 6″ cake pan on top to mark a circle where the 6″ cake will sit when stacked on top of the 9″ cake – this will show you where to put your support dowels.
Stick a piece of 1/4″ dowel straight up and down into the cake, about 1″ inside the marked circle. With a pencil, mark the dowel to the exact height of the cake, then gently pull it out of the cake and trim the dowel to that mark. Use this piece of dowel to cut 3 others the exact same length. Insert them perpendicularly into the cake, about 1″ inside the marked circle, in a square configuration. They should be level with or just a tiny bit lower than the top of the buttercream. The point here is for the dowels to support the weight of the second cake when it it stacked, rather than having the bottom cake take all the weight, which would cause the layers to squish.
(If your cake has more than 2 tiers, you want to put support dowels in each tier except for the top one.)

Use an offset spatula to gently place the 6″ cake on top of the dowels, making sure it is centered in the middle of the larger cake.
Insert a long bamboo BBQ skewer in the top of the cake and push it all the way through to the bottom (you will have to push hard to make it go through the 6″ cake board). Mark the exact height of the cake of the skewer, then pull it out a a few inches and use kitchen shears to cut off the excess. Push it all the way back into the cake and use a little dab of frosting to hide it. This will make the sure top tier doesn’t move.

Decorating
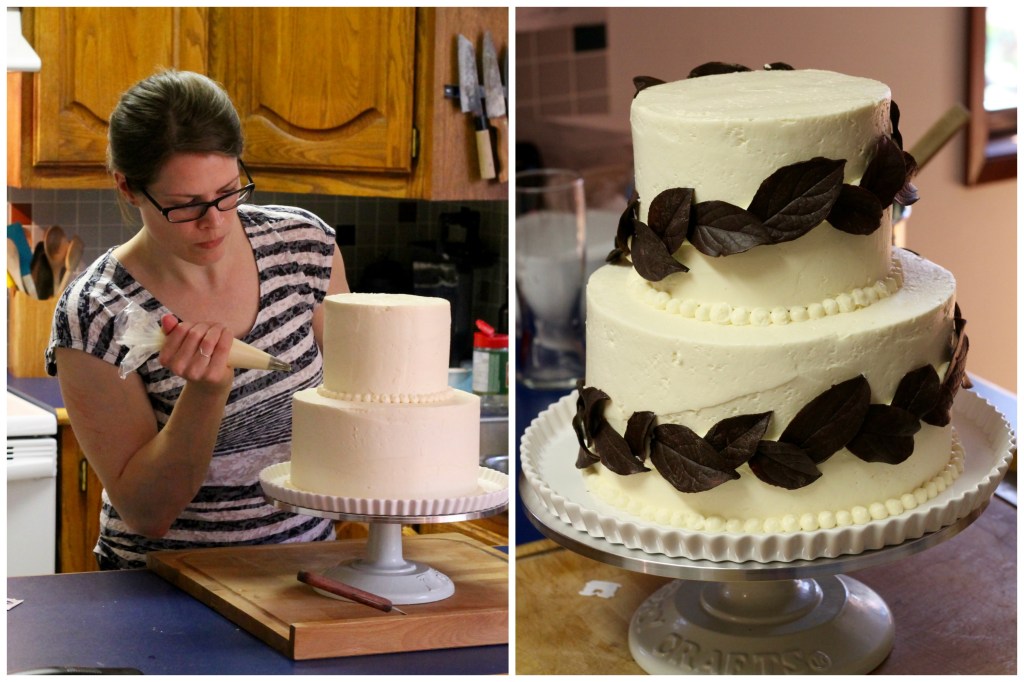
Put a medium round tip (#12) on your piping bag and fill the bag with vanilla Swiss meringue buttercream. Pipe a border of little dots around the bottom of each cake tier. To do this, you want to hold the tip about 1/4″ away from the surface of the cake and squeeze gently until a little round bead forms. Release the pressure and pull the tip away to leave a perfect little bubble of frosting. Repeat a hundred more times. 😉

To attach the chocolate leaves, first use a toothpick or the tip of a knife to lightly trace a spiral from the top to the bottom of the cake as a guide for placing the leaves. Starting from the top of each tier, use a large round tip to pipe a line of buttercream along the traced line. Again starting at the top of the tier, stick the chocolate leaves onto the buttercream, overlapping them to make a garland from the very top to the very bottom of the cake.

Voila! Your cake is finished!

At this point it should be chilled for a few hours or up to overnight. For the best taste and texture, make sure it has a chance to come to room temperature before serving. Wedding cakes are usually put on display during the reception for a few hours before being cut and served, which gives ample time for it to come to room temperature, so this shouldn’t be a problem.
For instructions on how to cut and serve a wedding cake, this is the best technique that I’ve found.
If you use these posts to help you make a wedding cake, I’d love to hear about it in the comments! Good luck!


Leave a comment