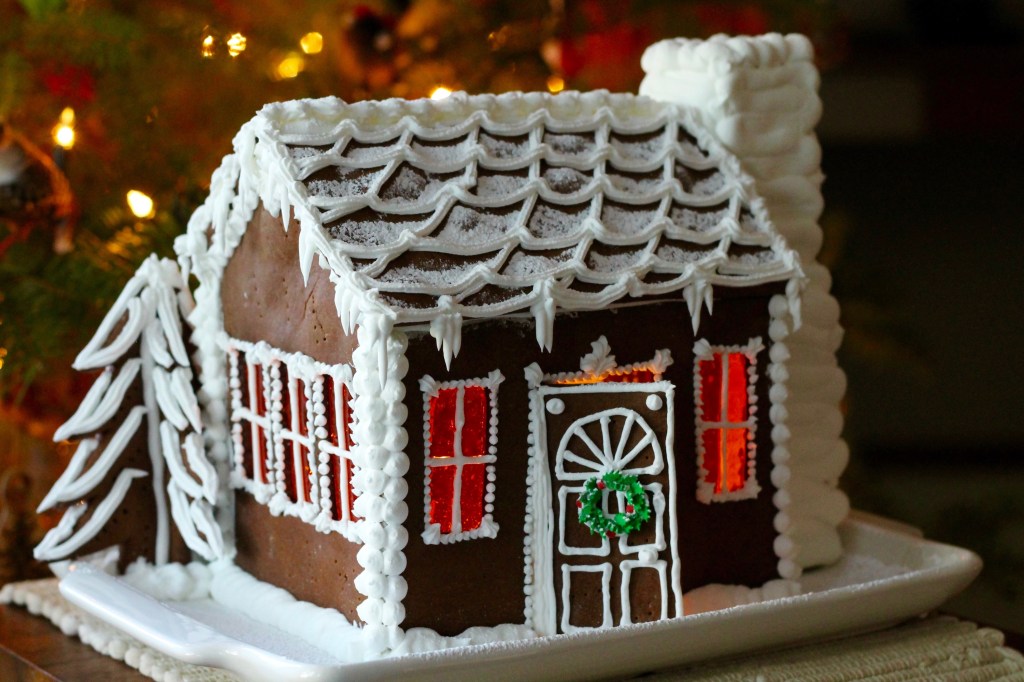
The twelfth day of Christmas was yesterday and now technically the holidays are really over, but I’m nothing if not always slightly behind the 8-ball when it comes to seasonal posts. So bear with me on this one.
The holidays at our house left a slick of butter, a cloud of sugar, and a trail of cookie crumbs. SO MANY cookie crumbs. I went hog wild with baking Christmas cookies two weeks before Christmas, so by the time Christmas actually happened, we absolutely didn’t need any more baked goods in the house. But I needed a baking project to take on between Christmas and New Year’s, and I decided on a gingerbread house. I know, I know – it’s a baked good, but I wasn’t planning on eating it. Gingerbread houses are generally made of “construction grade” gingerbread and royal icing glue, both of which are rock hard and not exactly prime snacking material. Plus, I just really wanted to make a gingerbread house, and one of the perks of adulthood is that sometimes you can do what you want!

I eventually turned to my trusted friend Martha for inspiration and based my project on her “Snow-Swept Gingerbread Cottage” recipe. It ended up being a lot of fun to make and I can’t wait to try another gingerbread project next year. There are tons and tons of gingerbread house tutorials on the internet already, so instead I’m just going to share some notes – what worked and what didn’t, what I’ll do next time, and the tips and tricks I picked up. Oh, and pictures – lots of pictures!


Gingerbread
The first step of any gingerbread project is making your gingerbread dough. For building a house, you want a construction grade gingerbread recipe rather than one for making cookies. It needs to be rock hard, tough, and dry in order to provide structure to your house, which means it won’t be fun to eat. It will, however, smell great, so there’s that. I used Martha’s construction grade gingerbread recipe, which contained a lot of liquid, meaning that it was easy to roll out and very tough, but also kind of stretchy (read: annoying) when cutting, and it got sort of blistery when baking. Next time, I think I will use this recipe instead.

You can find patterns for pretty much any gingerbread house with a quick Google search. I free-handed my design based on Martha’s plans because my printer wouldn’t print them to 200% (and also, the roof pieces seem to be missing?). Just make sure you cut out the right number of each piece (ie, two roof pieces, two side pieces, two end pieces, etc) so that you end up with a complete house! You also want to bake the dough until it is completely dry. I baked mine for about 15 minutes at 350˚F, then dropped the temperature to 300˚F and baked the pieces until dry, the time for which depended on the shape, size, and thickness of each piece. It’s also a good idea to freeze the cut-out dough before baking, to help keep it from shrinking in the oven.

Sugar Windows
Once your dough is baked and cool, you can make melted sugar glass for your windows. First, set up your window pieces on a baking sheet lined with parchment paper. In a small saucepan over medium heat, combine 1 cup sugar with 1/4 cup water and bring to a boil without stirring. Let the mixture cook without stirring (you can swirl the pan gently if you really feel the need) until it comes to 300˚F – it should just start to turn amber-coloured. Plunge the bottom of the saucepan into a bowl of ice water to stop the cooking, then carefully pour the sugar syrup into the window cut-outs. Use a spoon to catch any drips as you move from one window to the next, and return the pan to low heat to re-melt the sugar if it hardens too much to pour. Let the sugar harden completely before peeling the pieces off the parchment paper.

Next year, I’d like to try making stained-glass windows using crushed up clear hard candies (such as Life Savers or Jolly Rancher). You crush up each colour of candy, then spoon them into the window spaces in the baked gingerbread and put in a low oven to melt.

Royal Icing
Some people (including Martha) use a sugar syrup (same as the one above for the windows) to secure the gingerbread pieces together when assembling the house. This is great because it hardens almost immediately (whereas you have to wait for royal icing to dry) and I think it would be really helpful if you are making a big structure, but my house was pretty small and I didn’t want to be contending with a large pan of molten hot sugar syrup. So, I made a double batch of Wilton’s royal icing recipe. This is the icing I learned when I took a cake decorating class, and it is a very good one. It calls for meringue powder, however I had some egg whites to use up so I used a combination of egg whites plus meringue powder and water, and it worked really well. The substitution is to simply omit the meringue powder and replace the water in the recipe with the same volume of liquid egg whites. The trick to royal icing is to mix it on low speed for a LONG time – 10 minutes or more – until it is very creamy and matte. Wilton’s recipe will give a very stiff result, so I added a few more spoonfuls of water to get a slight softer consistency (ie, medium peaks), as I wanted to make sure it would be moist enough to adhere to the gingerbread without being at all runny.

Once your icing is mixed, keep the bowl covered with a damp cloth to keep it from drying out while you are working. Similarly, if you are using a piping bag and switching between icing tips (which you likely will be for a project like this), keep the used tips underneath a damp cloth to prevent the icing inside them from drying out and clogging up.

Assembly
First, a tip: I decorated the whole house with piping after I assembled it, but next time, I’d do some of the decorative piping before assembly – for example, all the window details. There will be some stuff that you will do after assembly (ie, icicles, piping at the corners of each house, the roof, etc) but do what you can before assembly, and let it dry completely.

Next, figure out how all your pieces fit together. This might seem obvious, but I stuck the walls together and then realized that I’d done it in such a way that the roof pieces were slightly too short to fit across the span of the walls, so I had to take it apart and start again (lucky the royal icing wasn’t dry yet). Start by assembling the walls at right angles to each other, using a thickly piped bead of royal icing to secure them. Do this on the surface you will be displaying the gingerbread house on, so that you can move it around easily without disturbing the drying icing. Secure the bottom inside of the walls to the base with royal icing as well, for extra stability. I had a bunch of tin cans on hand to prop the walls up while they dried, but didn’t end up needing them – once I got more than 2 walls stuck together, they held each other up. Once you have your walls up, let them dry for a while before putting the roof on.

Secure the roof pieces to the top of the walls, one at a time, and use icing to fill any gaps (I found that my roof pieces shrunk slightly in the oven). Again, set aside to dry for a bit.
Once your walls and roof are on securely, add the extra bits: chimneys, doors, etc.

Decorating
This is the fun part! I use several different piping tips to decorate and kept it pretty simple:
…little dots and scalloped details around the windows, doors, and corners…

…a star tip to do the piping on the roof…

…some holly sprinkles to make a wreath on the front door…

…and icicles! I did these at the end by thinning out the remaining royal icing with water so that it was softer and a little more inclined to drip, icicle-like, and then piped them from the eaves of the roof. Basically just squeeze the icing and pull the tip down as you decrease the pressure, dragging the icing with you into an icicle.

I made a “3D” tree by making two tree shapes and cutting one in half vertically before baking, then securing the two pieces perpendicularly to both sides of the intact tree.


The final touch is a dusting of icing sugar “snow”.

My favourite part was putting a tea light candle inside the finished house to make the windows glow! (Just don’t leave it unattended, of course!)




Leave a comment