
The bakery in the town I grew up in made a delicious cinnamon raisin bread, and on the occasions that I could convince my mum to buy a loaf, I would eat practically the entire thing myself, toasted and slathered with butter. Now, being an adult, I can, of course, go to the store and buy a loaf whenever the urge strikes – but in this particular instance, the urge also struck to make it myself.

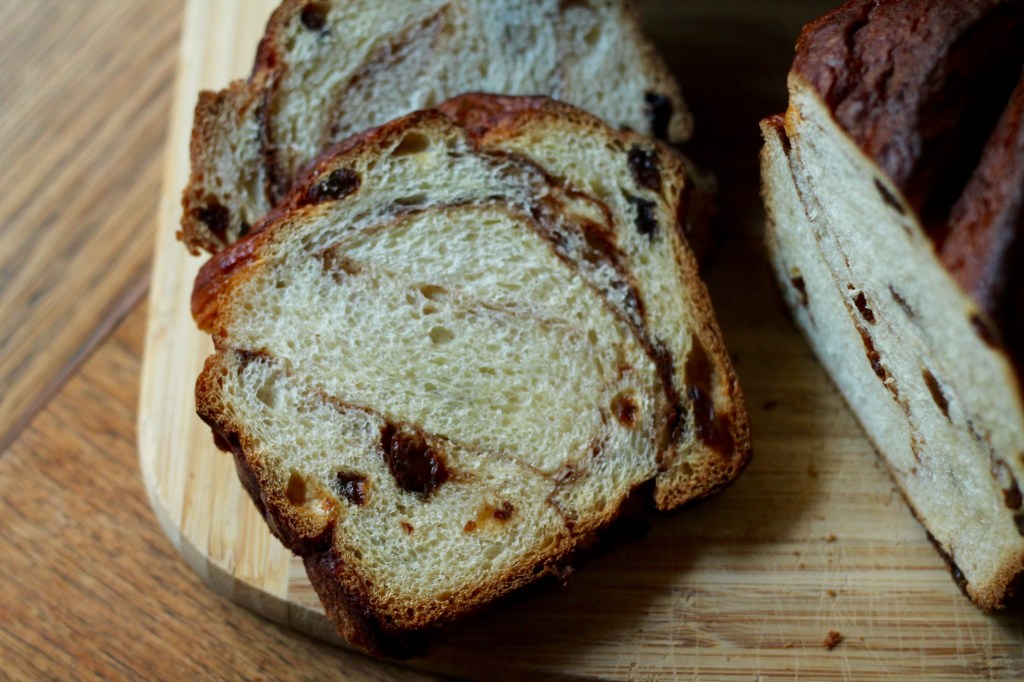
This recipe comes from Cooks Illustrated, so of course it is exacting and detailed and actually, pretty much perfect. It is the nicest dough I’ve worked with in a long time – it was beautifully soft, rose like a champ, and was easy to work with – and the shaping method for getting the cinnamon swirl inside the loaves is genius. Plus, the baked loaves look darn impressive with their swirly, twisty profile.

The smell of it baking in the oven will stop you in your tracks and I’m absolutely certain it would make mind-blowing french toast, but we never got that far – we ate all of it toasted and slathered with butter.

Cinnamon Raisin Swirl Bread
Adapted oh-so-slightly from Cooks Illustrated. Makes 2 loaves.
Dough
Cut 113 g (8 tbsp) unsalted butter into small cubes and toss with about 1 tbsp bread flour. Set the butter aside to soften while you mix the dough.
In the bowl of a stand mixer, combine with a whisk:
580 g (3 3/4 cup less 1 tbsp) bread flour
78 g (3/4 cup) nonfat dry milk powder
66 g (1/3 cup) granulated sugar
1 tbsp instant yeast

In a small bowl, whisk together:
340 g (1 1/2 cups) warm water (110˚F)
1 large egg
Pour the liquid mixture into the flour mixture and mix with the dough hook on medium-low speed until a shaggy dough forms, scraping down the sides of the bowl as necessary. Cover the bowl with plastic and let the dough rest for 20 minutes, for the flour to fully absorb the liquid.
Once the dough has rested, mix in 1 1/2 tsp salt and knead the dough on medium-low speed until the dough is smooth and elastic and pulls away from the sides of the bowl, leaving them clean (this took about 15 minutes for me).

With the mixer running, add in the softened butter cubes a few at a time, allowing them to mix into the dough before adding more. The dough will start to fall apart as you add the butter, but will become cohesive again when it is all mixed in. Continue kneading until the dough once again cleans the sides of the bowl.

Knead in 213 g (1 1/2 cups) raisins until they are evenly distributed throughout the dough (do this by hand if it is easier). Using your hands, lift one edge of the dough and fold it in towards the centre, then turn the bowl 90˚ and repeat. Repeat to make 8 fold total (this will help make the gluten structure of the dough long and stretchy).

Cover the bowl with plastic wrap and place it in a cold oven on the middle rack. Fill a baking dish or large glass measuring cup with 3 cups boiling water, place it in the oven beside the dough, and close the door – this will make a nice warm proofing box for the dough. Allow the dough to rise for 45 minutes, until at least doubled in volume.

Remove the risen dough from the oven (leave the warm water in there), press down gently to deflate it, and fold the dough 8 more times. Re-cover and return to the oven to rise again until doubled in volume, about 45 minutes more.

Filling
In a bowl, whisk together:
113 g (1 cup) icing sugar
3 tbsp ground cinnamon
1 tsp vanilla extract
1/2 tsp salt
Set aside.

Assembly
* Required equipment: a spray bottle filled with water
Grease two 8 1/2″ x 4 1/2 ” loaf pans and set aside.
Transfer the risen dough out onto a lightly floured container and divide it two.

One piece at a time, pat the dough into a rough 6″ x 11″ rectangle. Fold the long sides in to the middle in thirds, like you are folding a letter, to give you a skinny 11″ long rectangle of dough.

From one of the short ends, roll up the dough into a ball. Dust the ball lightly with flour and roll it out with a rolling pin into a 7″ by 18″ rectangle about 1/4″ thick (if the dough shrinks back when you are rolling it, let it rest for a few minutes to relax the gluten).

With your spray bottle, spray the surface of the dough lightly with water. Spread 1/2 of the cinnamon-sugar mixture evenly over the dough, leaving a 1/4″ border along the long sides and 3/4″ border along the short sides. Spray the filling lightly again with water – it should be speckled over the entire surface.

From one short edge, roll the dough into a tight cylinder and pinch the seam closed to seal. Dust lightly with flour on all sides and place seam-down to rest while you repeat with the second piece of dough.

One loaf at a time, cut each cylinder in half lengthwise with a large knife or bench scraper, straight down the middle. Lay the 2 strands of dough side by side with their cut sides up and gently stretch each strand until it is 14″ long.

Pinch the strands together at one end. To make the twist, lay the left strand over the right, still keeping the cut sides up, and repeat, left over right, until the dough is twisted along its length. Pinch the ends together and transfer, cut side up, into one of the prepared loaf pans. Repeat with the other loaf.

Cover the loaves loosely with plastic wrap and return to the oven with the (now lukewarm) water. Let rise for about 45 minutes, then remove and continue rising at room temperature while the oven preheats (about another 45 minutes, or until almost doubled in size).
Remove the water from the oven and preheat it to 350˚F (325˚F convection). Once the loaves are risen, brush them with a mixture of 1 egg beaten with 1 tbsp water.

Bake in the 350˚F (325˚F convection) oven until the crust is well browned, about 25 minutes, then reduce the oven temperature to 325˚F (300˚F convection). Tent the loaves with aluminum foil to prevent them from getting overly browned and bake until their internal temperature is 200˚F, another 15-20 minutes.

Let cool for 5 minutes in their pans, then turn them out onto a rack to cool completely before slicing. Can be stored at room temperature in a zipper lock bag for a few days. I highly recommend this bread sliced thick, toasted, and smeared with lots of butter.



Leave a comment