Oh how I’ve missed baking bread every week!
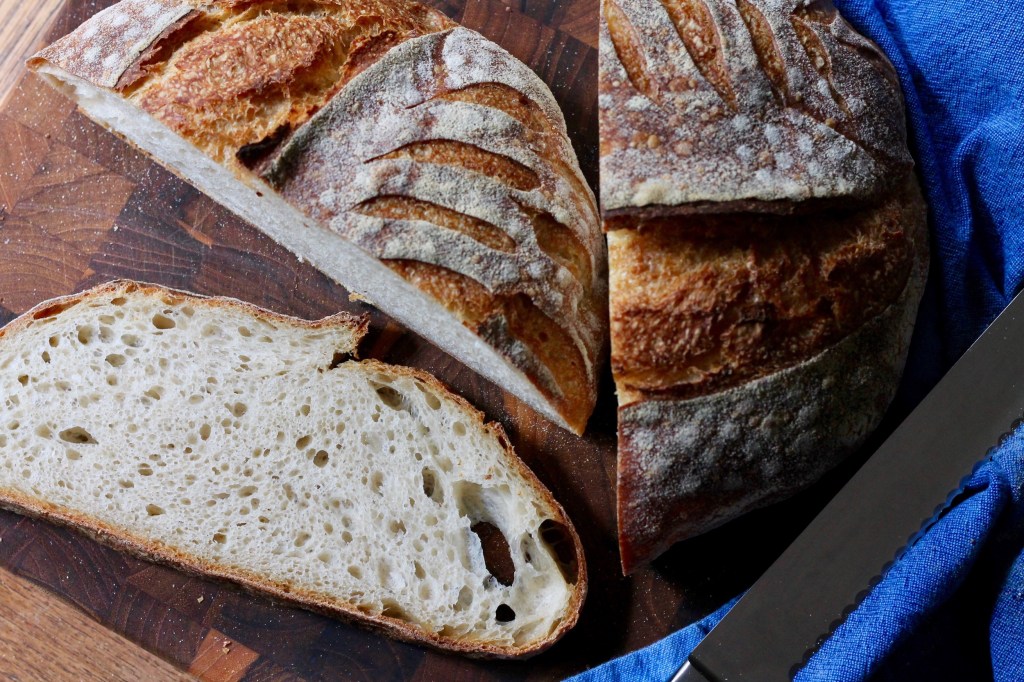
This beautiful, holey, airy, chewy bread is exactly what homemade bread should be: rustic and delicious and better than anything you can buy in the store, partly because it only contains five ingredients (flour, water, yeast, salt, and olive oil) but mostly because you made it yourself. That’s the part about baking bread that I love the best.
Ciabatta means “slipper” in Italian, and this bread is called that because apparently it looks like a worn-out old house slipper – ie: flat and kind of shapeless. It is made from a super high hydration dough, which gives it all those characteristic lovely bubbles and holes in the interior, but which also makes it hard to shape into anything other than a blob. But no worries – what it lacks in conventional good looks it more than makes up for in deliciousness, and when you cut into the wrinkled brown crust to reveal the creamy white, almost lacy interior, well… that, my friends, is beauty.
The typical ciabatta has a low rounded cross-section, a custardy interior crumb riddled with large holes, a thin-crispy-chewy crust, and a wrinkled-looking exterior from being coated in flour before baking. My loaves are lacking a few wrinkles – next time, more flour on the outside – but other than they are pretty much exactly what I was hoping for. The recipe couldn’t be much easier – you don’t even have to knead the dough, which instead employs the good old stretch-and-fold method combined with a long rest in the fridge to develop flavour and stretchy gluten strands.
This is the kind of bread you want to eat on its own, with maybe a smear of butter, just to enjoy the magic that happens when flour, water, and yeast combine. Sorry to wax all poetic here, but damn – bread is awesome, this one in particular.
Ciabatta Bread
From the “Pain Γ l’Ancienne” recipe in Peter Reinhart’s Artisan Breads Everyday. Makes 2 large loaves.
Up to four days before you want to bake the ciabatta, mix the dough. In a large bowl, combine:
4 1/2 cups bread flour
2 1/2 tsp coarse kosher salt
1 1/4 tsp instant yeast
In a measuring cup, mix together:
2 cups cold water
1 tbsp olive oil
Add the water/oil to the flour mixture and stir with a wooden spoon for a minute, until it is all evenly moistened and sticky. It will be quite wet, almost more of a batter than a dough.
Cover the bowl with plastic and let it rest for 10 minutes. While the dough rests, lightly rub your work surface with a thin coat of olive oil – this will help keep the wet dough from sticking.
After 10 minutes, scrape the dough out onto the oiled surface – you should almost be able to pour the dough out of the bowl. Wash the bowl out and oil it lightly with more olive oil. Wet your hands (this will prevent them from sticking to the dough) and grab the dough on one side from underneath, stretching it up and then folding it over on itself. Repeat this stretching and folding in all four directions, then scrape the dough up and put it back into the now-oiled bowl. Cover with plastic and rest 10 minutes.
Repeat every 10 minutes three more times, for a total of four stretch-and-folds over 40 minutes. With each consecutive series of stretches and folds, the dough will become less of a sticky mess and more cohesive, elastic, and manageable. Keeping your hands wet when handling it will make it much easier.
After 40 minutes, place the covered dough in the fridge to ferment at least overnight and for up to 4 days. It will rise in the fridge, perhaps up to double its original size.
Remove the dough from the fridge 3 hours before you want to bake. If it hasn’t risen to 1 1/2 times its original size, give it an extra hour at room temperature to rise a bit more.
After an hour (or more as necessary), line the back of a baking sheet with parchment paper and dust it liberally with flour. Flour your work surface heavily as well.
With wet hands, very carefully scrape the dough out of the bowl into the floured work surface, being careful not to deflate it. It should be full of bubbles and feel almost bouncy. Still with wet hands, gently shape the dough into a rectangle, reaching underneath the dough with your fingers to stretch it as necessary. With a large knife (wet the blade), cut it in half. Gently fold each half into thirds, like a letter, and equally gently, roll the dough in flour to coat it.
Transfer each blob of dough to the floured parchment paper, placing it seam-side down. Mist with spray oil and cover loosely with plastic wrap. Let it rest for 1 hour.
After an hour, transfer the dough back to your floured work surface, seam-side down to once again coat it in flour, then flip it over seam-side up. With your hands underneath the dough, gently stretch it into a rectangle and place it back on the parchment paper, seam-side up this time. Make sure the top surface is well-coated with flour to ensure that floury, wrinkled exterior. Cover gently with plastic and let the dough proof for one final hour.
Forty minutes before the hour is up, preheat the oven to 550ΛF (or its highest temperature) with a rack and baking stone (if you have one large enough) in the middle position and a metal roasting pan on a lower rack. When the dough is finished proofing, place it in the oven with the parchment paper, either on the upside-down baking sheet or directly on the baking stone (mine wasn’t big enough for both loaves). Pour a mugful of hot tap water into the roasting pan, close the door, and turn the oven temperature down to 450ΛF. Bake for 12 minutes, then rotate the loaves and bake 15-20 minutes more, until the bread is well browned and hollow-sounding when tapped.
Cool on a rack for at least 45 minutes before slicing (the waiting is torture!).
This post has been YeastSpotted, and submitted to Panissimo hosted by Barbara and Sandra.
nievesmischucherias says
Hi Korena!! is perfect your bred, love it =)
Korena in the Kitchen says
Thanks Nieves! π
Nieves says
You bread
frugalfeeding says
That is an absolutely astounding loaf, Korena – very impressed indeed!
Korena in the Kitchen says
Thanks Nick, easy to make and so satisfying!
wendyjv says
Yet another masterpiece from Korena’s Kitchen!
Korena in the Kitchen says
Thanks Ma π
whisksandchopsticks says
Korena, the master baker. All the characteristics of a beautiful ciabatta! Are you planning on your own bakery or baking class?
Korena in the Kitchen says
Haha, I wish!!
Linne says
Another loaf on my list! Thanks so much for the recipe. ~ Linne
Korena in the Kitchen says
You’re welcome – I hope you try it! π
Suz says
Wow, that is the most perfect crumb on your ciabatta! Beautiful.
Korena in the Kitchen says
Thanks Suz π
chef mimi says
That bread look perfect!
Korena in the Kitchen says
Thanks Mimi π
Bread & Companatico says
Korena, thank you so much for contributing with this glorious post and even more glorious bread. I hardly ever read a whole post from top to toe but this one was such beautiful ode to bread that I could not stop reading. So much careful work rewarded by such a perfect ciabatta bread! Wish I could have some right now… I will definitely try this recipe, that book is one I have not bought yet but maybe I should. One small technical question… what do you mean when you wrote to rotate the loaves?
Korena in the Kitchen says
Thank you Barbara, coming from a bread maven like you that means a lot! By “rotate the loaves” I mean turn them around in the oven so they bake more evenly. Does that make sense?
edith pilaff says
Korena,this is so impressive,i’m in love with your ciabatta!
I think it’s going to be quite difficult for me but i’m going to study your post and attempt this beauty!
Korena in the Kitchen says
Thank you Edith! It’s not difficult at all, I promise – the bread practically makes itself. You just need to be gentle with it because it’s such a wet dough π Good luck and I hope you love it!
Sibella at bakingwithsibella.com says
If a person could fall in love at a first sight with a loaf of bread, then that would be me and your ciabatta! It is PERFECT! My plan for Friday evening after work: make this bread! <3
Korena in the Kitchen says
Thanks Sibella π
whisksandchopsticks says
Korena, which conversion scale do you use for flour and liquid? There are so many out there and most are not giving same conversion. I am suspecting my own scale is not right either. Trying to see how to calibrate it. Thanks!
Korena in the Kitchen says
Do you mean when converting from volume to weight? I usually just Google it and go with the first result… probably not the most accurate way to do it! One way to calibrate your scale is to weigh 1 cup of water which is equal to 8 oz. Or if you’re using metric, 1 litre of water = 1 kg. Water is one substance where the volume to weight conversion is always constant, so it’s a good calibration measure. In *most* most things I’ve read about conversion, 1 cup of flour = about 4 oz, but it’s going to depend on how loosely (or not!) the flour is packed into the measuring cup. I hope that helps somewhat?!
whisksandchopsticks says
Thanks Korena. Will try to calibrate with water. π
Bam's Kitchen (@bamskitchen) says
You are the baking and bread guru!!!! Check out all of those delicious nooks and crannies in your bread. Have you ever thought about making a video? I love your step by step pictures but it would be really awesome if you could show in a video.
Korena in the Kitchen says
I’d have to grow another pair of arms first… π Or invest in a tripod I guess! lol
thejoemoose says
Reblogged this on Ramblings, shamblings, and other grooves and commented:
Ah, something I can try this weekend! Yay!
Korena in the Kitchen says
Cool, let me know how it turns out for you π
thejoemoose says
It went splendid! http://thejoemoose.wordpress.com/2013/05/04/roses-and-bread/ π
Korena in the Kitchen says
Just saw it! I’m so glad it worked well for you!
Louise says
I’m making my first-ever ciabatta using your recipe. Dough goes together today, baking tomorrow. Thank you for posting the recipe and pictures. Invaluable! Wish me luck!
Korena in the Kitchen says
Good luck! I don’t think you’ll need it though – I bet your bread will be delicious π
Louise says
I did it!! My first-ever ciabatta baked and eaten. Hubs loved it, and even I approved. Yes, I got holes! Thank you for the wonderful blog that gave me the confidence to try. I’ll certainly be making this again.
Korena in the Kitchen says
Yay yay yay! I’m so glad to hear this π Congratulations on a beautiful ciabatta π
Yvonne @ bitter baker says
Beautiful!! I just love the artisan look they have. I used olive oil last time I folded these in thirds, but I’m gonna start using flour, they turn out so much more less greasy, which I really like! (plus it’s healthier :))
Laura Harmon says
I just made this recipe and it is the best bread I have ever made and I’ve been baking breads for 40 years! Thanks for the step-by-step recipe!
Korena in the Kitchen says
Oh wow, now THAT is a statement! I’m so glad you liked it – it’s pretty awesome bread π
Laura Harmon says
Seriously, I have been looking for a recipe to make this type of bread. I had no idea that folding instead of kneading was the key! I let it rise in my fridge for 3 days, then today I took it out and baked it when it was ready, following your instructions. Best tasting bread, nice holes, the salt amount is just right… perfect!
Korena in the Kitchen says
A 3 day ferment would really enhance the flavour π Yeah, folding is kind of like magic for wet bread dough. Again, so glad you liked it!
Liz Leite says
Ok I’ve just come across this recipe, and this bread looks just gorgeous. I would love to try it, I’m from Australia so would the measurements be the same? As I know from some recipes our cups are a little different to US cups..???
Korena in the Kitchen says
Hi Liz, I checked the weight measurements for this recipe: 4 1/2 c flour = 20 oz = 567 g; 2 c water = 8 fluid oz = 237 g. I think 1 US cup is equal to .95 Australian cup, so 4 1/2 US cups of flour = 4 1/4 Australian cups; 2 US cups water = 1.9 Australian cups. I’d go with weights if you have a scale – much easier than trying to figure out 1.9 cups of water! This might be helpful: http://www.traditionaloven.com/culinary-arts/volume/convert-cup-us-to-cup-au.html
Mary says
Hi korena, i just took these bread out of the oven. As always it came out exactly the same as what you had explained. Unfortunately i was not able to attach their photoes in this page to show you how your post is useful for everyone who doesnt have any baking experience. Thanks korena .
Korena in the Kitchen says
I’m so glad to hear this Mary π