 Now that we’ve covered making the dough, it’s time to turn it into a pizza! This is the fun part. 🙂 (And if you haven’t already, you should read my previous post on Neapolitan-style pizza dough.)
Equipment
First of all, baking a Neapolitan-style pizza requires some equipment. You need an oven (obviously) that has a broiler element at the top of the oven (some broilers are in a separate compartment at the bottom). You also need a pizza or baking stone, and a pizza peel. If you don’t have a pizza peel, a rimless baking pan can be used to deposit the pizza on the blazing hot pizza stone instead. If you don’t have a pizza stone, there are instructions here for baking it on a cookie sheet, but I can’t vouch for how well it works.

Timing
I tried out two methods for baking Neapolitan-style pizzas, the first of which comes from Jim Lahey, and the second from the comments on a thread about pizza at The Fresh Loaf. The methods differ by oven rack position and use of the broiler while the pizza is in the oven, but both follow the same basic criteria to prepare the oven and pizza stone for baking the pizza: a one hour preheat of the oven, followed by a 15 minute blast from the broiler to heat the surface of the pizza stone. The one hour preheat coincides nicely with the one hour rest required for the dough. So while your dough rests, preheat the oven and prepare your toppings, and then when you turn on the broiler, use those 15 minutes to shape and top your pizza.
Shaping the Pizza
During the 15 minute broiler-blast
When working with the dough, remember to be gentle with it, and use lots of flour to prevent it from sticking. Don’t be tempted to use a rolling pin to shape the dough – use your hands to gently press and stretch the dough instead.
You will need:
Neapolitan-style pizza dough, individually portioned and rested for 1 hour
All purpose flour, for flouring your work surface
A pizza peel
Flour your work surface well and place the rested dough ball on it. Sprinkle it with more flour. Using your finger tips, lightly press down the middle of the dough, leaving a rim around the edge. Gently begin stretching the dough into an 8” – 12” circle, depending on the size of your dough ball. I do this by picking it up with both hands and holding it gently near the rim and letting it hang – it will stretch under its own weight.

Continue until your dough is the correct diameter and of mostly even thickness. If there are any large bubbles, pop them – they will burn in the oven. Make sure the bottom of your dough is not sticky at all (flour it if it is), then place it on the pizza peel. Give it a little jiggle to ensure the pizza is not stuck to it and will slide around freely. Your pizza is now ready for toppings!

Note: I used cornmeal on the pizza peel for the first few pizzas to help keep them from sticking, but found that it wasn’t necessary if the bottom of the pizza dough was properly floured. Also, any cornmeal that spilled onto the pizza stone burned under the broiler when re-heating the stone, so it’s better to just use flour on the bottom of the pizza dough. You can also flour the pizza peel to help keep the dough from sticking.
This video gives a good demonstration of how to shape high hydration pizza dough – not quite the method I use but the same idea of letting it hang off your hands and having gravity do the work.
Topping the Pizza
During the 15 minute broiler-blast
You want a light hand with toppings on a Neapolitan-style pizza – three or four max, including sauce and cheese (if you’re using them!). If you are going the traditional tomato sauce route, this is what I recommend: instead of pre-made pizza sauce, grab a can of good quality Italian tomatoes (whole or diced, but not pureed) and make your own sauce (it’s super easy). I use Italian tomatoes because in my experience, they are generally more tomato-y and less watery than other canned tomatoes.

Easy Tomato Sauce
Open a can of good quality Italian tomatoes. If they are whole, crush them with your hands. Use an immersion blender to gently puree them – you want little chunks, not smooth tomato soup. By using whole or diced tomatoes rather than already pureed, you can control the consistency of the final product. I used a can of “finely chopped Italian tomatoes” that was already the perfect consistency. Add a pinch or two of sea salt, to taste. I also like adding a pinch of dried oregano (rub it between your hands to release the oils) but that’s totally optional. Leftover sauce freezes well.

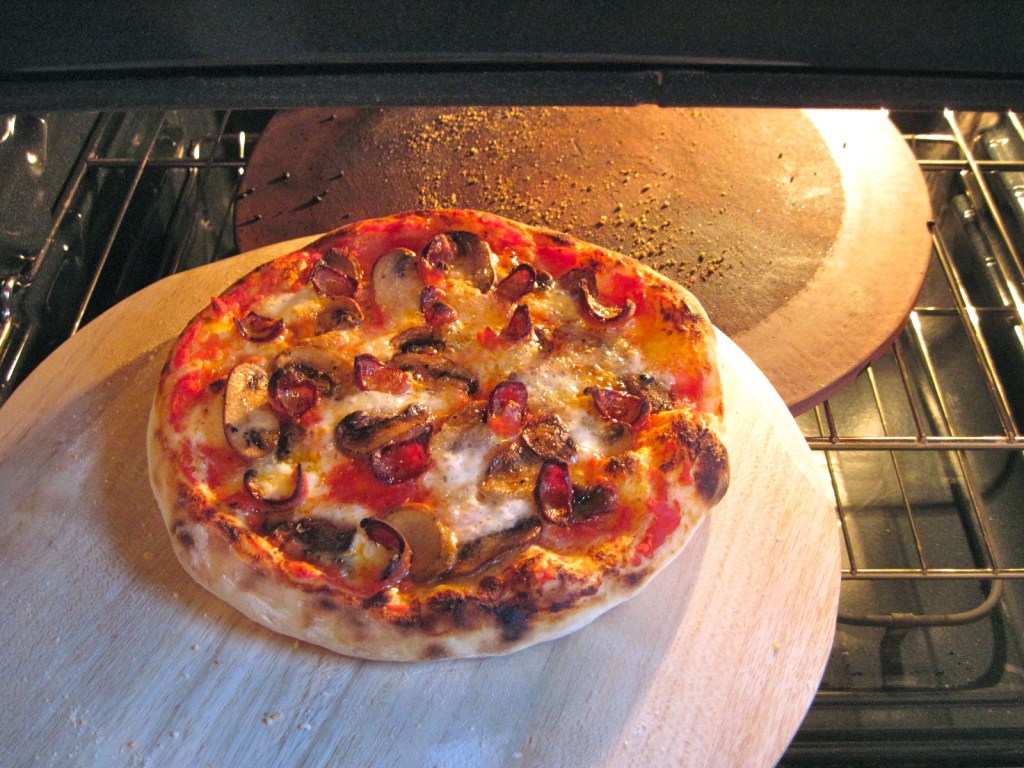
Spread about 2 heaping soup spoonfuls of sauce over your pizza. It should be just a light layer – too much sauce will prevent the dough from cooking properly. Arrange the rest of your toppings over the pizza – you want them to be mostly in one single layer. This pizza had pepperoni, sautéed mushrooms, and torn bocconcini (fresh mozzarella). If you are using shredded cheese, a light sprinkle is plenty.

Note: Save fresh herbs, such as basil for a pizza margherita, for after the pizza has come out of the oven and cooled for a few minutes. If you put them on before baking they will burn, and if you put them on immediately after baking they will turn black because of the heat.
Give your topped pizza another little jiggle on the pizza peel to make sure it isn’t sticking. If it is, use a little more flour to un-stick it. You’re ready to bake!
Baking the Pizza
You are working with very high heat here, so be very very careful taking the pizza in and out of the oven. And, while being very very careful, you also want to work quickly so that you don’t let all the heat escape while the oven door is open.
After removing the pizza from the oven, let it cool for a few minutes, then if desired, add fresh herbs, a sprinkle of parmesan, and/or a drizzle of olive oil, before cutting it into pieces.
Method 1
From Jim Lahey’s “My Pizza“, via several sources
Position a pizza stone on a rack in the upper third of the oven (this was the second rung from the top for me). Preheat the oven to bake at its highest temperature (500˚F or 550˚F) for 1 hour. 15 minutes before baking, turn on the broiler element to high to heat up the surface of the pizza stone. After 15 minutes, with the broiler still on high, slide the prepared pizza onto the hot pizza stone using the pizza peel. The residual heat from the pizza stone will cook the bottom of the pizza, and the broiler will cook the top. Watch the pizza carefully – it will cook very quickly. Mine took about 3 or 4 minutes. When the top of the pizza is looking nicely charred, the bottom is cooked, and the cheese is melted and browned, remove it using the pizza peel. Let the pizza stone re-heat under the broiler for 5 – 10 minutes between pizzas.

Method 2
From the comments on this pizza thread at The Fresh Loaf
Position a pizza stone on a rack at the very top of the oven, closest to the broiler. Preheat the oven to bake at its highest temperature (500˚F or 550˚F) for 1 hour. 15 minutes before baking, turn on the broiler element to high to heat up the surface of the pizza stone. After 15 minutes, turn the oven back to bake at its highest temperature and immediately slide the prepared pizza onto the pizza stone using the pizza peel. The residual heat from the pizza stone will cook the bottom of the pizza, and the residual heat from the broiler plus all the heat at the top of the oven will cook the top of the pizza. Watch the pizza carefully – it will cook quickly. Mine took about 6 or 7 minutes. When the top of the pizza is looking nicely charred, the bottom is cooked, and the cheese is melted and browned, remove it using the pizza peel. Turn the broiler back on for 5 – 10 minutes between pizzas to re-heat the pizza stone.

Which method worked better? Here’s what I thought:
Method 1: A really great-looking pizza (I actually did a happy-dance when the first one came out of the oven) with a nice char on top in about 3 minutes, but I found the crust was slightly under-done and doughy.

Method 2: Not quite the same char on top but the crust was crisp and perfectly baked. It took slightly longer (6 minutes) but I found it made for a better pizza, and if you really want the char on top, you could just turn the broiler on for a few seconds before taking the pizza out of the oven.

So for me, Method 2 is the winner, but it might depend on your oven and the kind of pizza stone you use. Mine is made of terracotta and I suspect that the material of your pizza stone might mean different things for its heating abilities. I also want to try this dough on the grill, so once I have that figured out, I’ll share my results.
Well, this has been very long and I hope educational! Happy pizza making!
Here’s the pizzas I made:
Pepperoni, mushroom, and bocconcini (Method 1)

An experimental pizza topped with leftover beef pasta sauce and mozzarella (Method 1)

Pizza margherita with tomato sauce, bocconcini, and basil (Method 2)

Pepperoni and bocconcini with oregano (Method 2)

This post submitted to YeastSpotting.



Leave a comment