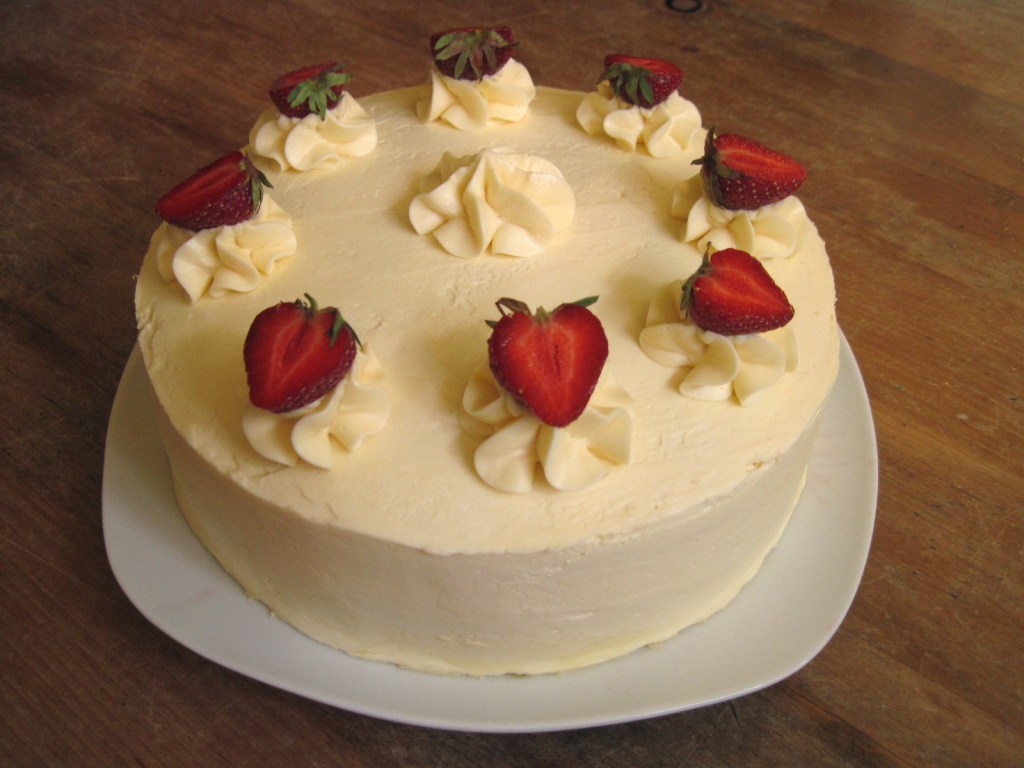
 A birthday definitely deserves a cake, so for my 29th birthday this weekend, I made myself one. Some people might think that it’s sad to make your own birthday cake, but quite honestly it is one of the best birthday presents I could get. Not only to I get to bake all day (which I love, obviously!), but I get to make the cake exactly the way I want it, AND I get to eat it. Totally a win-win situation for me. Because I’m a planner (at least when it comes to cakes, anyway), I’ve been thinking about my birthday cake for a while. At first I really wanted to make this Mexican hot chocolate-inspired cake, but then I came across Julia Child’s French strawberry cake, which seemed more seasonally appropriate. I also had my eye on this hazelnut cake, so I added some hazelnuts to Julia’s cake. And then I really wanted to make Swiss meringue buttercream, and this custard buttercream frosting caught my eye. So much for following one recipe as written, right? This time, anyway, it seems to have worked out and this cake was awesome!

The base for the cake is a classic French genoise, which is made without any chemical leavening and relies solely on air whipped into the eggs for its volume and structure. You beat the heck out of some eggs until they are very thick and fluffy, then, very gently so as not to deflate the eggs, fold in flour and melted butter. This isn’t actually that complicated, but I had to make the cake twice because on my first try, the batter completely deflated after I folded in the melted butter and hazelnuts, and baked into a dense, rubbery, shrunken disc that smelled unpleasantly eggy. I immediately Googled “deflated genoise batter” and found two helpful articles. The first said not to overbeat the eggs – three to four minutes is sufficient, because once they get to a certain volume, they won’t get any bigger. (It also encouraged me to get right back on the horse after suffering a genoise defeat). The second said that the melted butter must be warm, almost hot, otherwise it will solidify and cause the batter to deflate. So before I could psych myself out too much, I started again. This time I sifted the ground hazelnuts into the flour instead of mixing them into the melted butter, and I made sure that the melted butter was warm when I added it to the batter. It all worked out perfectly – the second cake was literally three times taller than the first one because I managed to keep all the air inside it.

The next challenge was the custard buttercream frosting – essentially, you make a Swiss meringue buttercream, but you combine the butter with chilled vanilla custard before adding it to the beaten meringue (this is a convenient pairing because the custard requires egg yolks and the meringue requires egg whites). I was a bit worried once I got into it because of my less than stellar experience with cream cheese Swiss meringue buttercream, but this frosting came together much easier (there was still a bit of anxious nail-biting!). It contains a LOT of butter, which is needed to emulsify the whole thing into a frosting. I also found that if it got too warm, it started to separate and look a bit curdled, so keeping it cool is key.

The filling was the easiest part: macerated strawberries and whipped cream. The strawberries were perfectly ripe and super sweet and juicy, so I didn’t have to use very much sugar. To avoid a soggy cake, you strain most of the accumulated syrupy strawberry juice out of the berries, so now I have a little jar of the most delicious strawberry syrup in my fridge – perfect for Italian sodas, maybe?

For all the effort this cake required, the only real pain-in-the-ass part was having to wash my mixer bowl and whisk attachment five separate times, because every single component of the cake required the stand mixer – the buttercream alone required it three different times! (Although in hindsight, I could have used a hand whisk for one part.) Anyway, I don’t recommend making this cake unless you have a stand mixer or electric mixer – a plain old hand whisk just ain’t gonna cut it (although you will need one of those too!).

Strawberries & Cream Birthday Cake
Hazelnut Genoise
Adapted from “Baking with Julia” by Dorie Greenspan, via Think, Love, Sleep, Dine. Genoise is a bit drier than other sponge cakes, so traditionally it is sliced very thin and filled with many layers of filling (this is called “torting”). Makes one 8” round cake.
Preheat the oven to 350˚F. Butter and flour an 8” cake pan and line the bottom with a circle of parchment paper. Set aside.
Sift into a bowl:
1 cup sifted cake and pastry flour (this means you have to sift it before you measure it)
1/3 cup ground hazelnuts
1 tbsp granulated white sugar
1/8 tsp salt
The hazelnuts might not all go through the sieve – just dump them into the bowl and mix them into the flour, making sure there are no lumps. Set aside.

In a mixer bowl, place:
4 large eggs, at room temperature (to speed this up, place chilled eggs in lukewarm water for a few minutes – taking the chill off makes them achieve better volume when whipped)
1/2 cup less 1 tbsp granulated white sugar
Beat on high with the whisk attachment until very thick, pale, and fluffy (like softly whipped cream), about 3 – 4 minutes. In the last few seconds of beating, add:
1 tsp vanilla extract

While the eggs are beating, melt:
2 tbsp butter
Pour the hot melted butter into a small bowl and keep it warm (I put it on top of the stove while the oven was preheating).
When the eggs are whipped, sift one third of the flour mixture over the eggs and very gently fold it in using a balloon whisk. Use large, confident yet gentle strokes, bringing the batter from the bottom of the bowl to the top. Try not to over-mix. Repeat two more times to fold in all the flour.

Take about 1 cup of the batter and fold it into the warm melted butter using your whisk, then very gently fold the butter mixture into the egg batter, again being careful not to deflate it. Pour the batter into the prepared pan and wrap it with a strip of wet towel.

Bake it for 25 – 27 minutes, until the cake springs back when pressed gently. Allow to cool in the pan for about 5 minutes, then run a knife around the edge and invert onto a cooling rack and peel off the parchment paper. Chill the cake (the freezer is even quicker) to make slicing it easier.

Vanilla Custard Buttercream
Adapted from Martha Stewart. The trick to this is not letting it get too warm – if it looks soupy and just won’t come together when you are mixing it, chill it for 10 – 15 minutes, then beat it again and it should turn into a fluffy, soft buttercream. The same goes if it starts separate and look curdled once it’s made – just chill it and then beat it with a whisk until it comes back together (I had to do this once when I was assembling the cake). Makes enough to frost the top and sides of one 8″ cake.
Separate the whites and yolks from 2 eggs. Set the whites aside. In a mixer bowl, combine:
the 2 egg yolks
2 tbsp granulated white sugar
Beat with a whisk attachment at high speed for 3 – 4 minutes, until the yolks are thick and pale (you could easily do this by hand it you want to avoid washing the mixer bowl again).

Meanwhile, in a medium saucepan, bring to a simmer:
2/3 cup whole milk
1/2 tsp vanilla
When the milk comes to a simmer, pour about 1/3 of it into the egg yolks to temper them, whisking constantly to keep them from turning into scrambled eggs, then pour the egg-milk mixture into the saucepan with the remaining hot milk and return it to medium heat, still whisking constantly. Cook until the mixture reaches 185˚F. Pour the custard through a strainer into a bowl, press plastic wrap directly onto the surface of the custard (this prevents it from forming a skin as it cools) and chill it until completely cold.

In a clean mixer bowl, place:
2 cups unsalted butter, softened
Beat on medium-high seed with the whisk attachment until the butter is very light and fluffy. With the mixer running, slowly pour in the COLD custard. It will look all separated and weird at first, but keep mixing until it comes together and looks like butter again (the sound of it in the bowl will also change). Set aside, and chill briefly if it gets very soft or melty-looking.

Wash the mixer bowl and whisk attachment with a lot of hot, soapy water, then rub the inside of the bowl and the whisk with a bit of white vinegar on a paper towel – this ensures that there is no buttery residue, which would prevent the egg whites from whipping up. In the absolutely clean bowl, place:
the 2 reserved egg whites
1/3 cup granulated white sugar
Beat on high speed with the whisk attachment until thick, glossy, stiff peaks form. Feel the outside of the bowl with your hands and stick your finger in the meringue to test the temperature (turn off the mixer first!) – if either are anything other than cool to the touch, stir the meringue on low speed until completely cool.

Once the meringue is cool, switch out the whisk for the paddle attachment. With the mixer running at low speed, add the butter-custard mixture a spoonful at a time, letting it mix between additions. The meringue will start to deflate and may look curdled – this is all normal so don’t give up! Once you’ve added all the butter-custard, turn up the speed to medium-high and mix until it emulsifies into a thick, creamy, buttercream – this should happen in minutes (see the note at the beginning of this recipe for more tips if you are having trouble with it). Don’t let the buttercream get too warm or it will start to separate – just chill it for 10 – 15 minutes and beat it with a whisk until it comes back together if this happens.

Strawberries and Cream Filling
Adapted from “Baking with Julia” by Dorie Greenspan, via Think, Love, Sleep, Dine.
In a bowl, combine:
2 pints hulled, sliced strawberries (about 1 3/4 lbs)
1/4 – 1/3 cups granulated white sugar, to taste
Macerate the strawberries and sugar for about an hour, then crush them lightly with a fork and let them sit another hour.

When you are ready to assemble the cake, prepare the whipped cream filling. In a mixer bowl, combine:
1/2 cup whipping (heavy) cream
1 tbsp sour cream
1 scant tsp granulated white sugar
Beat with the whisk attachment at high speed until medium peaks form.

Cake Assembly
Place the chilled genoise on a turntable and slice it into three thin, even layers. Place the bottom layer on a serving plate and protect the edges with waxed paper. Place some of the custard buttercream in a piping bag with a large round tip and pipe a line around the perimeter of the cake (this will keep the filling from spilling out between the layers). Fill inside the line with half of the macerated strawberries, strained from their juices. Top the strawberries with half the whipped cream. The strawberries and cream came up above the buttercream wall, so I piped another line of buttercream on top of the first before putting on the second layer of cake. Repeat, using up the remaining strained strawberries and whipped cream.

Place the third layer on top and press gently. Frost the cake with a light layer of buttercream to crumb-coat it, then freeze for about 20 minutes (chill the buttercream while you’re at it, then beat it with a whisk before proceeding). Frost the chilled cake with a smooth, even layer of the buttercream and pipe rosettes on the top, if desired. Chill thoroughly (several hours or overnight), then decorate with halved strawberries.

Before serving, let the cake sit at room temperature for a few minutes to soften the buttercream so it doesn’t crack when you cut the cake. Makes 8 – 10 servings.

Leave a comment