 Mandy of What The Fruitcake?! came to our rescue last minute to present us with the Battenberg Cake challenge! She highlighted Mary Berry’s techniques and recipes to allow us to create this unique little cake with ease.
Traditionally, a Battenberg cake is pink and white and covered in marzipan (and perfect for a tea party, I might add!). Nothing wrong with traditional, but when given the chance, it’s pretty fun to switch things up. Mandy gave us a recipe for the original pink-and-white cake as well as a walnut and coffee version with coffee buttercream, which sounded amazing, plus, as a substitute for marzipan, a recipe for something called “chocolate plastique”, which is chocolate mixed with corn syrup so that it can be molded or rolled out. Moldable chocolate? That had my name all over it.

I visited my parents at the beginning of the month and made a hazelnut and coffee Battenberg wrapped in dark chocolate plastique while I was there. This challenge was made even more interesting because 1) my mum is allergic to wheat and dairy, and 2) my parents’ kitchen is less equipped for baking than it was when I still lived with them! The cake was a bit on the dry side, I think because I was using spelt flour and didn’t do the substitution particularly well, but the flavour was good, the chocolate plastique worked, and it turned out quite pretty. And the coffee buttercream was delicious!

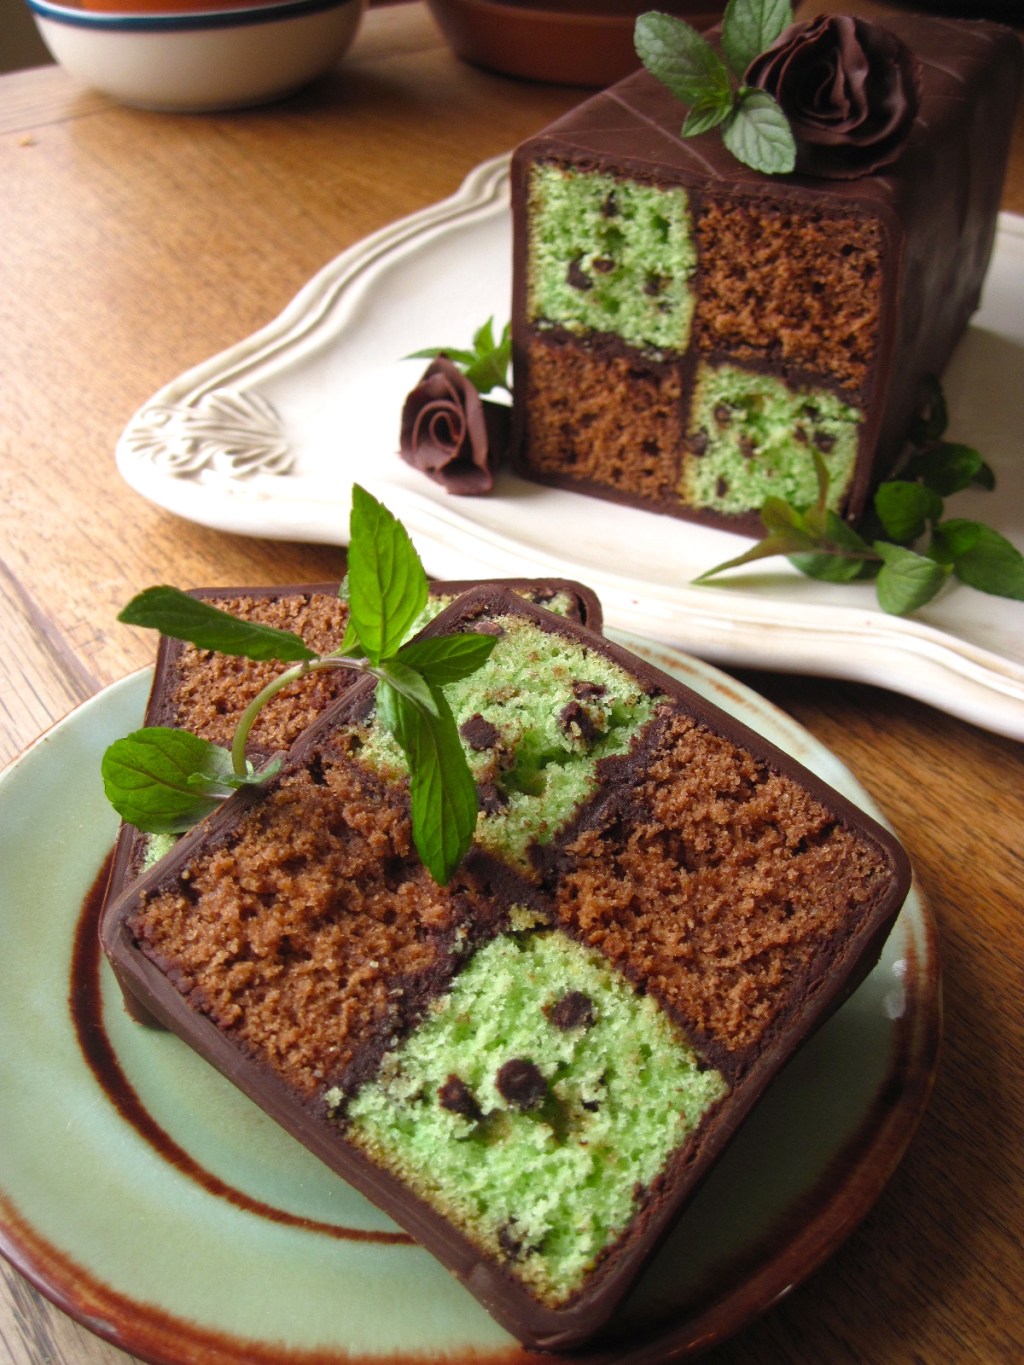
My second attempt was in my own kitchen and came out much better – or much more easily, being that I knew what to expect and had everything I needed. After much internal debate, I finally decided to make a mint chocolate chip Battenberg. I got the cakes baked and then realized I didn’t have anything to stick them together with. Ganache seemed the obvious choice but all I had left was unsweetened chocolate, but luckily I found a recipe for ganache that uses unsweetened chocolate and a mixture of milk and sugar boiled into a sort of syrup. Perfect! I covered the cake in dark chocolate plastique, which worked even better the second time, and I was really pleased with the results. Nate said the green mint cake tasted like chocolate chip mint ice cream, which is exactly what I was going for. On the first day, I found the cake to be a bit on the dry side, but over the next few days the texture improved and the cake seemed to get moister (I think the ground almonds in the batter had something to do with it). Either way, it would be perfect with a glass of milk or a scoop of vanilla ice cream. 😉

Thanks Mandy for hosting such a fun challenge! I have been waiting for one like this (sugar! cake! chocolate! fancy techniques!) and you certainly delivered. 🙂 Check out the Daring Kitchen for all the Battenbergs that were made this month (there are some real beauties), as well as for the original challenge recipe, which includes fantastic procedural shots by Mandy.
Mint Chocolate Chip Battenberg Cake
Dark Chocolate Plastique
Over a double boiler of simmering water, melt:
200 grams dark chocolate (at least 70% cocoa), roughly chopped
Stir the chocolate occasionally as it melts. When it is almost melted, remove it from the heat and stir until it smooth. Let it cool for a few minutes, then stir in:
1/4 cup corn syrup
The chocolate will start to thicken and look pasty and slightly grainy. Keep stirring until the chocolate comes cleanly away from the sides of the bowl. Scrape it into a Ziplock bag, press it flat, and place it in the fridge to chill for 2 hours or over night. Let it come to room temperature before using. I had good results by chilling it for about an hour, until firm and cool, then leaving it at room temperature while the cakes were cooling. It was just right by the time I was ready to assemble the cake.

Cake
Adapted from Mary Berry’s “Baking Bible”. Makes one 8-inch rectangular cake. This is known as the “all-in-one” method, where the dry and wet ingredients are mixed together directly, without creaming the butter and sugar together. It is easily done with an electric mixer. To make the cake by hand, I would cream together the butter and sugar, mix in the eggs, then add the dry ingredients.
Preheat the oven to 350˚F. Butter the bottom and sides of an 8″ square pan. Fold a piece of parchment paper to create a divider down the middle of the pan, and trim it to fit (you can use a piece of folded aluminum foil to reinforce the divide if you want). Press the parchment divider into the pan – the butter in the pan will help stick the parchment in place. If you happen to have a specialized Battenberg pan, butter and flour it. Set the pan aside.

In the bowl of a stand mixer, sift together:
1 1/4 cups all purpose flour
2 3/4 tsp baking powder
heaping 1/4 tsp salt
Add:
3/4 cup granulated white sugar
1/2 cup ground almonds
Whisk the dry ingredients together, then add:
3/4 cup unsalted butter, very soft
3 large eggs
Mix with the whisk attachment on medium-high speed until just combined, scraping down the sides and bottom of the bowl a few times with a spatula. Try to avoid over-beating the batter.

Place half the batter into a second bowl. To one half of the batter, stir in:
1/4 cup mini chocolate chips
3-4 drops green food colouring
1/2 tsp peppermint extract
To the second half of the batter, stir in:
1/4 cup chocolate chips, melted
1/2 tsp vanilla extract

Place each batter in one side of the prepared pan and spread evenly. Bake at 350˚F for 25-30 minutes, until the cakes spring back when pressed lightly with a finger and a toothpick inserted in the middle comes out with a few crumbs clinging to it (my cakes took closer to 40 minutes). Let the cakes cool in the pan for 5 minutes, then turn them out on to a rack to cool completely. To speed up the process, place them in the fridge or freezer (this actually makes them easier to trim into shape, I found).

Chocolate Ganache
In a bowl, combine:
2 1/z oz unsweetened chocolate, chopped
2 tbsp unsalted butter, cut in pieces
In a saucepan, combine:
scant 1/3 cup milk
1/3 cup granulated white sugar
Over medium-high heat, bring the mixture to a boil, stirring, until the sugar is dissolved. Pour the mixture over the chocolate and butter and let it sit for a minute, then whisk until melted and smooth. Chill the ganache until thickened.

Assembly
Watch this great video of Mary Berry assembling a Battenberg for the BBC’s Great British Bake Off.
When the cakes are completely cool, trim the top of each to make it flat. Stack the cakes as shown and trim the long edges to make them even. The cross section of the cake should be as square as possible. Cut the cakes in half to give you four long square strips, two of each flavour. Using the chocolate ganache, stick one green and one chocolate strip together, as shown. Repeat with the remaining two strips. Spread one double-strip with ganache and place the second double-strip on top, making sure to position it so that you have a checkered effect when viewed from the end. Press firmly so that everything sticks together and place the cake in the fridge to set while you roll out the chocolate plastique.

Remove the chocolate plastique from the plastic bag and place it on a silicon baking mat. Begin folding and kneading it. It will be very stiff and crumbly at first, but keep going and the warmth from your hands will eventually turn it into a pliable mass. This may take anywhere from 5 – 15 minutes, so don’t give up! Once it is soft enough, begin rolling it out into a rectangle slightly larger than 8″ x 12″. I would recommend using a non-wooden rolling pin – I used a silicon rolling pin, but a glass wine bottle is a good substitute. It will probably be quite hard to roll, so use your hands to gently stretch the chocolate plastique as well. When it is the desired size, choose which side is prettiest (ie, smoothest) and put that side facing down. Trim one short edge so that it is straight.

Spread one quarter of the remaining ganache over the top of the cake, then place the cake, ganache side down, on the chocolate plastique, about 1 1/2-inches away from edge that you trimmed straight. Spread the remaining ganache over the exposed three sides of the cake. Using the silicon mat, roll the chocolate plastique around the cake, pressing firmly to adhere it to the sides. To finish the bottom of the cake, cut off the excess chocolate plastique to form a neat seam. Place the cake, seam side down, on a cutting board and chill for about an hour to set.

When the cake has set, use a large knife to trim off the ends to expose the checkered pattern of the cake (I had to trim off about 1/2 an inch of cake beyond the excess chocolate plastique). If you wish, you can press a design into the top of the cake with the dull edge of a knife (this is easier when the cake has been at room temperature for a little while). Cut into slices to serve.

Coffee and Hazelnut Battenberg Cake
See the previous recipe for the Dark Chocolate Plastique.
Cake
Adapted from Mary Berry on the BBC Website.
Preheat the oven to 350˚F. Follow the cake recipe above to prepare the pan and make the plain cake batter up to the point of dividing the batter evenly between two bowls. To one half of the batter, stir in:
1 1/2 tsp instant coffee powder dissolved in 1 1/2 tsp milk
To the other half of the batter, stir in:
1/2 tsp vanilla extract
1 1/2 tsp milk
3 tbsp roughly chopped toasted hazelnuts
Place each batter in one side of the prepared pan and spread evenly. Bake at 350˚F for 25-30 minutes, until the cakes spring back when pressed lightly with a finger and a toothpick inserted in the middle comes out with a few crumbs clinging to it (my cakes took closer to 40 minutes). Let the cakes cool in the pan for 5 minutes, then turn them out on to a rack to cool completely. To speed up the process, place them in the fridge or freezer (this actually makes them easier to trim into shape, I found).

Coffee Buttercream
In a bowl, mix together:
1 1/2 tsp milk
1/2 tsp instant coffee powder
Add:
1/2 cup unsalted butter, soft
2 cups icing sugar
Cream the mixture together until you get a smooth buttercream.

Assembly
Assemble the cake as above, using the coffee buttercream to stick the cakes together (save some for decoration), and cover it with the rolled out chocolate plastique. Use your thumb and fingers to make a fluted edge on the corners, if desired. Chill the cake then trim the ends to expose the pattern. Pipe the reserved buttercream decoratively on the top of the cake and garnish with toasted hazelnuts. Cut in slices to serve.


Leave a comment