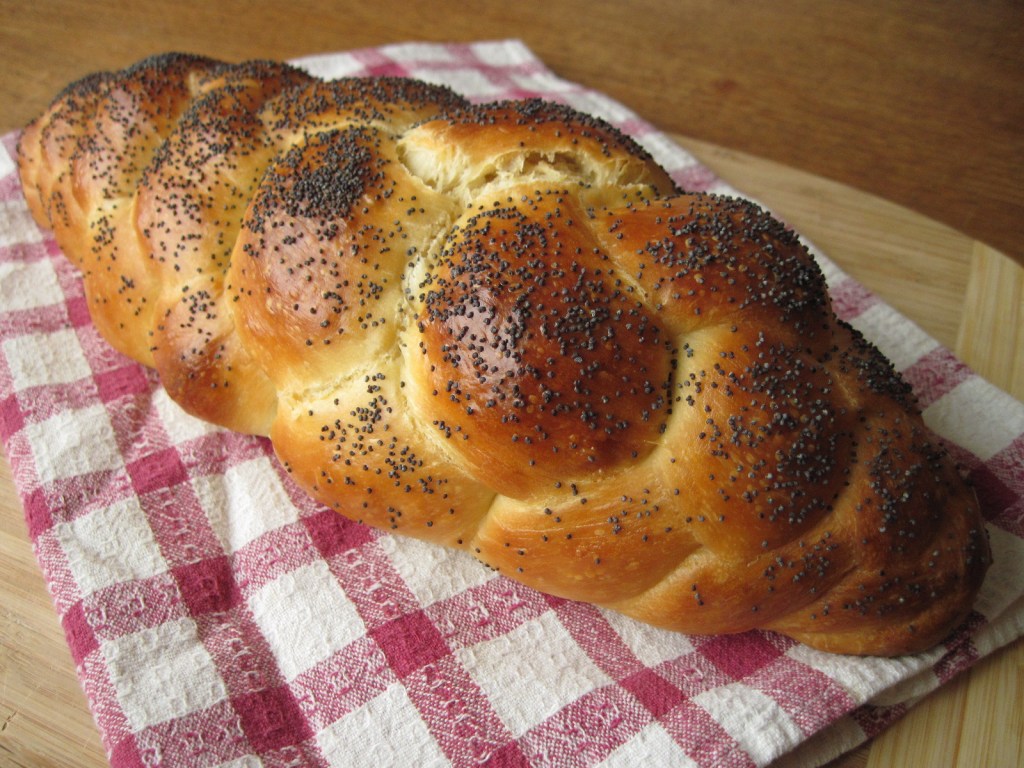
 This is, sadly, the final installment of my challah dough series. I wasn’t going to do a plain challah loaf – I was going to continue in the vein of sticky buns with unique fillings – but then I found a video demonstrating a six-strand challah braid that I got all excited about and had to try. The dough was easy to work with, and I was really pleased at how the braid turned out.

When it came to eating it, I was reminded that along with being a great base for sticky buns and such, this dough makes a really really good loaf of bread – soft yet firm with a nice fine crumb and great favour. It also makes amazing toast, and if it had lasted long enough, probably would have made wonderful french toast too.

While this loaf may look or sound complicated, it’s really not – a six-strand braid is simply two steps repeated over and over again. For the sake of this tutorial, I made it into four steps, because first you do the two steps on the right, then repeat them on the left. But however you look at it, if you can do a regular three-strand braid, this should be no problem. And no matter how your braid turns out, you’ll have a loaf of delicious challah bread in the end, which is the important part!

6-Strand Braided Challah Loaf
To make this braid, you will need one 1 1/2 lb portion of chilled challah dough.
Place the chilled dough on a lightly floured surface and divide it into 6 equal pieces.

With your palms, shape and roll each piece into a tapered log about 10 inches long. Try to use a minimal amount of flour when doing this – just enough to stop it from sticking.

Line your 6 tapered logs up vertically side by side and pinch them together at the end facing away from you. Keep hold of this pinched end with one hand.

Now start braiding:
Step 1: Take the strand that is second from the right and move it all the way over to the far left, like so:

Step 2: Take the strand that is on the far right and move it to the middle, like so:

Step 3: This is the mirror image of Step 1, done on the left side. Take the strand that is second from the left and move it to the far right:

Step 4: Again, this is a mirror image of Step 2 but on the left. Take the strand that is on the far left and move it to the middle:

Now you are back at Step 1. Repeat Steps 1 through 4 several times. You will start to see a pattern emerging:

Don’t pull on the strands or stretch them too much when you are braiding – you want to keep the braid loose so that the dough has room to expand when it bakes. If the braid is too tight, it will “explode” in the oven.
When you get to the end, pinch the ends together. You should have a tapered, slightly foot ball-shaped loaf.

You can gently “bump” the tapered ends with your palms to shorten up the loaf and give it a higher cross section.

The bottom of the braid will look like this. Cool, hey?

Place the braid on a piece of parchment paper, cover it lightly with plastic, and let it rest for about an hour and a half.

Preheat the oven to 350˚F. Brush the challah with egg wash (1 egg beaten with 1 tbsp water) and, if desired, sprinkle it with poppy seeds or sesame seeds.


Bake for 25-35 minutes, until shiny and dark golden brown.

Cool completely before slicing.


Leave a comment