 The August 2011 Daring Bakers’ Challenge was hosted by Lisa of Parsley, Sage, Desserts and Line Drives and Mandy of What the Fruitcake?!. These two sugar mavens challenged us to make sinfully delicious candies! This was a special challenge for the Daring Bakers because the good folks at http://www.chocoley.com offered an amazing prize for the winner of the most creative and delicious candy!
Did I mention that right now, Nate and I have sworn off refined sugar six days a week? Oh man, this challenge came at the wrong time! But it was also so, so right…
The premise of this month’s challenge was to have all us Daring Bakers learn to temper chocolate, and then use it in our candy creations. To temper chocolate, you heat it, cool it, and heat it again to specific temperatures in order to create small, uniform crystals of cocoa butter in the chocolate so that it stays nice and shiny when it hardens and has a good snap when it breaks. It also gives a thin, even coating to things like dipped candies. Untempered chocolate will have a mottled, dusty look when it hardens, and will crumble rather than snap cleanly when broken. For chocolate making, couverture chocolate is the gold standard – this is chocolate with a high percentage of cocoa butter that, when tempered properly, results in a shinier, snappier, mellower finished chocolate. Lisa and Mandy provided chocolate tempering instructions plus a ton of chocolate and non-chocolate candy recipes, and to be eligible for the Chocoley contest, we had to make two kinds of candy: one chocolate, and one of our choice (chocolate or otherwise).
I started out with a non-chocolate candy: sponge toffee. My friend’s mum used to make this when we were kids and it was awesome. Lisa and Mandy provided a recipe, but many people commented that it tasted strongly of baking soda (which you add to the caramelized sugar to get it to foam up), and the bubbles in the toffee were quite large. I wanted smaller bubbles, so I used a recipe that includes gelatine, which somehow makes the texture a little more “refined”. At the advice of other Daring Bakers, I reduced the amount of baking soda from 1 tbsp to 1 tsp, and ended up with a smoothly textured, rock hard sponge toffee full of tiny bubbles – but no baking soda taste 😉
 I think I could have safely used 2 tsp, or even the full tablespoon, of baking soda to get a less dense but equally tasty final product. Once I broke it into smaller pieces it was much more manageable, and it tasted great – when it wasn’t getting stuck in your teeth and threatening to dislodge them from your jaw 😉
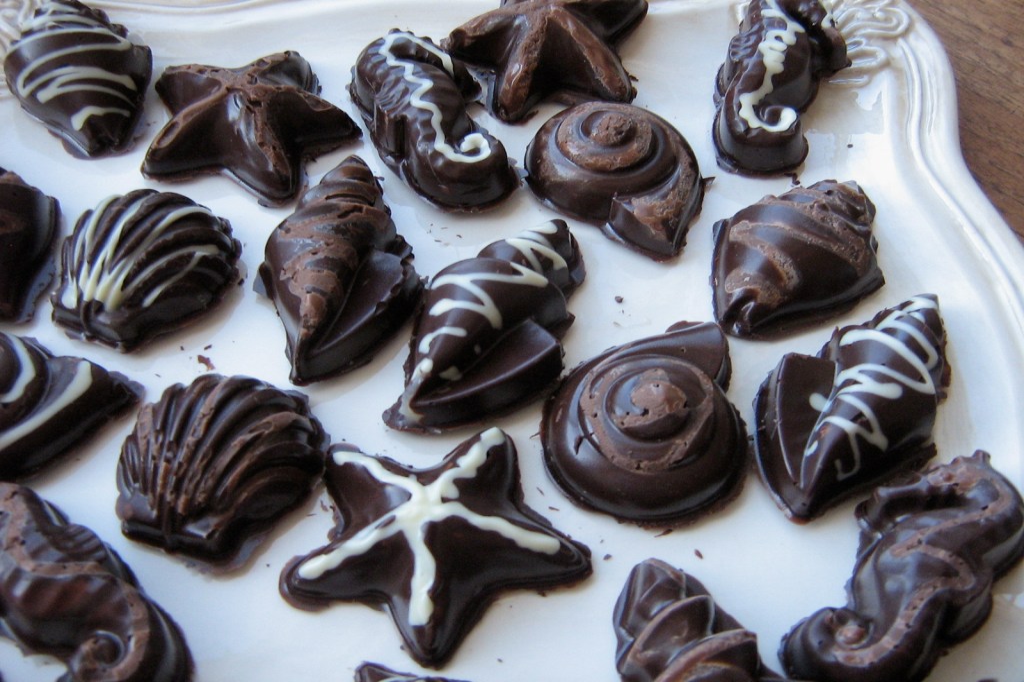
After the toffee, I moved onto the chocolate. I make rolled and dipped chocolate truffles every year for Christmas, but I had never actually bothered to temper the chocolate before, and I had never made a filled chocolate bonbon in a mold, which was one of the suggested candy-making methods. I have this cute metal pan that I thought was for making tiny shell-shaped cakes, but then I saw it on the Chocoley site as a professional-quality chocolate mold, so I guess it was meant to be for this challenge. First I had to temper the chocolate to coat the mold with. I tried the “seeding” method, where you chop up the chocolate, melt about two-thirds of it over a bain marie (simmering pot of water) to bring the temperature up, stir in the remaining un-melted third to bring the temperature down, and then heat it again to the proscribed temperature

In theory, this is all easy and straight-forward, but in practice, not so much. You have to be fairly precise about the temperatures that you heat, cool, and heat the chocolate to, and if you mess it up, you have to start again (which is also a blessing, I guess, rather than having it ruin the chocolate!). I used a glass bowl to melt the chocolate over the bain marie, and the glass acted as insulation and kept the temperature of the chocolate rising even after I’d removed it from the heat and was supposed to be cooling it down. In the end, I found it easiest to melt all of the chocolate at once over the bain marie to bring it up to temperature, submerge the bowl in cool water to bring the temperature down, and then heat it again over the bain marie to bring it to the final temperature. I think it took me about three tries to get it right!
Making a filled chocolate in a mold also sounded pretty straight-forward, but just like tempering the chocolate, it wasn’t (for me, anyway). To make the outer chocolate coating, you fill the cavities of the mold with tempered chocolate, dump it out (leaving a coating of chocolate behind), scrape off the excess chocolate, then let it harden in the mold before filling it up and capping it off with more chocolate. I drizzled white and milk chocolate in the cavities of the mold before adding the dark chocolate coating, and I stuck the metal pan in the fridge to set the drizzled chocolate. Big mistake. When I filled the cavities with tempered dark chocolate to make the outer shell, it thickened up on contact with the cold metal and wouldn’t come put when I tried to dump out the excess. I had to sort of scrape it out and hope that I had left enough of a coating. I had better luck spreading the chocolate into the cavities using a teaspoon.
For the filling, I made two kinds of ganache. In Paris about 10 years ago I had a chocolate lava cake with thyme-infused vanilla ice cream that was absolutely to die for, and I’ve had my eye on a caramel ganache truffle recipe for a while, so I decided to combine them into a thyme-infused dark chocolate caramel ganache filling. I’ve been on a strawberry rhubarb kick this spring/summer, and I discovered that ginger pairs really well with those flavours, so I also came up with a strawberry-rhubarb-candied ginger white chocolate ganache filling.
 The thyme-caramel ganache was my favorite – very subtle but totally delicious.
And now for the fun part: recipes!
Sponge Toffee
Recipe adapted from Wilde in the Kitchen. You will need a candy thermometer for this recipe. The gelatine in the recipe makes the bubbles in the sponge toffee very small and finely textured. It is best to make this in a high-sided pot so that when you add the baking soda, the chemical reaction has enough room to expand and use up all the baking soda so as not to leave any taste behind. I only used 1 tsp baking soda, but I think 2 tsp would have given better results (less rock solid!).
Butter and flour an 8- or 9-inch square pan and set aside.
In a small bowl, sprinkle 1/4 tsp gelatin over 1 tsp water to soften. Sift 1 – 2 tsp baking soda and set aside (this ensures there are no clumps when you add it to the molten sugar).
 In a medium-sized, heavy pot with high sides, combine:
1 1/2 cups granulated white sugar
1/2 cup corn syrup
1/2 cup water
 Heat over medium heat, stirring, until the sugar dissolves and the mixture boils. With a wet pastry brush, wash down any sugar crystals that form on the sides of the pot. Clip the candy thermometer to the side of the pot, making sure enough of it is submerged in order to register the proper temperature, without touching the bottom of the pot. Heat to 310˚F without stirring – the boiling mixture will stir itself.
 When the mixture reaches 310˚F, remove from the heat and whisk in the gelatin. It will foam up.
 Sprinkle over the sifted baking soda and whisk vigorously. Return the pot to the heat for about 30 seconds, still whisking. The mixture will foam up and expand quite a bit.
 Pour the mixture into the prepared pan – it should come out in a big mass. Let it settle into the pan (don’t try to spread it around or you’ll end up with a big mess) and set aside until cool.
 Remove from the pan and break/cut into pieces. Dip the pieces in tempered chocolate, if desired.
Filled Chocolate Bonbons
Tempering Chocolate: My Way
Actually I have no idea if anyone else has come up with this method; they probably have, as it seemed to work! Also, it’s easier to temper a larger amount of chocolate than a small amount, so don’t be afraid to temper more than you need – just let the unused chocolate harden, store it, and then re-temper it when you need it.
You will need:
a heat proof bowl (preferably metal)
a larger bowl with a few inches of cool (but not cold) water, about 20˚C / 68˚F
a thermometer that reads temperatures as low as 27˚C / 80.6˚F
a pot with about an inch of gently simmering water that your bowl will fit over, without the bottom of the bowl touching the water
couverture chocolate – dark, milk, or white
Chop the chocolate and place it in a heat proof bowl set over the pan of simmering water (bain marie).

Stir the chocolate until it melts and the temperature reaches 45˚C / 113˚F. Remove the bowl from the bain marie and submerge the bottom of it in the bowl of cool water. Be very careful not to get any water or steam in the chocolate or it will seize up.

Stir, scraping the bottom of the bowl, until the temperature drops to 27˚C / 80.6˚F. Return the bowl to the bain marie and stir until the temperature reaches the final working temperature (but no higher), depending on the type of chocolate:
Dark: 32˚C / 89.6˚F
Milk: 30˚C / 86˚F
White: 29˚C / 84.2˚F
 The chocolate is now ready for molding, coating, and/or dipping. Keep the chocolate at this temperature while you are working with it by wrapping the bowl in a towel, and warming it over the bain marie every 10-15 minutes for 30 seconds to 1 minute. Don’t let the temperature go over the final working temperature or you’ll lose your temper (ha ha) and have to start again from the beginning.
The Fillings
Each recipe will make enough to fill approximately 23 1-tbsp capacity chocolate molds – I made about 12 of each kind and then used the rest of the ganache to make rolled truffles, coated with cocoa powder and confectioner’s sugar.
Thyme-Infused Dark Chocolate Caramel Ganache
Adapted from Canadian Living’s Best Chocolate cookbook
Chop 4 oz dark chocolate, place in a heatproof bowl, and set aside. In a small saucepan, combine:
scant 1/2 cup heavy cream
several sprigs of fresh thyme (about 1 tsp dried)
 Bring the cream to a simmer, remove from the heat, and let it infuse with the thyme until you can taste it (5-10 minutes). Remove the thyme (strain if needed) and set the cream aside.
In a heavy saucepan over medium heat, stir 1/2 cup granulated sugar until melted. Once melted, swirl the pan until the sugar is golden. Pour in the thyme-infused cream in a steady stream, stirring constantly (watch for spattering caramel). Return the pan to medium heat and stir until the caramel is dissolved.
Pour the hot caramel over the chopped chocolate and let it sit for a few minutes to melt. Add:
Add:
1/2 tsp vanilla
1 tbsp butter
dash salt
Stir until smooth and set aside until cooled to room temperature.
Strawberry-Rhubarb White Chocolate “Ganache” with Candied Ginger
This filling was tasty but could use some tweaking, so I’m going to post how I would make it next time – with double the strawberry-rhubarb purée and half the ginger, as it sort of overpowered the other flavours. Because of the increased liquid from the fruit purée, I’m omitting the heavy cream, so I guess this isn’t really a ganache anymore.
Chop 4 oz white chocolate, place in a heatproof bowl, and set over a bain marie to melt, stirring occasionally. Purée several tablespoons each of chopped strawberries and rhubarb, then strain it to make 1/4 cup total of fruit purée (I used frozen, thawed fruit).
 Stir the puree into the melted chocolate. Stir in 1 1/2 tsp finely chopped candied ginger.

Stir until smooth and set aside to cool.
Assembling the Chocolates
You will need:
a chocolate bonbon mold (metal, plastic, silicon…) (some Daring Bakers used fancy ice cube trays)
about 10 oz tempered chocolate (dark, milk, white – your choice)
tempered chocolate in a contrasting colour, to drizzle decoratively (I didn’t temper my drizzling chocolate and you’ll see how it turned out 😉 )
ganache filling of your choice
a spatula
a spoon or small ladle
Make sure your chocolate mold is clean and dry (and, if metal, at room temperature). Place the contrasting coloured chocolate in a small Ziploc bag, snip off a tiny corner, and drizzle it decoratively into each cavity of the mold. If your mold is NOT metal, you can put it in the fridge to set. If it IS metal, set it aside to harden at room temperature. When the drizzled chocolate is totally set, fill each cavity with tempered chocolate and knock the mold against the counter a few times to remove any air bubbles. (To make it easier, I only filled about half the cavities at a time.)
 Dump the chocolate out, back into the bowl of tempered chocolate, leaving a coating on the inside of each cavity. With a spatula, scrape off the excess chocolate from around the edges of the molds, and set the chocolate-coated molds aside to harden (you can put them in the fridge for a few minutes to speed things up). Alternately, you can use a spoon to sort of paint the inside of each cavity with chocolate, instead of the fill-and-dump method.
 Place the cooled filling into a Ziploc bag (or piping bag), snip off a corner, and pipe the filling into each chocolate-coated cavity, stopping a few millimeters from the top (ie, don’t overfill – you need room on top for the chocolate “cap”).
 Pour chocolate over the filling in each cavity to cap it off, then scrape any excess chocolate off with a spatula.
 Refrigerate until set, but don’t leave them in there too long or they will start to sweat.Invert the pan into a flat surface and pop out the chocolates (I had to whack the bottom of the mold with a wooden spoon quite violently to get the chocolates out!)
 I tempered the dark chocolate coating, but not the white or milk chocolate for decoration. It didn’t make much difference for the white chocolate, but you can see the milk chocolate is not as shiny, and it stuck to the mold.


Thanks Lisa and Mandy for hosting this challenge – it was a doozie! Check out the Daring Kitchen for this month’s complete challenge (including instructions for other methods of tempering chocolate and a bunch of awesome candy recipes), as well as a gallery of all the other chocolate and candy creations!


Leave a comment