 I finally got the replacement power cord for my computer so I can post about the wedding cake trial run I did a few weeks ago – yay!
First of all, cake size: there are about 55 guests at the wedding, so I’m making a three-tiered cake with 10-inch, 8-inch, and 6-inch round tiers, each about 4-inches high. I used the Wilton party cake serving guide and Earlene’s cake serving guide to come up with those sizes, which should yield about 60 pieces of cake (including the top tier, which will be eaten at the wedding rather than being saved for the bride and groom’s first anniversary). Wilton’s wedding cake serving guide gives much smaller servings, so I opted for larger pieces and slightly more cake than might be needed, to be on the safe side.
Based on the comments from the post where I asked for advice on which flavour to make the cake, the lemon cake with raspberry filling and cream cheese frosting is the clear winner! This was actually the combination I was going to go with in the first place, so thanks for validating my choice! So, now that my paralysing indecision was dealt with, I had to actually choose recipes for a lemon cake, raspberry filling, and cream cheese frosting, and then do a test run to figure out recipe yields and make sure they came out alright and tasted good!
After looking at dozens of cake recipes, I finally settled on a lemon butter cake from Margaret Braun’s book Cakewalk (she did the swirly yellow and white cake from my previous wedding cake post). I chose this recipe because she uses it for stacked cakes, so I know it will hold up, and also because it doesn’t require whipping egg whites separately, which is time consuming.
I halved the recipe to make two 6-inch cakes, and ended up with 4 3/4 cups of batter, which turned out to be more than enough (I’ll need two cakes to get the 4-inches of height). I took some advice on baking a level cake from i am baker and sacrificed a towel to cut into strips to wrap around the pan before baking. This is supposed to act as insulation and stop the edges of the cake from baking faster than the middle, thus preventing a domed top (which has to be trimmed off when stacking the layers, meaning you’re wasting a bunch of cake). As you can see, it didn’t really work. Later I realized that the towel strips are supposed to be wet, so I’ll give that a try when I bake the cakes for real! (Also, doesn’t it look like the pan is wearing a diaper?)

Anyway, using the amount of batter suggested by Wilton, I baked the first cake with 2 cups of batter and it rose up in a dome about an inch higher than the pan, which meant I would have to slice off a bunch from the top, so I scaled back on the second cake to 1 1/4 cups of batter. This one baked in a shorter amount of time so it didn’t get the same golden crust as the first one, but it didn’t overwhelm the pan and I wouldn’t have to trim as much off the top.

Based on this second cake, I calculated that I will need about 14 1/2 cups total for all the cakes, which is one and a half times the original recipe (or three half-batches, which will be easier for my mixer to handle!). Doing this required all of my math skills and I definitely can’t explain how I figured it out, but it does make sense. Thank goodness for calculators! Math problems aside, the cake itself tasted really good, with a pound-cake like texture (firm rather than airy) and a nice moist crumb. I will add a bit more lemon juice and zest next time though – it could have been more lemon-y.
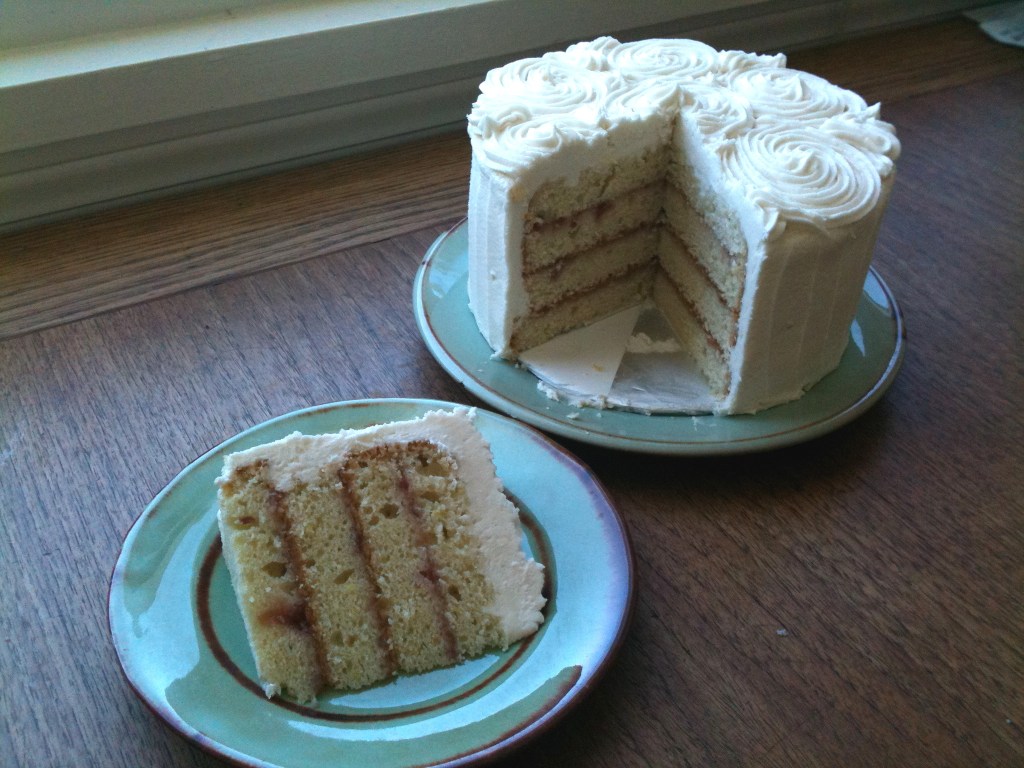
The frosting: cream cheese frosting is usually quite soft and heavy and not exactly fluffy, so I spent a long time looking for a recipe that would give me something both spreadable and light, but that would also be able to sit unrefrigerated for a while and not lose its shape. I found this recipe for Professional Cream Cheese Buttercream Frosting, and the only thing that I wasn’t sure about was that it contained shortening. I know that lots of decorators use shortening-based frostings because they are light, fluffy, pipeable, and hold up well at room temperature, but I’ve never even bought shortening (ie, Cristco) before, so I was wary. I made a quarter batch for this 6-inch cake, which gave me 2 2/3 cups of frosting. I liked that it got really firm in the fridge, which would make moving and stacking the cakes easy, but it was not as fluffy as I wanted and WAY too sweet. Upon further research, apparently this is usually the problem with confectioner’s sugar-based frosting, so I’m going to try a cream cheese Swiss Meringue Buttercream frosting instead, like this one. This method sort of scares me but I think it will taste much better, so I will just have to get over my fear! I got the idea for vertical stripes on the sides from i am baker. The swirly stuff on top was just me trying to use up the rest of the icing (actually I was trying to do this, but I failed. Among other things, my star tip was too small!)
I used store-bought raspberry jam to spread between the layers, because I figured that making my own jam or filling would be too difficult, but now I’ve changed my mind. The jam was not quite raspberry-ey enough, so I’m going to try a no-cook freezer jam recipe instead, which is essentially just mashed berries with sugar and pectin. Hopefully this will result in a suitably rasberry’d filling!
I also made a simple syrup of sugar, water, and lemon juice and zest to sprinkle on the cake layers before spreading them with raspberry. This tasted great and helped keep the cakes moist.
And finally, the cake base: my trusted friend Martha suggests that you can use regular 3/16-inch foam-core board to put the cakes on, which I did, but I covered it in foil because I wasn’t sure how well cake and paper go together. The foil was a bad idea though, because when I cut the first slice of cake it came off with a chunk of foil stuck to the bottom. Now I don’t know if I should buy real cake boards from a bakery, or just use the foam core au naturel, as Martha suggests…

So, the plan: I will bake the cakes ahead of time and freeze them, then fill/frost/assemble the cake the day before the wedding. I will add more lemon to the batter, be careful about sifting and not over-beating, and use wet towel strips when baking in hopes of ending up with a level cake. I still need to try the cream cheese Swiss Meringue Buttercream frosting, and make the raspberry filling. Figure out what to do about the cake base. Oh, and did I mention I need to transport all of this plus equipment on the ferry from Victoria to Vancouver and assemble it in my grandparents’ kitchen before moving the cake to the venue?? Did I also mention how EXCITED I am about this?!?!
Here’s some helpful wedding cake-related links:
My trusted friend Martha puts together a tiered wedding cake from start to finish
A helpful video on how to get a smooth finish on a frosted cake
A really pretty decoration idea for a wedding cake
Cake and filling/frosting recipe ideas from Martha
Deb at Smitten Kitchen made a wedding cake for her friends: read about it here
PS: I’m off to California for a week to visit my aunt and uncle starting tomorrow, so I might not update again until I get back. Rest assured, however, that I will have lots of delicious things to write about!!

Leave a comment