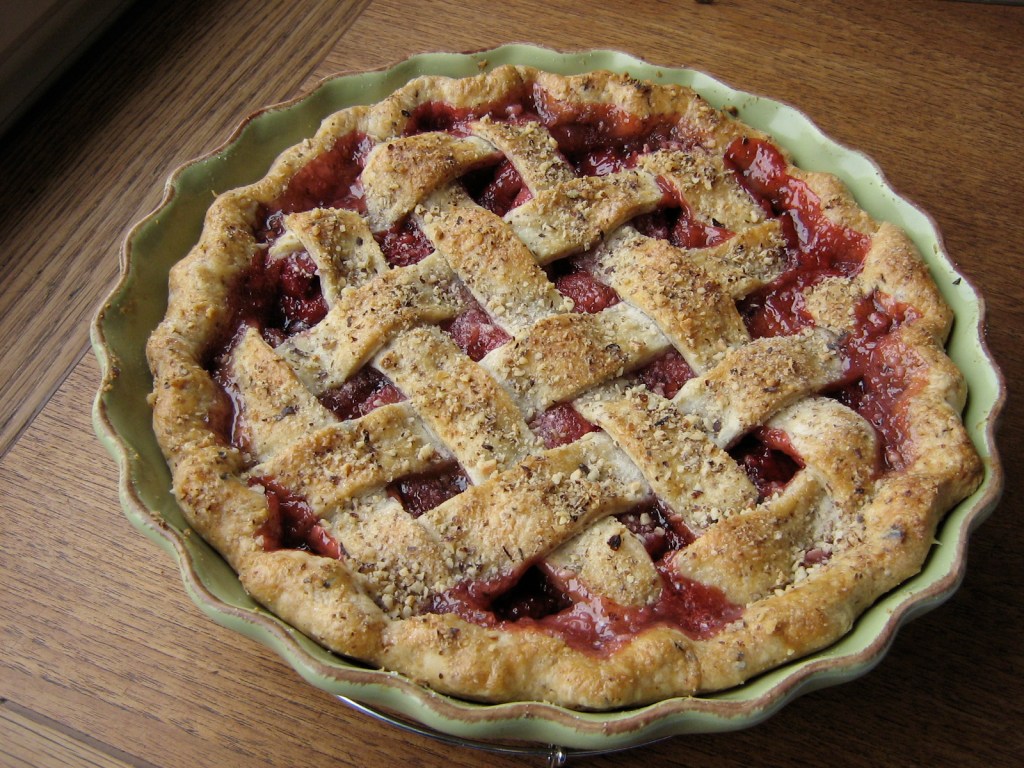
 I have been meaning to share my favorite pie crust recipe here for a while now, but every time I’ve made it lately, I’ve been experimenting with it somehow, with varying degrees of success. For Easter I decided to experiment once more with a hazelnut pastry for strawberry rhubarb pie, and I have to share this variation on the pie crust recipe because it was so good. For the strawberry rhubarb filling, I used this recipe from Simply Recipes, which was a good starting point, but I have some changes I’d make for next time. First, less sugar – 1 cup of sugar to 4 cups of fruit was too sweet for my taste. I like a bit of tart rhubarb flavour, and this was quite sugary. Second, more fruit – probably 4 cups of rhubarb and 2 of strawberries. Third, the recipe used instant tapioca for the thickener, which gave the filling a kind of tapioca-pudding texture (little tiny gelatinous balls). Nate said he couldn’t tell, but I wasn’t loving it – not that it tasted bad, I would just prefer a smoother texture from, say, corn starch. And fourth, I would add some lemon zest along with the orange zest to the filling. So once I have all that figured out and perfected, I’ll share my recipe. In the meantime: hazelnut pastry!
This is a super easy-to-make pie crust, made in a slightly different way than usual: instead of cutting cold butter in to flour, you actually cream the room-temperature shortening/butter, then stir in the flour until the dough looks ragged. I know – I was skeptical the first time I made it too, but it was so easy to work with and turned out SO flaky and delicious that it has become my go-to pastry recipe for everything that needs a crust. The only thing it doesn’t work for is single crust pastries that are blind-baked (pre-baked) before filling (like a quiche), because the large amount of fat in the dough causes it to melt and shrink down the pie plate. But for pies that you fill before baking (especially double crust), it is fantastic. I also like that it is easily made entirely by hand – you don’t need a food processor to make good pastry!
I had a strawberry rhubarb pie a few years ago that was topped with a sort of almond struesel, which gave me the idea of adding nuts to the pastry. I like the assertive flavour of hazelnuts, and thought they would pair well with strawberry and rhubarb, so I ground some up and substituted 1/2 cup of the flour for the ground hazelnuts. When I added the water, I ended up with a slightly wetter dough, but by sprinkling it with flour and folding it several times on a floured surface, I got a dough that was just the right consistency and baked up really nicely into lots of light, flaky layers.
And lastly, I wanted to show off the gorgeous pinky-red strawberry rhubarb filling, so I went with a lattice top. It looks impressive and is actually really easy to do!
Hazelnut Pastry
Makes 2 pie crusts, enough for an 8″ – 10″ double crust pie. It is really important that the shortening/margarine and butter are soft (ie, room temperature) but not melted. I usually use margarine instead of shortening. I’ve played a bit with the ratio of shortening/margarine to butter and found it to be pretty flexible – 1/2 cup of shortening and 1/4 cup plus 3 tbsp of butter works just fine! You can use any kind of nut you want (almonds or pecans would be delicious), just make sure they are finely ground. I ground the hazelnuts in my tiny food processor, but you can sometimes buy them already ground (sometimes sold as “meal”, as in almond or hazelnut meal). Modified from Canadian Living.
In a large bowl, cream together:
3/4 cup shortening or margarine, softened
3 tbsp butter, softened
In a smaller bowl, whisk together:
1 3/4 cups all purpose flour
1/2 cup ground hazelnuts
3/4 tsp salt
With a wooden spoon, stir the flour mixture into the butter until the mixture looks coarse and ragged – you want it to be fairly well mixed, with some streaks of shortening/butter left.
Pour a scant 1/2 cup ice water down the sides of the bowl and mix briskly to incorporate into a loose dough, using as few strokes as possible. The dough will be wetter and stickier than regular pastry – do not despair, and DO NOT overmix!
Turn the dough out onto a floured surface, along with any flour that didn’t get incorporated into the dough. Sprinkle with a little flour and gently pat it down…
…and then fold the dough in half.
Repeat 5-6 times, until the dough is no longer wet and sticky but still a bit soft. This creates layers of butter and flour which will translate into layers of flaky pastry. Do not knead it like bread dough or you will end up with hard, chewy pastry. Cut the dough in half, flatten into disks, and wrap in plastic. Chill for 1 hour (this will make the dough easier to handle – it you leave it longer than 1 hour (say, overnight), leave it at room temperature for a few minutes before rolling it out).
When the dough has chilled, roll out one pastry disk on a lightly floured surface until it is slightly larger than your pie plate. To keep it from sticking, move the dough around as you roll it, dusting your work surface and rolling pin with more flour if needed. Use the flour sparingly – too much will make your pastry tough.
When your pastry is large enough, roll it up around the rolling pin…
…then unroll it over your pie plate.
Gently press it down into the corners of the pie plate, patching up any tears or holes that appear. Trim the edges, leaving about 1/2″ to 1″ overhang (for an idea on what to do with the extra pastry scraps, keep reading!).
Add your filling. Roll out the second pastry disk to fit the top of the pie. At this point, you can simply moisten the edges of the pastry in the pie plate, place your rolled-out pastry on top, trim the overhang, crimp the edges, cut some steam vents, and bake as directed for your filling (oh, and brush with an egg wash – keep reading for instructions). OR you can be adventurous and make a lattice pie crust top! It’s not hard, I swear 🙂
Lattice Pie Crust
Cut strips in the rolled out pastry by making 11 parallel cuts about 1 inch apart – this will give you 10 strips, with 1 edge piece on each end.
Moisten the edges of the pastry in the pie plate. Place 5 strips, evenly spaced, over the filling.
Fold back strips 1, 3, and 5 to slightly more than halfway, and place a strip across the middle of the pie, on top of (and perpendicular to) strips 2 and 4.
Fold strips 2 and 4 back and place another strip across strips 1, 3, and 5.
Fold down 2 and 4; fold back 1, 3, and 5, and place one more strip across 2 and 4.
Repeat on the other side of the pie with the remaining two strips to complete your lattice weave.
When all 10 strips are woven into the lattice, press down the edges and trim them, and then fold the edges over on top of themselves, in towards the middle.
Crimp the edge with your fingers to make a fluted border.
Make an egg wash by whisking together 1 egg with 1 tbsp water. Gently brush over the pastry with a pastry brush.
Sprinkle with a little granulated sugar (or larger sugar crystals, such as turbinado or raw sugar, if you have them!) and any extra ground hazelnuts left over from the pastry dough.
Bake as directed for your filling, until golden brown and flaky.
(I find that this pastry works best when baked for 15-20 minutes in a hot oven (400˚ – 425˚ F), then at 350˚ F for about 40-50 minutes, depending on your oven and filling of course!)
What to do with pastry scraps:
Gently gather them into a ball and roll out into a circle on a floured surface. Brush with a little melted butter, sprinkle with brown sugar and cinnamon, cut into wedge, and roll up from the wide edge like croissants. Bake on a parchment-lined baking sheet in the oven with the pie for about 40 minutes, until golden brown and flaky. You can also use jam or preserves as a filling. These are great to munch on while ravenously waiting for the pie to cool!



Leave a comment