 I recently joined an online cooking challenge group called the Daring Bakers (their website, the Daring Kitchen, is also home to the Daring Cooks). Every month members are challenged to make a certain recipe, showcasing their creativity and skills to interpret it. The members keep it a secret (no blog posts or online mention of the challenge) until the 27th of the month, when everyone posts a write-up on their blog, recounting their kitchen adventure with that month’s challenge recipe. April was my first Daring Bakers’ Challenge, and it was a good one!
The April 2011 Daring Bakers’ challenge was hosted by Evelyne of the blog Cheap Ethnic Eatz. Evelyne chose to challenge everyone to make a maple mousse in an edible container. Prizes are being awarded to the most creative edible container and filling, so vote on your favorite from April 27th to May 27th at http://thedaringkitchen.com!
I have to admit that I was a teensy bit disappointed because mousse isn’t exactly a challenging *baking* recipe, and the previous months’ challenges had definitely employed more advanced baking skills (including a Jaconde sponge/entremet and a yeasted meringue coffee cake, both of which I want to try out at some point!). However, the edible container part was intriguing, and gave me a chance to try two things that I have wanted to make for a long time: tuile cookie cups and chocolate cups using water balloons. I got over my initial disappointment pretty fast after that, because I love maple syrup (and coincidentally, I had just bought a litre of it for a relatively good price!) AND because Evelyne suggested incorporating bacon into the edible container – and who doesn’t love bacon? Plus the maple/bacon combination is just so delicious…

So I planned it all out in my head for a few weeks, and then on Saturday the 16th I got down to business. The maple syrup mousse came together pretty quickly and was really easy, and INCREDIBLY DELICIOUS. Quite sweet, but then I have a major sweet tooth so it didn’t pose a problem for me, and with a fantastic maple flavour. Some people mentioned that their mousse stayed pretty soft, but mine firmed up quite nicely and had a really good fluffy texture. It was all I could do not to eat it by the spoonful as I was preparing the edible containers!


For the tuile cookie cups, I used my trusted friend Martha’s tuile cookie recipe, adding 4 slices of crisp bacon, very finely diced, to the batter. This recipe was a good fit with the mousse because it used 4 egg whites and the mousse called for 4 egg yolks – no wasted eggs! For a more intense bacon flavour, next time I might try replacing a tablespoon or two of the butter with bacon fat. Using a stencil made of a plastic container, I spread about 1 tablespoon of the batter into a 4 inch circle on a Silpat baking mat and then baked them. When they came out of the oven, I pressed them into a small bowl and let them set for a minute before removing them to a cookie rack to cool, keeping their bowl shape. When they were all cool, I dipped the edges in chocolate and nuts.


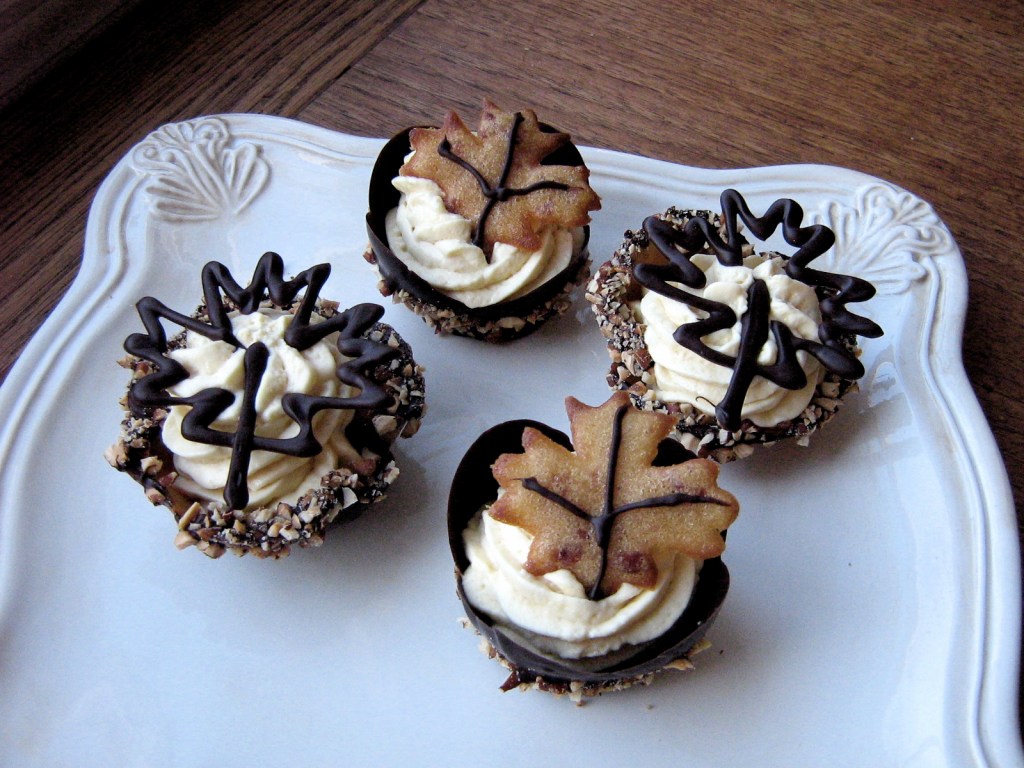
I also made some tuile cookies in the shape of maple leaves as garnishes, inspired again by Martha. I made myself a stencil from the lid of a plastic container and spread the batter over it, then removed the stencil to reveal a maple leaf shape… in theory. In reality, it was a lot less precise and a lot more messy, and involved considerable doctoring with the tip of a knife after the stencil was removed, to make the cookie resemble something looking like a maple leaf! After they were baked, I laid the warm leaf cookies on a rolling pin to give them a little bit of a curl, then piped lines on with chocolate after they were cool.


The chocolate cups were pretty straight forward, and I’d seen the method done before, so I just went from memory on this one. I dipped inflated water balloons in melted chocolate and chopped nuts, then placed them on a parchment paper-lined cookie sheet to set in the fridge. When they were set, I deflated the balloons and peeled them out to reveal tulip-shaped chocolate cups. Note: water balloons are REALLY HARD to inflate with air! I could not for the life of me blow one up with my lungs – I actually had to use a bicycle pump! Also, a water balloon dipped in melted chocolate that is too warm will burst. Ask me how I know this 😉


I used the rest of the chocolate to pipe maple leaves on parchment paper to make another garnish for the mousse. When I was finally ready to assemble, I piped the mousse into the cups, then topped the bacon tuile cups with a chocolate maple leaf, and the chocolate cups with a tuile maple leaf cookie.


I served these to a bunch of friends and got rave reviews. They were all in total awe of how the mousse cups looked, and even more impressed with how they tasted: the mousse is FANTASTIC, and the edible cups were really good. (The fact that no eating utensils or dishes were needed was a bonus!) The slightly savoury bacon tuiles complimented the maple flavour really well, and the bitter dark chocolate was a good balance to the sweetness of the mousse (although I think I preferred the bacon tuile cups over the chocolate). The crunch of the tuile, chocolate, and nuts also contrasted with the fluffiness of the mousse. Delish!

This was fun to make, but it took FOREVER! I started around 1 pm and didn’t finish until close to 7:30 pm, working pretty much non-stop. If I endeavour to try this again (which I probably will – it was that good!) I will do it over two days: mousse and tuile cups on day 1, and chocolate and assembly on day 2. Thanks Evelyne for a fun challenge and a delicious maple mousse recipe! I will definitely make it again 🙂 Click here to read more about the challenge and to see pictures from all the other Daring Bakers. And don’t forget to vote for the most creative entry at The Daring Kitchen between April 27 and May 27!
Note: I made this for a crowd, so I increased the mousse recipe by 1.5 and ended up with 23 servings of about 1/4 cup. I’m posting the original proportions for the mousse, and I’m assuming that anyone who tries this will make either the tuile cups OR the chocolate cups, but not BOTH, so I have adjusted the yield of the recipes to accommodate 6 servings of mousse 🙂
Maple Syrup Mousse
The yield for this recipe is 6 approximately half cup servings.
1 cup pure maple syrup (NOT maple-flavoured pancake syrup!)
4 large egg yolks (reserve egg whites for tuile cookie cups recipe)
1 pkg ( 7 grams/1 tbsp) unflavoured gelatine
1 1/2 cups whipping cream (35% fat content)
Bring maple syrup to a boil over medium heat, then remove from the burner. Beat egg yolks until thickened and lighter in colour (this is a really good arm workout!). Whisk a small amount of the hot maple syrup into the egg yolks to temper them, then slowly pour the rest of the maple syrup into the eggs yolks, whisking constantly. Set aside.
Sprinkle the gelatine over 1/4 cup of the cream and let soften for 5 minutes. Heat the cream in the microwave (in 10 second bursts, mixing after each) for about 45 seconds or over a double boiler until the gelatine has melted and completely dissolved (it will go from weirdly clumpy and solid to totally liquid). Pour the gelatine/cream into the maple/egg yolks and whisk to combine. Set aside for about an hour, whisking every 10 minutes or so, until the mixture has the consistency of a unbeaten egg white. Mine set quite a bit firmer, more like pancake batter or a loose cake batter, resulting in a firmer mousse.
Whip the remaining 1 1/4 cups of whipping cream until stiff peaks form. Using a whisk, gently fold 1/4 of it into the maple mixture to lighten it. Fold in the remaining cream and refrigerate for at least an hour. Makes 6 half cup servings.
Bacon Tuile Cups
This recipe says it yields six 7-inch rounds. I made fifteen 4-inch rounds (using 1 tbsp of batter and baked for 7-8 minutes) plus maple leaves, and still had batter left over. You could probably halve this recipe and still make enough cups for the mousse (6 servings)! Adapted from Martha Stewart.
1/2 cup butter, softened (may substitute 1-2 tbsp of butter for cooled bacon fat)
2/3 cup packed light brown sugar
4 large egg whites, at room temperature
1 tsp vanilla
1 cup all purpose flour
pinch salt
4 pieces bacon, cooked until crisp and finely diced
Preheat oven to 350˚F with rack in the middle. Line a baking sheet with a Silpat baking mat or parchment paper.
In bowl of an electric mixer, beat butter and sugar until fluffy. Add egg whites one at a time, beating well after each addition. Add vanilla, then beat in flour and salt. Stir in bacon.
Using a stencil (or freehand if you’re feeling confident!) spread 2 tbsp of batter into a 7 inch circle in the prepared baking sheet, making the edges slightly thicker than the middle. Leave plenty of space between each cookie – probably 2 cookies per sheet.
Bake at 350˚F for 8-9 minutes, rotating the sheet halfway through the baking time. Remove the sheet from the oven and let the cookies cool for about 30 seconds. Using spatula, peel the cookie off the sheet and press into a small bowl. Repeat with remaining cookie(s) (return the sheet to the oven for a few seconds if the cookies become too firm to mold). Remove from the bowl after 30 seconds to 1 minute and let cool on a cooling rack. Repeat to make 6 tuile cookie cups. See directions below for Garnishing and Assembling.
For maple leaf cookies, cut a maple leaf shape out of the lid of a plastic container to use as a stencil. Place the stencil on the baking sheet and spread a small amount of batter over it, making sure to get it in all the corners. Lift the stencil straight off the sheet and you should have a leaf-shaped cookie left behind. Re-shape as needed with the tip of a knife. Bake as above for 6-7 minutes. Drape the cookies over a rolling pin to give them a curved shape, and cool on a rack. Repeat to make 6 maple leaf cookies. See Garnishing and Assembling, below.
Chocolate and Nut Cups
7 oz dark chocolate (at least 70% cocoa), chopped
1/3 cup each toasted almonds and pecans, chopped finely
6 water ballons, inflated (with a bicycle pump?!) until they fit into a 1/2 cup dry measuring cup
Melt the chocolate in a bowl over a double boiler. Remove from the heat and allow to cool to body temperature. Place the chopped nuts in a bowl. Line a baking sheet with parchment or waxed paper. Place a small spoonful of chocolate on the baking sheet – this will be the base for your bowl. Dip the bottom of a balloon in the melted chocolate, rotating to coat. Allow the excess chocolate to drip off, then dip the chocolate balloon in the nuts. Place on the baking sheet on top of the spoonful of chocolate. Repeat for the remaining balloons and refrigerate until set. Reserve any remaining chocolate for Garnishing and Assembling (below).
To remove the balloons, make a small cut below the knot of the balloon and deflate slowly. Gently peel the balloon from the chocolate – you may have to use some force, so be careful!
Garnishing and Assembling
Bacon Tuile Cups: Dip the edges of each cup in the remaining melted chocolate and then in the nuts. Let set on a cooling rack.
Tuile Maple Leaf Cookies: Place the remaining melted chocolate in a small Ziplock bag and snip a tiny piece off one corner. Pipe decorative lines on the leaves and allow to set.
Piped Chocolate Maple Leaves: Using the melted chocolate in the Ziplock bag (you may want to make the hole in the corner slightly larger), pipe maple leaves onto waxed paper (you can draw them with pen on one side of the paper, then flip it over to trace with the chocolate). Refrigerate until set.
To Assemble, place the mousse in a piping bag fitted with a large star tip. Pipe into the Bacon Tuile Cups and/or Chocolate Nut Cups. Garnish each cup with a chocolate maple leaf or a tuile maple leaf cookie. Keep in the fridge until ready to serve.
PS: As of about 10:30 am on Apr 27, WordPress is having some issues with comments… as in, for some reason, no one can leave any on certain posts, ie: this one 😦 Hopefully it’s fixed soon! Seems to be fixed… fingers crossed!

Leave a comment