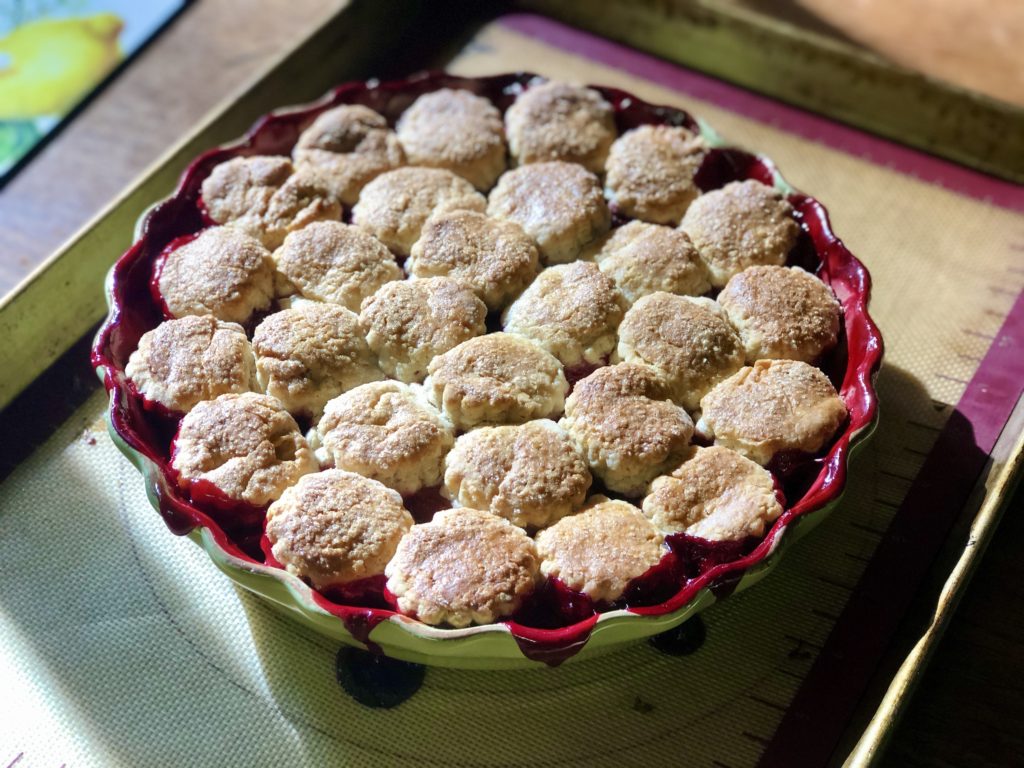
Archive | Other Baked Goods & Sweets RSS feed for this section

Sourdough Danish Pastries, Part II

24 May

As promised, here’s the follow-up to my last post on Danish pastries: how to shape and fill the Danishes. So fun!

I got really excited about the different Danish shapes I was going to make, so I tried a whole bunch of them. They were all pretty successful so I’m confident that I can pass along my skillz ;) . I only used half the batch of dough to make these (I couldn’t justify making sixteen Danishes for only two of us) so I will be experimenting with the rest of the dough sometime soon… stay tuned for Part III! ;) (more…)

Sourdough Danish Pastries

20 May

In my last post, I was extolling the virtues of making something simple from scratch. Now I am going to extol the virtues of making something rather complicated from scratch: Danish pastries using sourdough starter. Yes, we are doing this!

At the end of April, I wrote a list of stuff I wanted to make for this blog over the summer, and Danish pastries was on it. I had my first taste of making laminated dough when the Daring Bakers made croissants a while back, and I wanted to try it again. But I was kind of putting it off because it’s a lot of butter and a lot of work: all that rolling and folding and rolling and folding and resting and waiting. Then, during the Daring Bakers reveal last month, I came across Sourdough Surprises, which is another baking group that a few Daring Bakers members have created to bake together once a month using their sourdough starters. And their recipe for May was sourdough Danishes! Well, it seemed like fate. I was in. (more…)

Strawberry Cheesecake Banana Bread

6 May

It is finally strawberry season here, and by that I mean that there are local strawberries in the stores. They are a bit more expensive than the ones trucked up from California (which seems so totally backwards!) but they taste amazing because they are so perfectly ripe and fresh.

I knew I wanted to make something special with these berries but I couldn’t decide what until I remembered the strawberry banana bread I’d seen on Joy the Baker a while ago. I wanted to jazz it up even more so I added a cream cheese swirl. The result is an incredibly moist, decadent, not-to-sweet bread with a pleasant strawberry flavour and cheesecake-y tang. The banana is not overpowering at all and mostly just contributes sweetness, and the hint of cinnamon in the batter goes really well with the strawberries. (more…)

Cookbook Review: Whitewater Cooks with Friends (plus a bonus recipe!)

3 May

A few months ago I was asked if I would write a review of Shelley Adams’ newest cookbook (her third so far), Whitewater Cooks with Friends. I jumped at the chance, because 1) free cookbook! Yay! and 2) my Mum has Shelley’s first book, Whitewater Cooks, and has very good things to say about it, so I was pretty sure I would enjoy this one. However, I’ve been putting off reviewing it until now, when I’m off work for the summer and actually have time to do a proper job of it. Also, the whole tone of the cookbook is so summery that I couldn’t face concentrating on it too much while it was still grey and dreary outside – not when it was taunting me with its fresh, sunny flavours, colourful pictures, and outdoor potluck-worthy recipes. (more…)

Daring Bakers: Armenian Treats

27 Apr

The Daring Bakers’ April 2012 challenge, hosted by Jason at Daily Candor, were two Armenian standards: nazook and nutmeg cake. Nazook is a layered yeasted dough pastry with a sweet filling, and nutmeg cake is a fragrant, nutty coffee-style cake.

Armenian baking is not something I had ever contemplated before this challenge, which may ring true to many (have you ever contemplated Armenian baking?). However, Nate’s paternal forebears came from Armenia several generations ago, and he has a very Armenian last name, so it does surprise me just a little bit that, me being me, I never looked into it. That’s totally something I would do. (more…)

Chocolate Hot Cross Buns

7 Apr

Once again, the start of spring and the approach of Easter mean that it’s hot cross bun season. I had pretty good success last year making hot cross buns, so I gave them another try – but this time I added chocolate, because almost anything is better when you add chocolate. Prior to this, I had never actually had a chocolate hot cross bun, but I have seen them in bakeries and heard wonderful things about them (apparently they are very popular in Australia). There doesn’t seem to be a huge amount of recipes available on the internet, so I decided to come up with my own. I added cocoa powder and chocolate chips (plus dried cherries and apricots) to my existing hot cross bun recipe, along with a healthy dose of cinnamon and cardamom, with which I have recently become enamoured and which happens to go very well with chocolate. And for the cross on top, white chocolate. (more…)

The Pioneer Woman’s Chocolate Pots de Crème

3 Apr

Aka, The Easiest Dessert Ever.

When I was at home suffering from the plague last week, I had a major craving for chocolate, specifically something rich and creamy and easy. These chocolate pots de crème satisfy all of those criteria: throw some chocolate chips and eggs in a blender, blend with some steaming hot coffee, chill, and eat. Couldn’t be simpler, or more decadent! I topped them with a little coconut cream (I didn’t have any whipping cream) and they were totally delicious. It’s a good thing I only discovered these recently, or I would have been making them once a week. Very dangerous.

Technically, I don’t think you can call these “true” pots de crème, because they don’t actually contain any cream, nor are they baked in a water bath. However, the flavour and texture are pretty much right on. The hot coffee serves to cook the eggs and imparts a little bit of coffee flavour, but mostly it just intensifies the chocolate flavour. I think you could use hot milk or cream instead of coffee and change up the dark chocolate chips for milk or white chocolate, and add whatever flavours you want (I added a pinch of cinnamon). I intend to do lots of experimenting with this one – it got rave reviews from everyone who tried it, and was waaaay too good not to make again soon! So if you need a quick chocolate fix, here you go: you can thank me later.

Chocolate Pots de Crème

Adapted from the Pioneer Woman. Makes 4 servings.

In a blender jar, combine:

6 oz semi-sweet chocolate chips

2 eggs

a small pinch of salt

1 tbsp or so of liqueur (I used French vanilla Kahlua)

Put the lid on and blend to combine.

Pour in 1/2 cup very hot coffee and blend, blend, blend. You are supposed to pour the coffee in through the hole in the lid while the blender is going, but I’m not very good at reading instructions and just dumped the coffee in all at once, then put the lid back on and blended. It worked fine.

At this point you can also add a pinch of cinnamon or a dash of vanilla if you feel so inclined.

Pour the blended mixture into 4 small vessels of about 1/2 cup capacity.

Chill them in the fridge for a few hours until cold and set. Top with lightly sweetened whipped cream (or coconut cream) and devour.

Lemon Rosemary Sticky Bun Twists

9 Mar

Lemon and rosemary might not be a flavour combination you’re familiar with in a sweet context, but man oh man, does it ever work! I stumbled across a recipe for Meyer Lemon Rosemary Sticky Buns and bookmarked it immediately because it sounded so intriguing, and I planned to make them using one portion of challah dough. Then I saw Sawsan’s beautiful cinnamon twists and decided to use her technique instead of just making plain old spirals.

The result is these very tasty, very pretty Lemon Rosemary Sticky Bun Twists.

I used Meyer lemons for these, and it’s the first time I’ve ever gotten my hands on them. I’ve been hearing about Meyer lemons for quite a while, but had never seen them in any grocery stores – until a week ago, when they started popping up everywhere! A Meyer lemon is a cross between a lemon and a mandarin orange, and has a sweeter, tart taste and thinner skin than a regular lemon. Quite honestly, I’m still not sure what all the fuss is about. They are tasty, but they don’t quite have the tang that a regular lemon does, and I think a good, ripe, organic lemon would give you just as much (maybe better?) lemon flavour. If you love Meyer lemons, go ahead and use them here, but don’t worry if you can’t find them – regular lemons will be just fine!

These smelled AMAZING coming out of the oven, and once I’d smothered them in a lemon-cream cheese glaze, they were pretty irresistible. The first sweet bite revealed subtle lemon and floral rosemary, the combination of which somehow reminded me of rosewater. Really unique, and really delicious. I found the flavour to be even better the next day (if they last that long, that is!).

Lemon Rosemary Sticky Bun Twists

Filling and glaze adapted from Eats Well With Others; twist technique from Chef in Disguise. This recipe uses one approximately 1 1/2 -pound portion of challah dough. Makes 8 twists.

When handling the dough, DO NOT knead it. While a certain amount of man-handling is necessary to roll and twist the dough, try to be as gentle as possible and use only a minimal amount of extra flour to keep it from sticking. If you feel you’ve over-worked the dough, let it have a longer rest before baking.

On a lightly floured surface, place:

approximately 1 1/2 lbs of chilled challah dough

Divide the dough into three roughly equal pieces, and gently shape/roll each piece into a 10-inch circle, using just enough flour to stop it from sticking. If the dough resists rolling, let it rest for a few minutes, then come back to it. Set the rounds aside while you make the filling.

Filling

In a bowl, combine:

1 cup white granulated sugar

1/4 tsp nutmeg

zest of 2 lemons

1 tbsp minced fresh rosemary

Mix together with your fingers until it resembles damp sand, then stir in:

2 tbsp lemon juice

Have ready:

3 tbsp unsalted butter, softened

Assembly

Place one round of dough on your lightly floured work surface. Spread it with about 1 tbsp softened butter, then with half of the lemon-rosemary-sugar filling.

Top it with a second round and spread it with 1 tbsp butter and the other half of the filling. Place the final round on top and spread it with the last 1 tbsp butter. With a large, sharp knife, cut the round into 8 wedges. Flour the knife blade if needed, and make single downward cuts to keep things as neat as possible. With the tip of the knife, cut a ~1-inch slit in the middle of each triangular piece.

Pull on the sides of the triangle to widen the hole, then tuck the point of the triangle into the hole. Gently pull it through to form the twist.

Arrange the 8 pieces in a circle with their sides touching on a parchment-lined baking sheet. Pinch together the two points at the base of each triangle.

Cover the twists lightly with plastic wrap and let rest for about 1 hour at room temperature (or refrigerate for several hours or overnight). It’s OK if some of the sugar-lemon mixture seeps out while the twists are resting.

Preheat the oven to 375˚F and bake the twists for 20-30 minutes, until nicely browned and baked through in the middle.

While the twists are baking, prepare the glaze.

Glaze

In a small bowl, cream until light and fluffy:

2 oz cream cheese

With a whisk, beat in:

1 tbsp lemon juice

Mix until smooth.

Add:

1/2 cup confectioner’s sugar

The glaze should be about the consistency of honey. Drizzle the glaze over the warm twists.

These are fantastic warm from the oven, and if you happen to have any leftover, the lemon-rosemary flavour is even better the next day.

Caramel Pecan Sticky Buns

2 Mar

Here they are… the caramel pecan sticky buns that started my obsession with making bread the Artisan Bread in Five Minutes a Day way. They are so good that I am sure they will also start your obsession.

This is one way to use up a portion of this challah dough. Roll it out, spread it with cinnamon-sugar-butter and sprinkle it with pecans, sit it on a bed of brown sugar-butter-pecan goodness, let it rest, let it bake, and then you will be in caramel pecan sticky bun heaven.

I’m telling you, these are GOOD, and although they require some waiting time, they don’t require a lot of physical effort. They don’t even have to be particularly pretty or neat looking to still taste out-of-this-world amazing. There is a TON of butter and sugar in this recipe, so if you’re looking for something diet-friendly, you might want to pass on this one… but I wouldn’t recommend it ;) .

The pecans are calling your name. Make these sticky buns. You know you want to…

Caramel Pecan Sticky Buns

From Artisan Bread in Five Minutes a Day. Makes 8 buns. This recipe uses one 1 1/2-ish lb portion of challah dough.

Caramel-Pecan Topping

In a medium bowl, cream together:

6 tbsp unsalted butter, soft

1/2 cup brown sugar

1/2 tsp salt

Spread the mixture evenly over the bottom of a 9″ round cake pan. Sprinkle it with:

1/2 cup roughly chopped pecans (you can leave them whole if you prefer)

Set aside.

Filling

In a small bowl, cream together:

4 tbsp unsalted butter, soft

1/4 cup brown sugar

1 tsp ground cinnamon

1/4 tsp nutmeg

pinch of freshly ground black pepper

Set aside.

In a 375˚F oven, toast:

1/2 cup chopped pecans

Toasting the pecans keeps them from getting soggy inside the rolls. They should take about 20-25 minutes – watch them carefully and stir several times. Set aside to cool.

Assembly

Place a 1 1/2-ish lb portion of chilled challah dough on a lightly floured surface. Using your hands and a rolling pin, roll and stretch it into an 18″ x 9″ rectangle. Keep the dough lightly floured to prevent it from sticking, but try not to over-flour it.

Spread the rectangle of dough evenly with the filling, then sprinkle it with the toasted pecans. From one of the long edges, roll up the dough securely to enclose the filling.

With a sharp serrated knife, cut the roll into 8 pieces. Arrange them over the caramel-pecan topping mixture in the baking pan. Cover lightly with plastic wrap and set aside to rest for about 1 hour.

After an hour, the buns should have expanded quite a bit. With a few minutes left in the rest period, preheat the oven to 350˚F. Remove the plastic wrap, place the pan on a cookie sheet to protect against bubbling-over caramel (I didn’t do this and my oven was a mess of melted butter and molten caramel!), and bake at 350˚F for about 40 minutes, until golden brown and cooked all the way to the center of the pan.

Place the pan on a cooling rack for about 5 minutes, until the bubbling caramel subsides. While still hot, run a knife around the edge of the pan to release the buns and invert them onto a plate (if you wait for them to cool they will stick to the pan). Scrape out any caramel and pecans left behind.

Devour!

Daring Bakers: Quickbread

27 Feb

The Daring Bakers’ February 2012 host was – Lis! Lisa stepped in last minute and challenged us to create a quick bread we could call our own. She supplied us with a base recipe and shared some recipes she loves from various websites and encouraged us to build upon them and create new flavor profiles.

A quickbread is a sweet or savory bread/cake that is made with baking powder or baking soda (and sometimes eggs) rather than yeast, thereby making it “quick” to make, start to finish. Scones, muffins, popovers, Irish soda bread, and loaves like banana bread and tea cakes all fall into this category.

A beautiful, golden brown, airy popover

My quickbreads for this challenge all happened to be sweet, and after looking though a bunch of recipes, I wondered, where do you draw the line between a sweet quickbread and a cake? The answer is… it all comes down to the shape of the pan ;) . A sweet quickbread is generally baked in a loaf pan and often comes out more dense and rustic-looking than a cake, and may include things like fruit in the batter. Any quickbread batter can also be baked as muffins, and then, depending on what’s in them, it’s a toss-up as to whether to call them muffins or cupcakes…

Apples, carrots, apricots, raisins, and seeds say "muffin" rather than "cupcake"

Somehow, anything baked in a loaf pan or muffin tin is a lot more acceptable to eat for breakfast, and in my case, totally OK to slather with butter.

Even though it wasn’t a complicated challenge this month, the Daring Bakers taught me something new (actually, a few somethings). Here’s what I learned:

First, quickbreads are generally made in one of three ways:

  1. The muffin method (aka 2-bowl method), in which the dry and wet ingredients (including a liquid fat, such as melted butter or oil) are mixed separately, them combined gently with as few strokes as possible. The idea is to avoid creating tough gluten strands by overmixing, and the end result is usually moist and tender with a larger crumb.
  2. The creaming method, in which a solid fat (such as butter) is creamed with the sugar, egg and flavourings, then the dry ingredients and any other liquids are mixed in. Most cakes are made with this method, so it stands to reason that this will give a lighter, more finely-textured end result.
  3. The cutting-in method, in which a chilled, solid fat (again, usually butter) is cut into the dry ingredients, and the wet ingredients are folded in gently. This gives a baked good with a flaky texture. These scones are good examples of this method (as are these banana breads).

The two-bowl "muffin method"

Second, there are generally three types of quickbread batter:

  1. Pour batter, which has an equal ratio of wet to dry ingredients and, as the name suggest, can be poured. The end result is usually moist and dense – think pancakes.
  2. Drop batter, with a 3:1 ratio of dry to liquid. This is generally muffin and loaf batter, and ends up moist and fluffy.
  3. Stiff batter, with a 7:1 ratio of dry to liquid, such as scones or Irish soda bread. This gives a light and fluffy end result.

A "pour batter" is... pourable!

Third, especially with the muffin method, the gluten in the flour is important, in that less is more. Lower gluten flours are best because they keep the baked good from getting tough, and to help this out you can replace up to 4 tbsp per cup of all purpose flour with cake flour.

OK, enough with the learning. Lis gave us a basic quickbread recipe to play around with, so my first attempt, at Nate’s request, was a Brown Sugar Caramel Apple Struesel Loaf.

Then I decided to recreate the Good Morning Muffin from Pure Vanilla Bakery in town, using my favorite muffin recipe as a base. These babies have chopped apple, grated carrot, dried apricots, golden raisins, coconut, sunflower seeds, and flax seeds in them, and are topped with a sticky orange glaze (which is actually frozen orange juice concentrate – it’s my favorite part!).

And then, after seeing Renata’s amazing-looking popovers on the Daring Bakers forum, I decided to give them a try. A popover is very similar to a Yorkshire pudding but made without the beef drippings, and can be served with butter and jam rather than gravy. I coated these in cinnamon-sugar to make Cinnamon Sugar Doughnut Popovers, inspired by David Lebovitz. I made theme once according to David’s recipe, which came out under-cooked and doughy, and a second time using the recipe Renata provided, which came out perfectly. Moral of the story: bake the popovers until they are deep brown and crisp! These are SO GOOD and will satisfy any doughnut cravings.

Thanks to Lis for not only hosting this challenge, but for running the Daring Kitchen and giving us all the chance to do this every month!! Check out the Daring Kitchen for the original challenge and all the other Bakers’ contributions!

Brown Sugar Caramel Apple Struesel Loaf

Makes one 9″ x 5″ loaf

Brown Sugar Caramel Sauce

Adapted from Modern Classics II by Donna Hay

In a small, heavy saucepan, combine:

6 tbsp brown sugar

1/2 cup heavy whipping cream

dash salt

Place over medium heat and stir until the sugar is dissolved. Increase the heat slightly and bring the mixture to a boil. Let it simmer rapidly for about 8-10 minutes without stirring (watch it carefully and remove it from the heat if it looks like it will boil over). Pour the caramel into a bowl and set it aside to cool while you make the struesel.

Cinnamon Struesel

Adapted from Flour Power: Recipes from Jana’s Bake Shop by Jana Roerick

In a bowl, mix together:

1 cup all purpose flour

3/4 cups brown sugar

1 tsp cinnamon

1/4 tsp baking powder

1/4 tsp salt

With your fingers, rub in:

6 tbsp unsalted butter, softened

Mix until the butter is fully incorporated and the mixture is crumbly-looking. Set aside while you make the batter.

Apple Cinnamon Batter

Adapted from the basic recipe provided by Lis for the challenge

Preheat the oven to 350˚F. Grease a 9″ x 5″ loaf pan and line the bottom and sides with parchment paper (I didn’t do this and almost had a near-death sticking experience!).

In a bowl or measuring cup, whisk together the wet ingredients:

1 cup sour milk (1 tbsp white vinegar + enough milk to make 1 cup)

1 egg

1/4 cup neutral-flavoured vegetable oil

In a large bowl, whisk together the dry ingredients:

1 1/2 cups all purpose flour

1/2 cup cake flour

1 cup granulated sugar

1 tsp baking soda

1/2 tsp salt

1 tsp cinnamon

Add:

1 chopped apple

Toss gently to combine, then make a well in the center of the dry ingredients. Pour in the wet ingredients and with a rubber spatula, stir just to combine, using as few strokes as possible. There should still be a few lumps and streaks of flour.

Sprinkle over 2/3 of the cinnamon struesel and 2/3 of the cooled brown sugar caramel and fold them into the batter with three or four strokes.

Pour the batter into the prepared pan and spread it evenly. Pour over the remaining caramel and sprinkle with the remaining struesel.

Bake at 350˚F for 65-75 minutes, or until a skewer inserted in the middle comes out clean. Cool for 5 minutes in the pan, then remove, peel off the parchment, and cool completely on a rack.

Will keep for a few days wrapped in plastic or in an airtight container.

“Good Morning” Muffins

Inspired by Pure Vanilla Bakery + Cafe, adapted from these muffins. Makes 12.

Preheat the oven to 375˚F. Lightly grease the top of a muffin tin and line the cups with paper liners (or these nifty silicon liners).

In a small bowl, combine:

1/3 cup chopped dried apricots

1/3 cup golden raisins

Pour over 1/3 cup boiling water to rehydrate the fruit. Set aside.

In a small bowl, mix together the wet ingredients:

3/4 cup plain yogurt

1/4 cup brown sugar

2 tbsp granulated sugar

1 egg

5 tbsp neutral-flavoured vegetable oil

1 tsp vanilla

In a large bowl, mix together the dry ingredients:

3/4 cup all purpose flour

3/4 cup whole wheat flour

1 1/2 tsp baking powder

1/4 tsp baking soda

1/4 tsp salt

Make a well in the dry ingredients and pour in the wet. With a rubber spatula, mix until just combined. There should still be lots of lumps and streaks of flour.

Add:

1/2 an apple, chopped

3/4 cup grated carrot

the rehydrated apricots and raisins (discard any liquid that hasn’t been soaked up)

1/4 cup shredded unsweetened coconut

2 tbsp hulled sunflower seeds

1 tbsp flax seeds

Stir everything together gently in as few strokes as possible.

Spoon the batter into the prepared muffin tins and sprinkle each muffin with a few flax seeds and sunflower seeds.

Bake at 375˚F for 20-25 minutes, until a toothpick inserted in the center comes out clean. While the muffins are still hot, brush the tops with 2 tbsp thawed orange juice concentrate.

Remove the muffins from the tin and cool on a cooling rack. Best eaten the day they are made, but will keep a day or two in an airtight container.

Cinnamon Sugar Doughnut Popovers

Inspired by David Lebovitz, recipe adapted from Second Floor Walkup. I made 6 large popovers, but next time I would make 12 smaller ones. You could omit the sugar all together and replace the butter with beef drippings to make Yorkshire puddings, which I will be doing the next time we have roast beef!

Preheat the oven to 425˚F. Grease the cups of a muffin tin VERY liberally with butter, then place a small piece of butter in the bottom of each. Put the pan in the oven to preheat.

Meanwhile, in a bowl, beat together with a whisk:

2 eggs

1 cup milk

1 tbsp melted butter

Add:

1 cup all purpose flour

1 tsp sugar

pinch salt

Whisk vigorously so there are no lumps.

When the oven reaches 425˚F, remove the muffin pan, pour the batter evenly between the greased cups, and place the pan back in the hot oven.

Bake for 15 minutes, then reduce the heat to 350˚F and bake another 15-25 minutes, until deeply golden brown and crisp. DO NOT open the door to peek at your popovers before the second 15-minute mark – this will cause them to collapse.

They were a lot darker brown in person

While the popovers are baking, mix together:

1/2 cup granulated sugar

1 tsp ground cinnamon

Have ready:

2-3 tbsp melted butter

When the popovers are baked, remove them from the muffin tin (you may need to coax them out with a butter knife), brush them lightly with melted butter, and roll them in the cinnamon-sugar. Place on a rack to cool.

These are best eaten the day they are made (which shouldn’t be a problem!).

Follow

Get every new post delivered to your Inbox.

Join 333 other followers